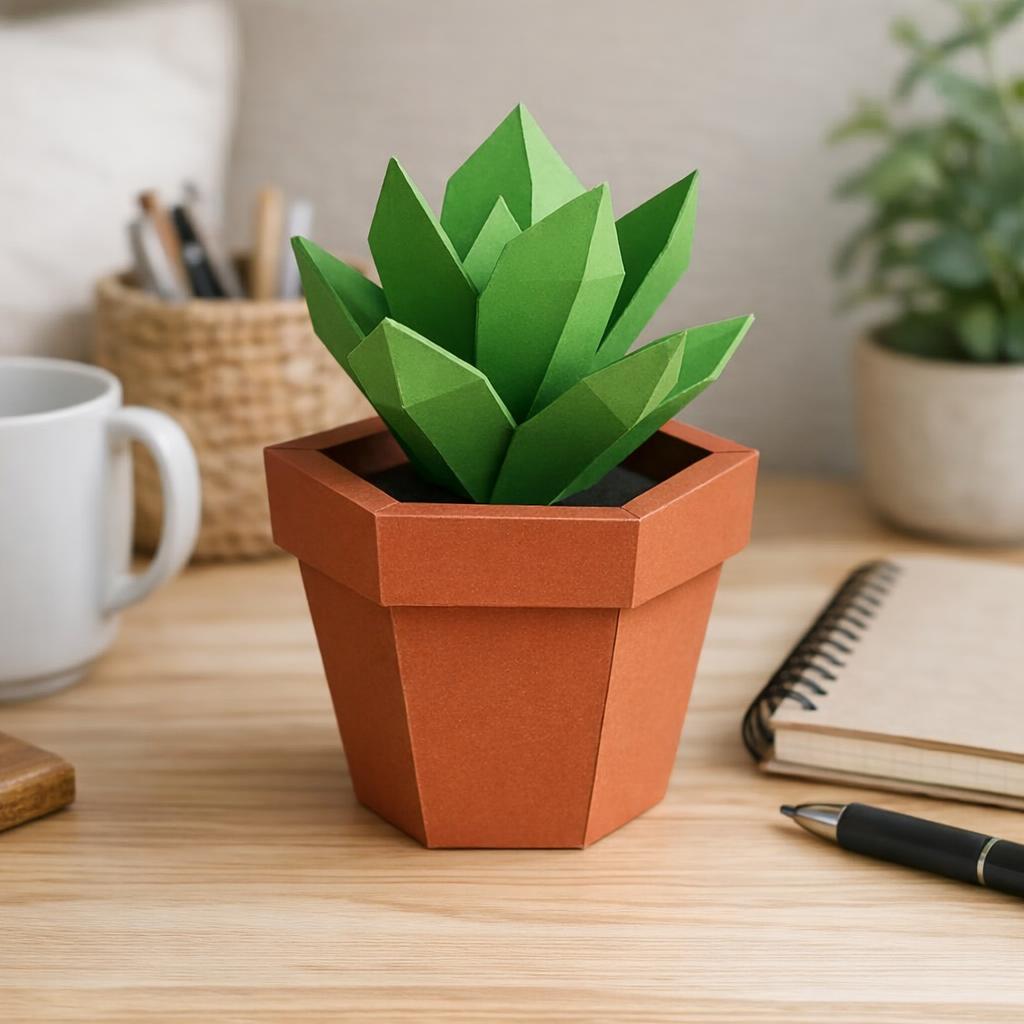
This free paper flower pot craft is a simple spring and summer activity for families, classrooms and link-party readers. Print the free 3D papercraft template, cut the pieces, fold the numbered tabs and glue the little geometric planter together as a bright handmade decoration.
Free printable flower pot template
The model used in this tutorial is the Flower pot. It is a free downloadable papercraft PDF, so it works well as an easy seasonal craft project rather than a commercial product page.
Download the free flower pot papercraft PDF
The PDF itself is served through the free model page so the public tutorial never links visitors to a protected upload URL.
Materials for this easy spring paper craft
- Free flower pot papercraft PDF printed at 100% scale.
- White cardstock or thick printer paper, ideally 160–220 gsm.
- Scissors or a craft knife, used by an adult or with close supervision.
- A ruler or scoring tool for clean folds.
- Paper glue, glue stick or double-sided tape.
- Colored pencils or stickers if kids want to decorate the pot before assembly.
- A protected table mat for cutting and gluing.
Step-by-step flower pot assembly
- Print the template. Use 100% scale so every tab lines up correctly.
- Decorate first if you want a kid-made look. Add small flowers, names, classroom labels or spring patterns before cutting.
- Cut around the outer lines. Keep all glue tabs attached; they are needed to close the 3D shape.
- Score the fold lines. Run a ruler or scoring tool along each fold to make the planter look crisp.
- Pre-fold every tab. Fold once before adding glue so the shape closes without forcing the paper.
- Glue the base first. Let the bottom section become stable before closing the higher sides.
- Close the side panels slowly. Match each numbered edge and press each join for a few seconds.
- Let it dry upright. Once dry, use the flower pot as a desk decoration, pretend mini planter or spring display prop.
Kid-friendly safety and classroom tips
- Adults should handle sharp craft knives; younger kids can decorate, pre-fold and press glued tabs.
- For a classroom table, print one test copy first and prepare a finished sample so children can see the goal.
- Use glue stick for less mess, or double-sided tape if the group needs a faster drying craft.
- Turn it into a seasonal activity by adding paper flowers, Easter colors, summer labels or a handmade Mother’s Day message.
More free printable papercraft ideas
For another no-cost model, browse the free papercraft templates to print. If you like home décor and classroom props, the 3D papercraft vases and planters collection and the everyday objects papercraft collection are the most relevant next pages.
FAQ
Is the flower pot papercraft PDF free?
Yes. The tutorial links directly to a free downloadable flower pot papercraft PDF and to its free Papercraft-3D model page.
Can kids make this craft?
Kids can decorate, fold and help glue the model. Cutting should be handled by an adult or supervised carefully, especially when cardstock is used.
Is this a seasonal craft?
Yes. It fits spring, summer, Easter, Mother’s Day, classroom garden themes and simple rainy-day craft sessions.
Ready to make it? Download the free flower pot papercraft PDF, print the pages, then follow the folding and gluing steps above.
Garden craft link-back
This flower pot papercraft is a garden-themed paper project and can be used as a direct source page for Ellibelle’s Garden Party No. 16: Anything in (or from) a Garden. The entry points to a finished handmade paper flower pot, not a shop homepage, and the downloadable template remains on the official free Papercraft-3D product page.