Why not make your own paper Christmas decorations this year? From simple cut-out snowflakes to the most sophisticated 3D papercraft models, paper offers a thousand possibilities for a unique, creative and cost-effective celebration. In this article, find out why Christmas DIY is all the rage, what paper and tools to choose, and lots of ideas – both classic and original – for embellishing your home this festive season.
Why make paper Christmas decorations?
There are many advantages to making your own party decorations. Firstly, it’s an economical choice: as we all know, the festive season can put a strain on the budget. In 2023, the French spent an average of just €23 on end-of-year decorations, down from the previous year. Creating your own garlands, stars and other paper ornaments is a great way to save money, replacing expensive off-the-shelf items with homemade ones. What’s more, DIY guarantees you a unique, personalized decoration: no more Christmas trees that look exactly like the one next door! By making your own hanging lights, table centerpieces or door wreaths, you choose the colors, motifs and style – in short, you add your own personal touch to the magic of Christmas.
And let’s not forget the pleasure and conviviality of homemade products. Setting up a decorating workshop with the kids on an Advent Sunday is a great way to create precious family moments in the run-up to Christmas. Everyone can participate according to their age (drawing, cutting out, gluing sequins…) and share a fun activity away from screens. Some even make it an annual ritual: for example, every year, make a new paper decoration with the children and date it – over time, the tree is adorned with family memories ❤.
Making paper Christmas decorations is also part of an ecological and sustainable approach. You use a recyclable material, often already present in the home (leaves, old magazines, cardboard…). Why not create your own decorations from recycled materials? For example, cut garlands out of scrap paper or make stars from the pages of a damaged book to give them a second life. In this way, you’ll reduce the need to buy new products (often made of non-eco-friendly plastic) and cut down on waste: paper decorations can be stored and reused in subsequent years, rather than being thrown away.
Last but not least, taking time out for creative paper hobbies brings a real sense of well-being. DIY is known for its anti-stress virtues: it lowers cortisol, the stress hormone, and releases endorphins (happiness hormones). Folding, gluing and watching an object come to life under your fingers is very gratifying and relaxing – a good remedy for the commercial frenzy of Christmas! And on Christmas Eve, you’ll be proud to be able to say “I did it” when you show off your beautiful paper creations!
Which paper to use for the perfect Christmas decorations?
The choice of paper is crucial to ensure that your Christmas DIYs look their best. There are all kinds, with different thicknesses (grammages) and textures. Here’s how to choose the right paper for your project:
- Cardboard paper (bristol, thick canson…): ideal for volume decorations that need to stand upright or hold a shape (e.g. a 3D star, a geometric tree or a papercraft subject). This rigid paper (often 160 g/m² or more) won’t warp and stands up well to glue. Its surface can be white, colored, metallic… It’s up to you to choose the look you want. At Papercraft-3D.com, we recommend a paper weight of between 160 and 250 g/m² for our 3D models, to ensure strength and durability.
- Origami paper (70-90 g/m²): a thin but strong paper designed for folding. It’s perfect for intricate folds such as modular stars, small origami trees, decorative hanging cranes and so on. Its thinness enables precise folding without breaking the fiber. Often sold in colored squares, it can be used for anything from folded ornaments to small figurines. Tip: for origami, prefer paper with two colored sides if the decoration will be visible from all angles.
- Crepe paper: very light and supple, almost fabric-like, it is used to create crinkled or wavy effects. It can be used to make decorative pompoms, frilly garlands, or paper flowers (like the poinsettia, the “Christmas flower”, reproduced in red and green crepon). It adds volume while remaining airy. But beware: it’s fragile and water-repellent (it bleeds when wet). Reserve it for interior decorating, away from flames.
- Gift wrap & printed paper: Don’t overlook pretty printed paper (gift wrap, patterned scrapbook paper, etc.). They can be glued onto cardboard to create festive hanging objects (for example, glue fir-tree patterned gift paper onto a cardboard sheet, then cut out a star shape in it: you’ll have a rigid star with a beautiful pattern). Gift paper can also be used for origami, provided its texture isn’t too plasticky. Its advantage: a variety of Christmas motifs (snowflakes, reindeer, etc.) without the effort of drawing.
- Recovered cardboard: cereal boxes, corrugated cardboard packaging, toilet rolls… These elements can be the basis for solid, eco-friendly decorations. For example, cut out the silhouette of a Christmas tree or reindeer from cardboard, then paint or cover it with paper to create a table decoration or wall trophy. Think of cardboard rolls too: painted white, they become snowmen; brown with paper antlers, reindeer and so on. Perfect for arts and crafts with the kids.
???? Tip: Whatever paper you choose, make sure it’s flat and in good condition before you start (no unintended creases or stains). For thick paper, you can soften it slightly by gently curving it between your hands, especially if you need to roll or fold it.
In addition to paper, tell me a little about basic tools ????! Fortunately, you won’t need a professional DIY outfit. To make 90% of paper decorations, you’ll mainly need: a pair of scissors (and/or a cutter), glue, a ruler, a pencil… and that’s it. We’ll go into more detail on some useful tools below, but remember this:
“Making paper snowflakes brings me back to childhood. No technology needed, just paper, glue and scissors, and it’s great for all ages!”
(“Making paper snowflakes takes me back to childhood. No technology needed, just paper, glue and scissors, and it’s great for all ages!” – Danielle Gibson, event decorator)
In French or English, the message is clear: with simple materials, you can already achieve a lot. That’s the magic of DIY ????.
Ideas for paper Christmas decorations (and how to make them)
Let’s get down to business with an array of creative ideas. Whether you’re a beginner or a seasoned papercrafter, you’ll find plenty of inspiration:
❄️ Paper snowflakes
It’s THE must-have decoration when it comes to paper and the festive season. Paper-cut snowflakes are an instant reminder of our childhood workshops and create a magical winter atmosphere.
What to do? Take a sheet of paper (preferably white, or pale to imitate snow). Typically, we use thin printer paper. Cut out a square, fold it in half (triangle), then in half again… and again, until you’ve got a thick triangle. Then, using scissors, cut out motifs along the edges: triangles, arcs, points… taking care not to cut all the way through the edges of the triangle (so that the parts remain attached to each other). Gently unfold: surprise, you’ve got a unique flake!
By varying the cut-outs (and looking for folding patterns with 6 branches, 8 branches…), you can create a whole collection of different snowflakes. Stick them to the windows with a dot of transparent tape, or hang them from a string so they “fall from the sky”. It’s also a great activity to do with the kids – they’ll be amazed when they open the paper.
Example of an idea: The HabitatPresto article suggests gluing a thread to the snowflakes to suspend them from the ceiling, creating a snowfall in the room. A guaranteed effect above the New Year’s Eve table!

Paper snowflakes, cut out and hung on wires, add a magical, wintry touch to your decor!
You can also make 3D paper stars (which are actually big, bulky flakes). For example, by folding and gluing 7 or 8 paper bags together, you can create magnificent giant “rosette” stars. Many online tutorials exist for these Scandinavian stars – and it’s easier than it looks for a wow ✨ result.
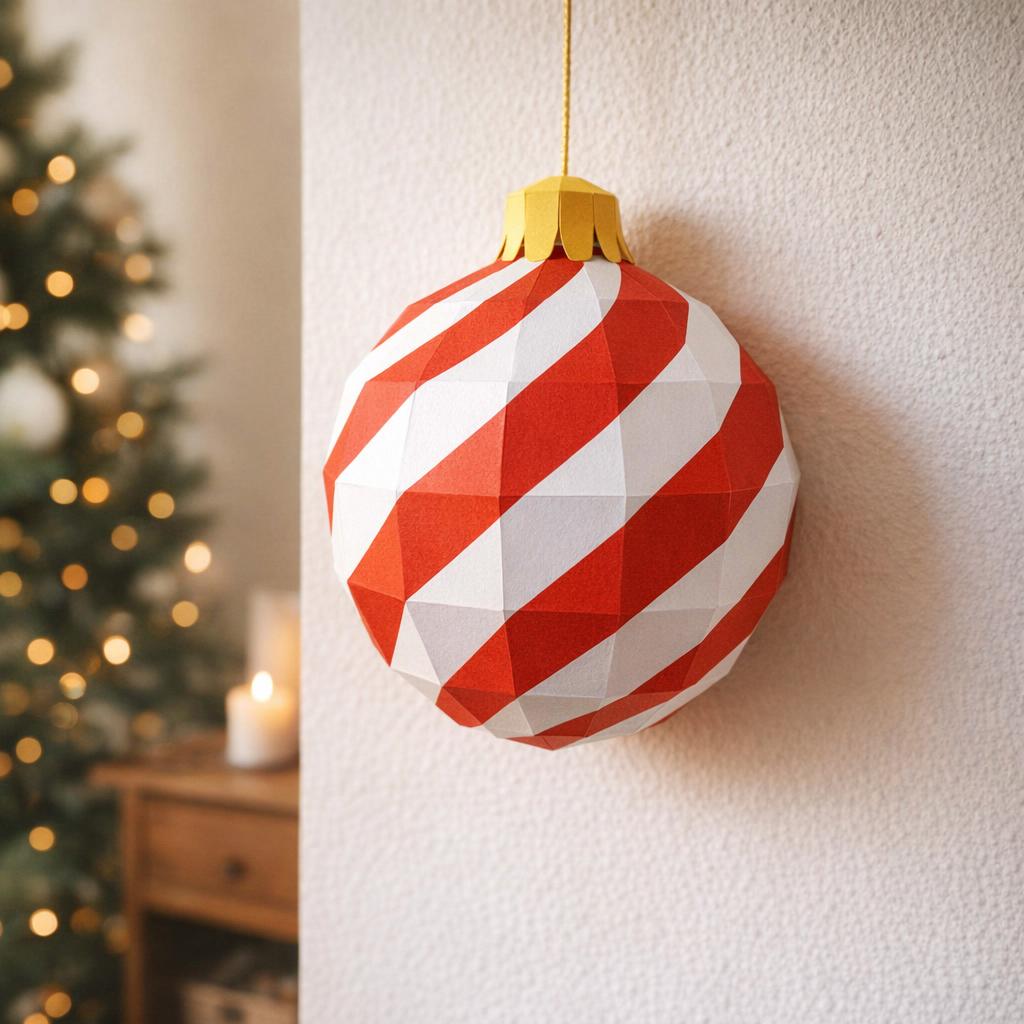
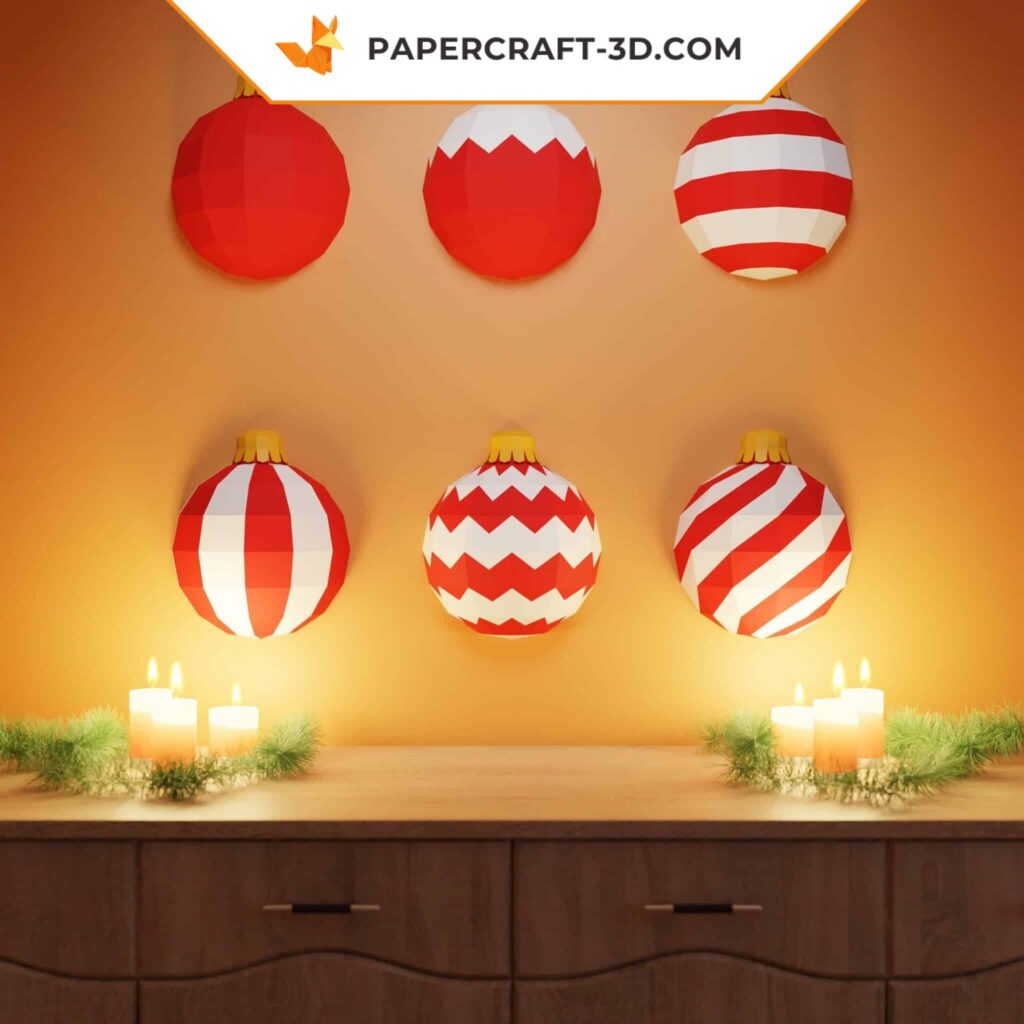
⭐ 3D paper Christmas baubles
Fed up with plastic baubles made in China? Make your own DIY baubles to hang on the tree! There are several fun techniques:
- Honeycomb balls: these are the honeycomb balls often seen in home decor. They’re made by cutting numerous discs (or half-discs) of tissue or crepe paper and gluing them edge-to-edge. When unfolded, they form a ball full of little cells. You can make them in any color. Hang 3 or 4 of different sizes on the tree for a contemporary effect.
- Balls made from strips of paper: very easy and pretty. Cut 6 to 8 strips of cardboard of equal length (e.g. 15 cm x 1 cm). Punch a small hole at each end. Tie them together with a brad or thread knotted through the holes. Then fan out the strips to form an openwork sphere. A small wooden bead can be inserted at the top and bottom for a finishing touch. Now you’ve got a homemade openwork ball!
- Ball origami: there are modular origami models (e.g. the kusudama ball) where you assemble several paper flowers to form a decorative sphere. It takes a little longer to make, but what a result! An origami ball with Christmas motifs can become the star of your Christmas tree.
Here again, you can play with paper: shiny gold or silver paper will create very festive baubles. Red and white paper creates a delicious “candy cane” contrast.
Inspiration: HabitatPresto illustrated this idea by saying “No more plastic baubles! Personalize your tree with low-cost decorative accessories”, showing off some very elegant baubles made from folded paper. Indeed, these creations make as much of an impact as commercial baubles, for virtually zero euros.
???? Paper garlands
Paper garlands are a must for setting the right mood, and can be used in an infinite variety of ways. Here are a few ideas:
- Chain-linkgarland: the simplest! Cut ~2 cm x 15 cm strips of paper. Form a first ring and glue it in place. Take a second strip, pass it through the first ring, glue it… and so on. In no time at all, you’ll have a long, colorful chain to wrap around the tree or hang on a wall. Perfect activity for little kids: they love making the links (with a helping hand for the glue).
- The garland of shapes: choose a Christmas shape (fir tree, star, gingerbread man, bell…). Cut out lots of them from colored or patterned paper. Punch a small hole at the top of each shape, and thread a string or ribbon through to connect them all. The result is an original garland. For example, alternate red reindeer and green fir trees: guaranteed success.
- The vertical snowflake garland: instead of hanging your snowflakes individually, attach them to a transparent wire one below the other (10-15 cm apart). Three or four snowflakes in a row make a pretty vertical hanging that can be placed in front of a window or in the corner of a room.
- Paperpom-pom garland: make pom-poms from tissue paper (several layers of crepe folded accordion-style, tied in the middle and unfolded to form a fluffy ball). Tie several together on a thread and you’ve got a festive, fluffy garland, a bit like a snowball garland!
The great thing about paper garlands is that you can make them any length you like, and adapt them to your theme. Traditional Christmas? Green fir and brown reindeer garland. Children’s Christmas? Garland with funny snowmen. A chic Christmas? Garland white and gold stars… Let your imagination run wild.
Below is an example of a simple but charming garland:

Colorful paper circles sewn into a garland: an easy-to-make decoration to brighten up the tree or a wall:contentReference[oaicite:75]{index=75}.
Technical tip: Can you sew? Try a garland of sewn circles: use a paper punch to cut out a number of circles. Then pass them through the sewing machine one after the other (or by hand) to create a fine, moving garland. The circles appear to float – it’s very delicate. Leave about 5 cm of thread between each one for a beautiful effect.
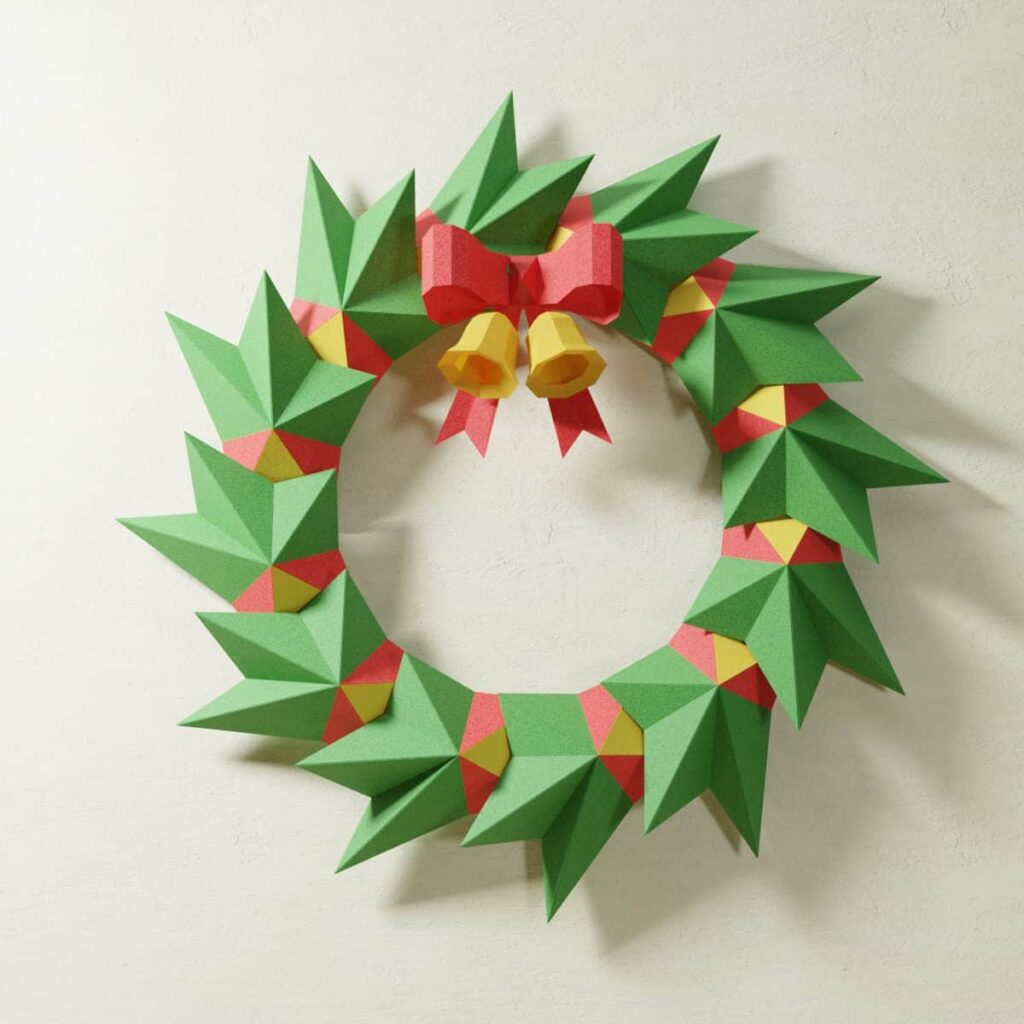
???? Paper Christmas wreath
The wreath that adorns the front door can also be made from 100% paper! It’s a refreshing change from fir or holly wreaths, but still in the same spirit.
Quick step-by-step: Take a thin cardboard box (like a cereal box) and cut out a large ring of the desired size for the wreath (e.g. 30 cm outside diameter, 15 cm inside). From green paper (or several shades of green), cut dozens of stylized leaves: holly, ivy, fir, whatever you like. You can also make white and gold leaves for a more modern theme. Then glue these paper leaves all around the cardboard ring, overlapping slightly. Add a second layer on top for volume. Once you’ve covered the entire ring, decorate with small red touches: for example, red paper rounds to imitate holly berries, or even real little red balls if you have them. Finish with a pretty red bow in paper or ribbon to attach to the bottom of the wreath. And that’s it!
This wreath has the advantage of being very light (a simple adhesive fastener is all you need to hang it from the door) and infinitely customizable. You can imagine an all-white wreath for a snowy Christmas, or a multicolored one if you’re feeling fanciful.
If you don’t like cutting out so many leaves, consider paper poinsettias (the Christmas flower): 5 or 6 large red paper flowers arranged in a circle can form an original floral wreath.
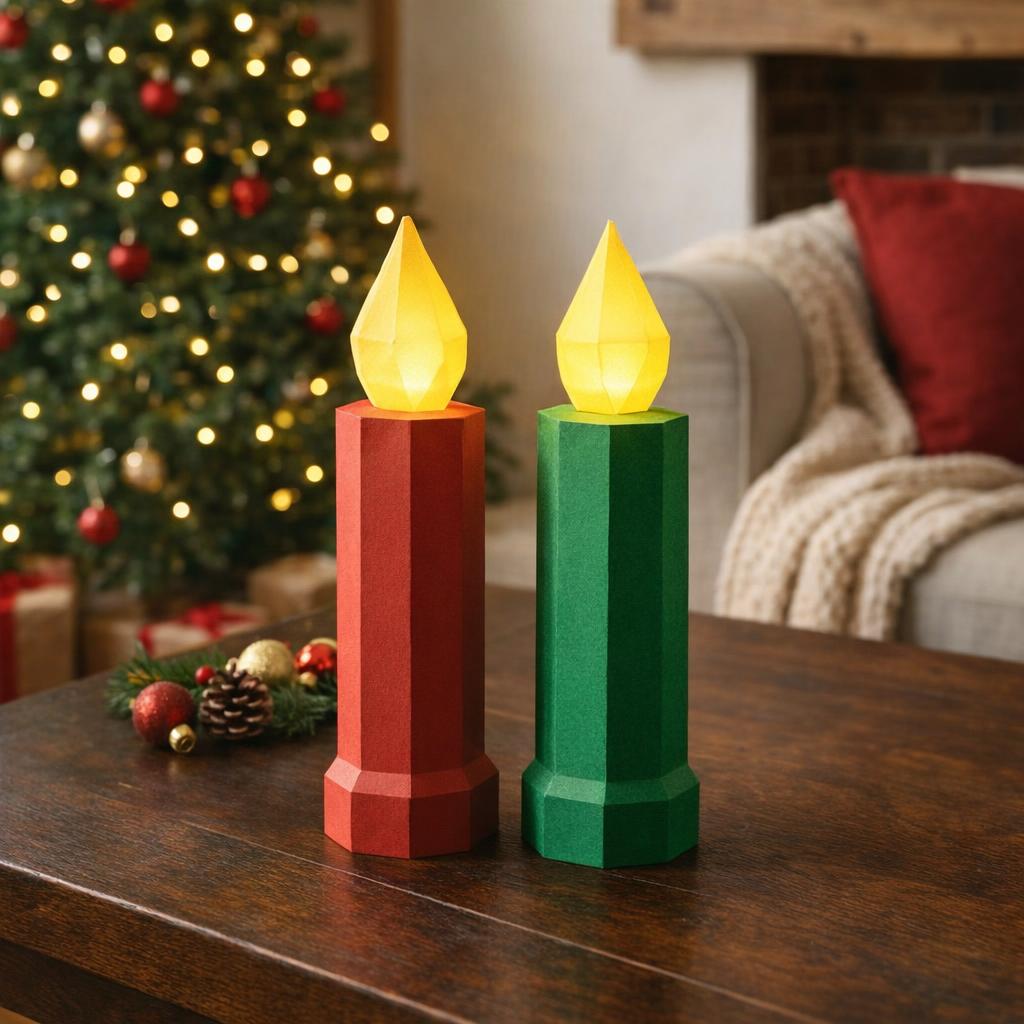
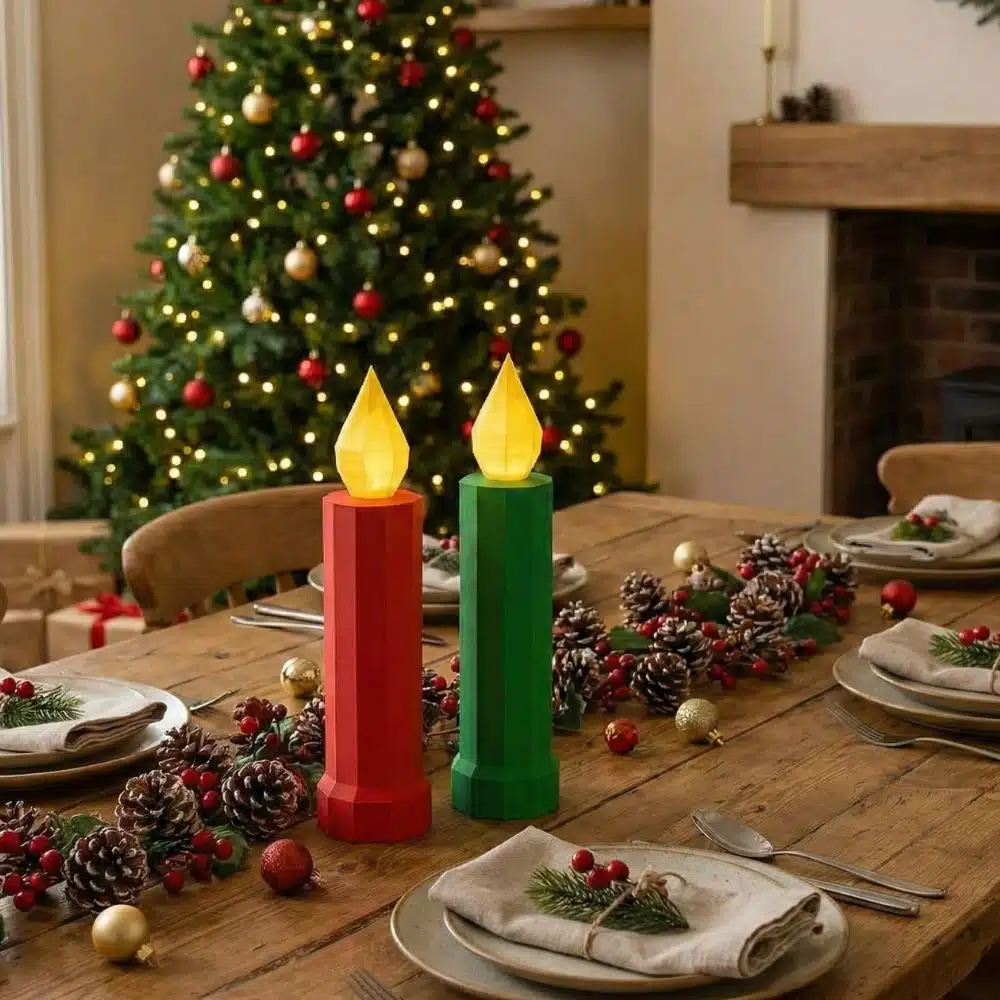
????️ Photophores and paper lanterns
There’s no better way to create a warm atmosphere on Christmas Eve than with a few scattered lights. And good news: your candle holders can be… made of paper!
Idea 1: Openwork photophoric bags – Recycle ordinary paper bags (e.g. from bakeries). Using a cutter, cut out star or snowflake shapes on the sides of the bag. Place an LED candle inside: the light will filter through the cut-outs, projecting pretty light patterns all around. You can line up several of these photophoric bags on a windowsill, on the table, or outside along a path (but away from the wind and with LEDs! No open flames, for safety’s sake).
Idea 2: “Star” candle holders – Make a hollow 3D star from cardboard (e.g. two identical stars assembled in volume). Place a small battery-powered LED garland in the center. Your star will be illuminated from within, like a luminous candle. You can also make small paper-cut cubes (like mini-lanterns) and slide an LED inside.
Idea 3: Origami lanterns – There are some lovely origami models available for making little lanterns. Place an LED inside and you’ve got a nomadic mini-lantern. You can hang several of them on a luminous wire to make an ultra-customized decorative electric garland.
Of course, use only LED candles or LED garlands for these paper creations, never real flames. Modern LEDs imitate the glow of a candle perfectly, with no risk of burning your masterpiece ????.
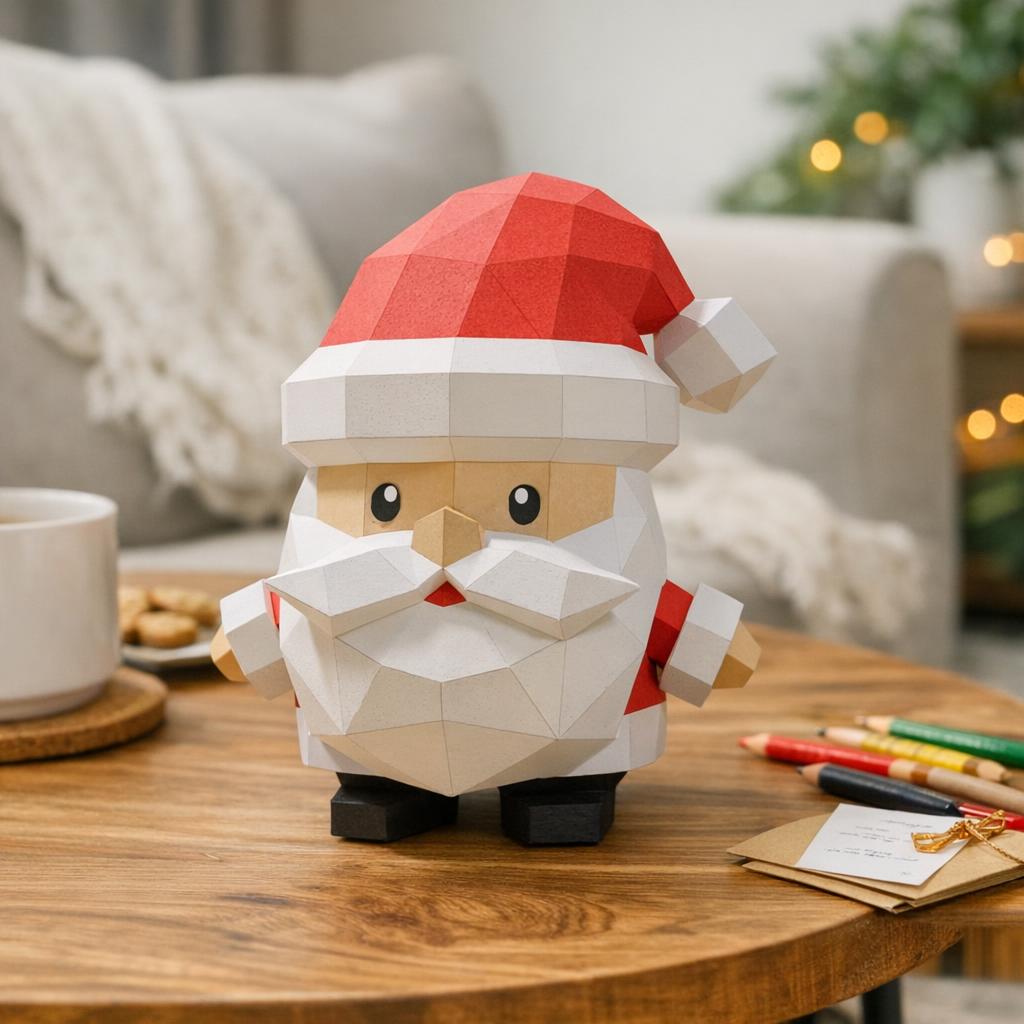
???? Paper Christmas figures and figurines
Finally, have fun creating all the little paper Christmas people:
- Paper Santas – For example, fold origami (there’s an easy flat Santa origami), or assemble a red cone (for the body) and a cotton ball (for the head and beard). You can use them to make garlands or hangers for the tree.
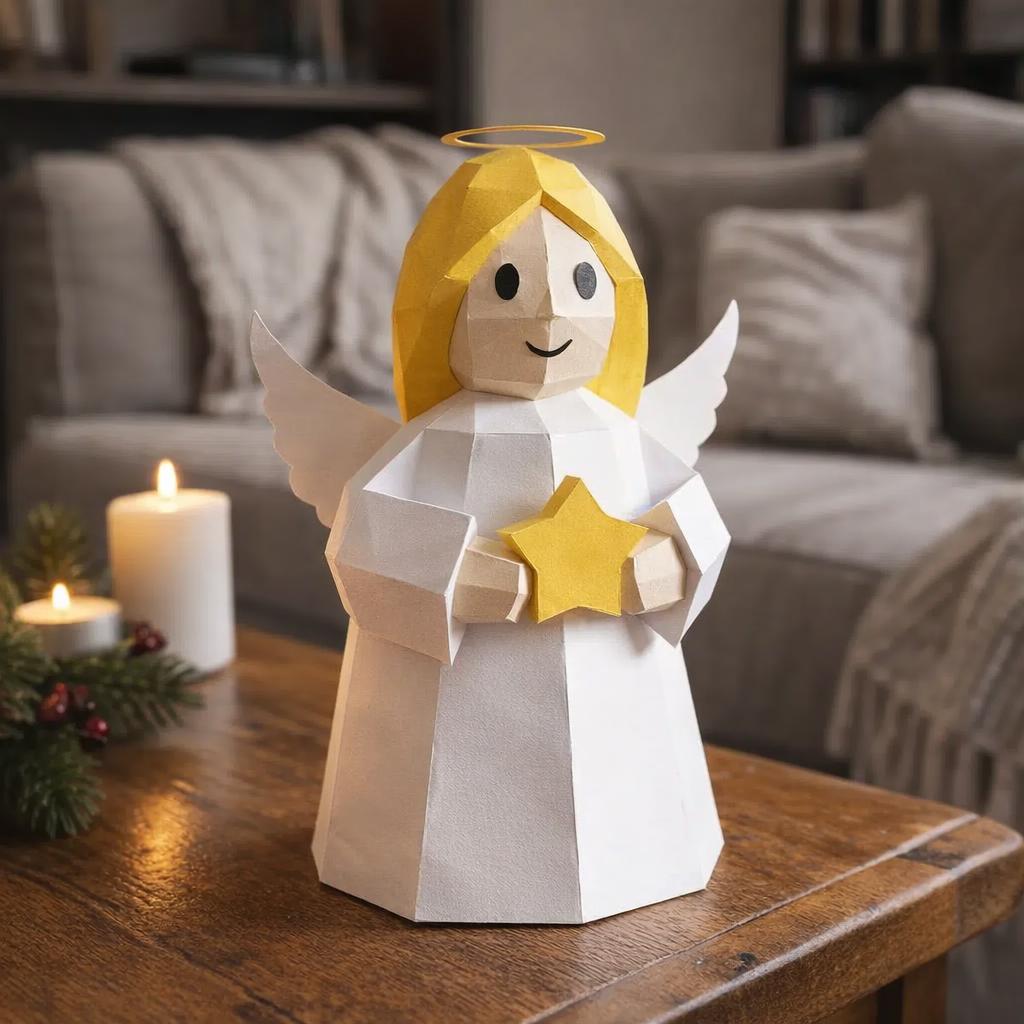
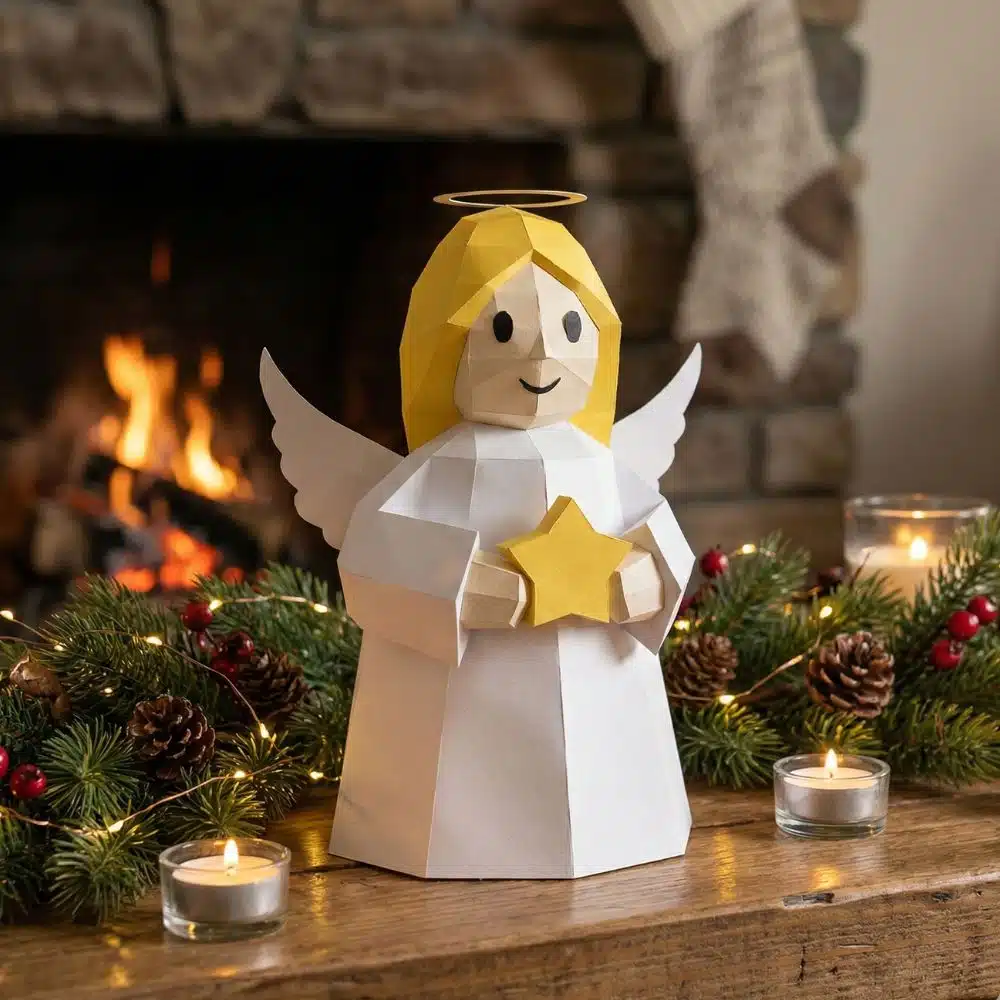
- Paper angels – A classic angel can be made from pleated paper (for the dress) topped with a small paper ball, or from wood for the head. Add cut-out wings… and our Christmas trees now have guardian angels! A tutorial suggests accordion pleating for the dress and arms: even a beginner can do it.
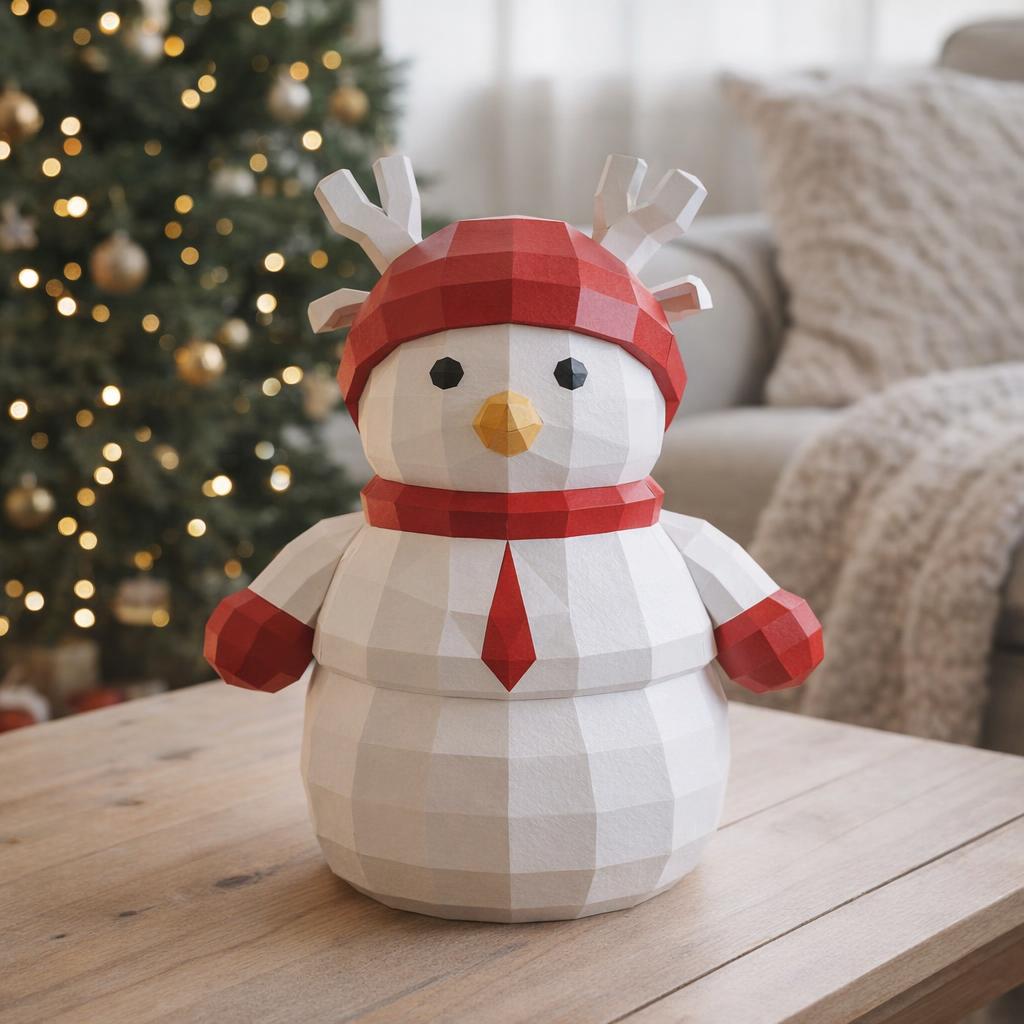
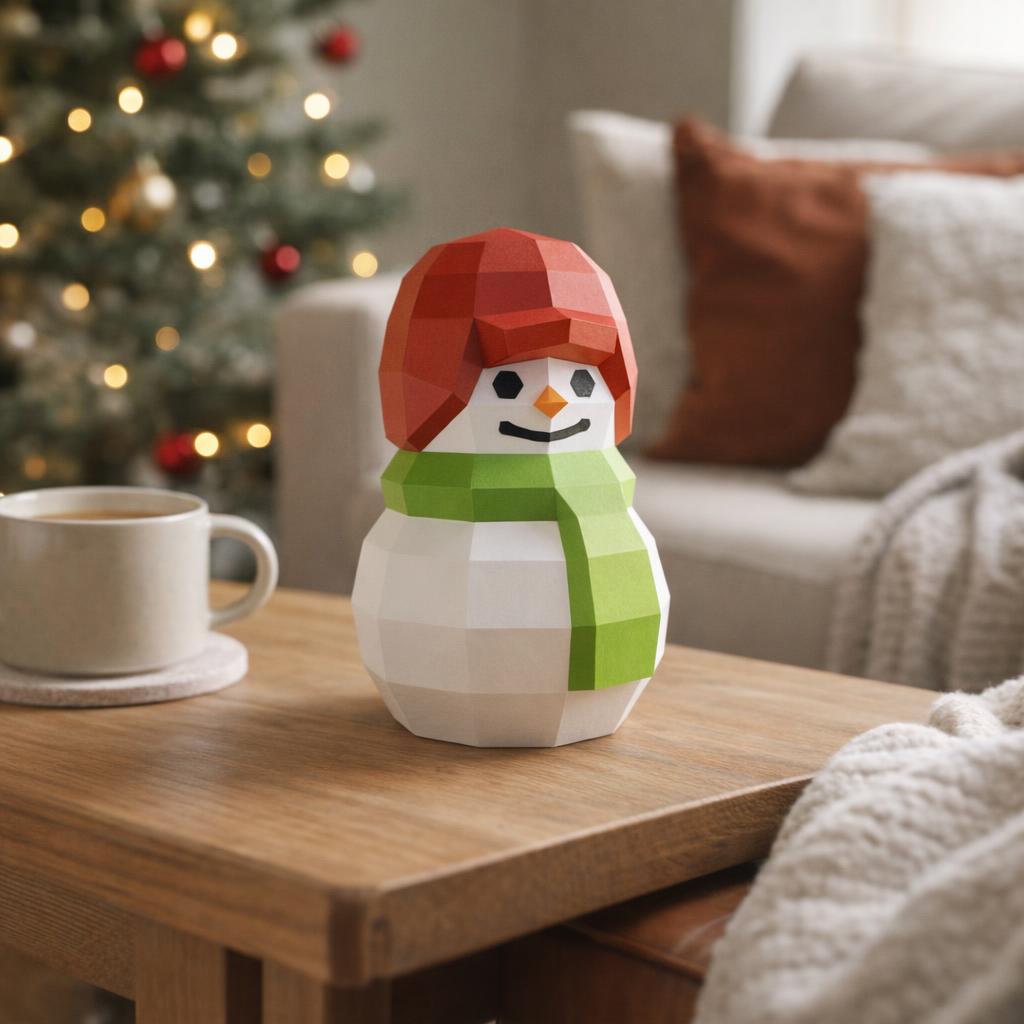
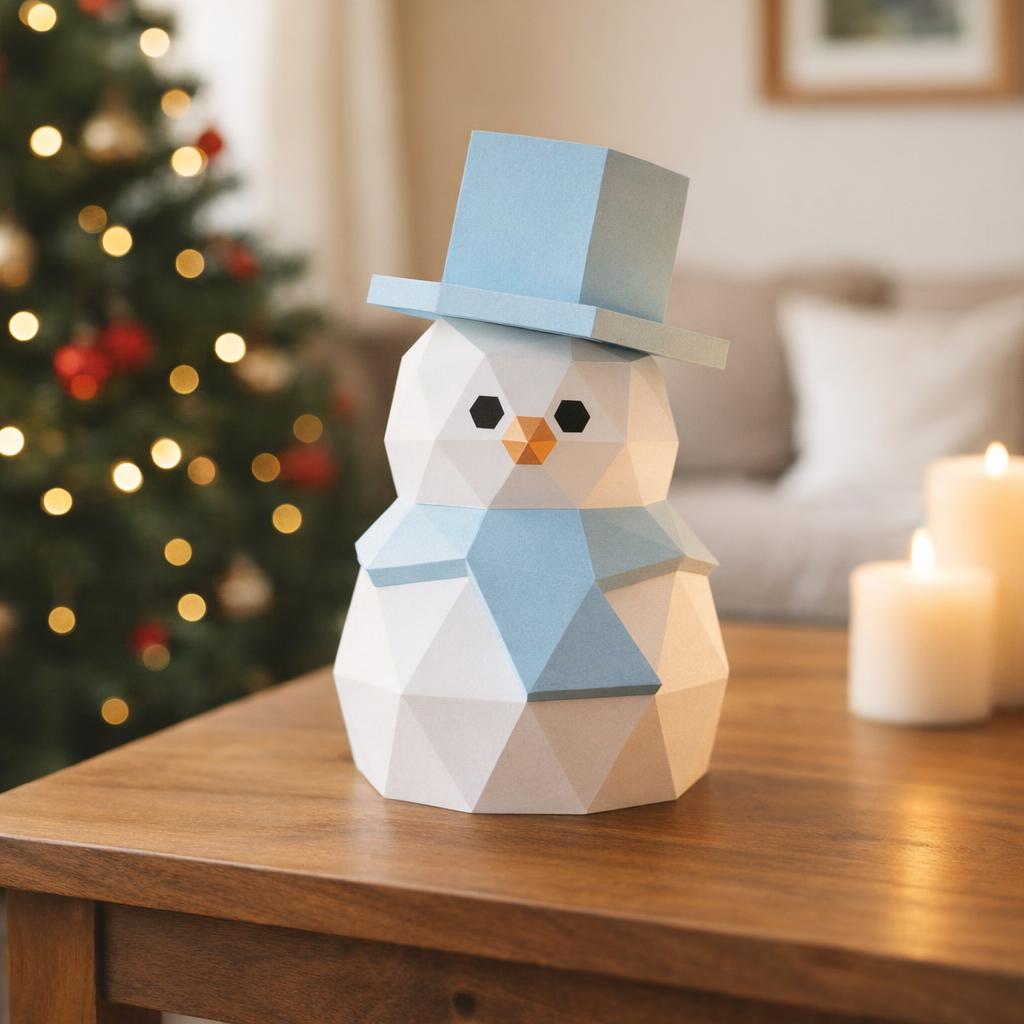
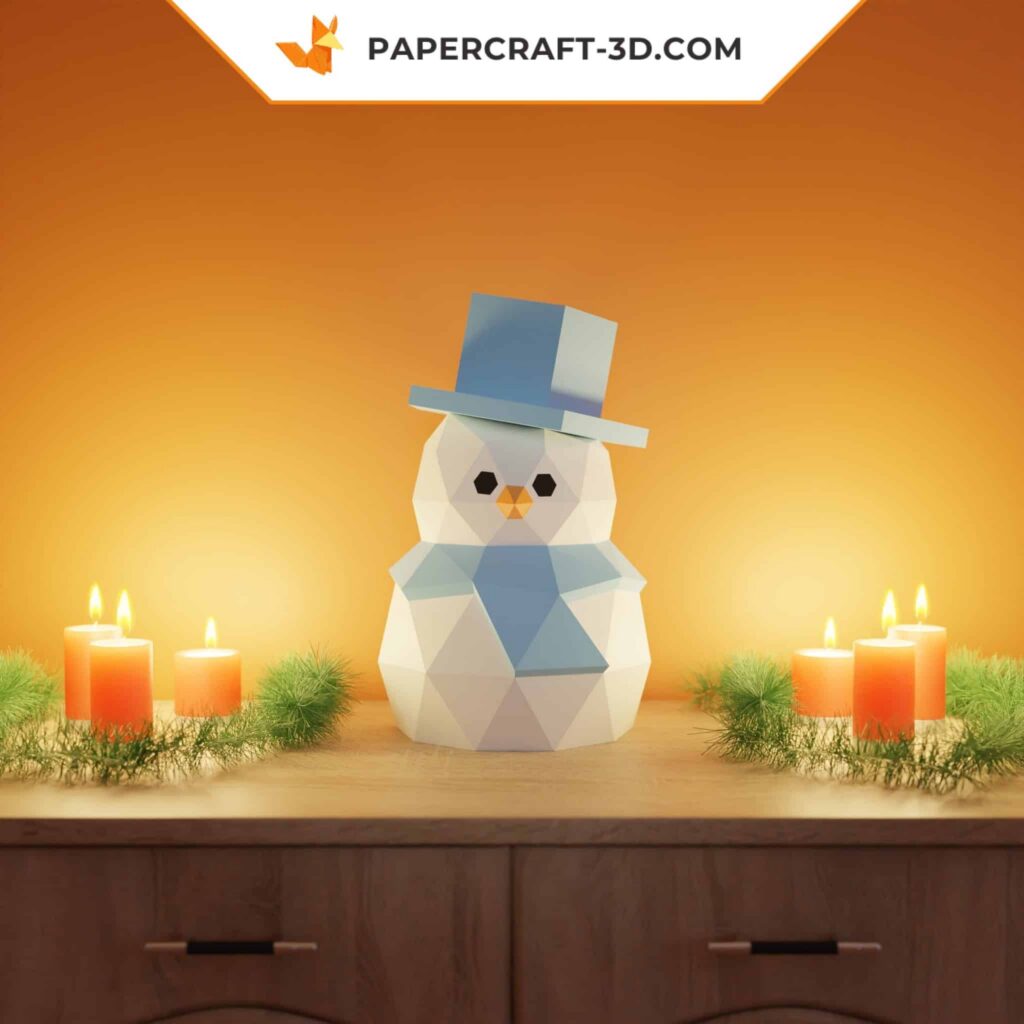
- Snowmen – Stack 3 white paper rounds of decreasing size, staple them together: you’ve got the shape of a snowman. Glue on eyes, an orange paper carrot nose, a cut-out scarf… and why not a black top hat? Easy for youngsters to make.
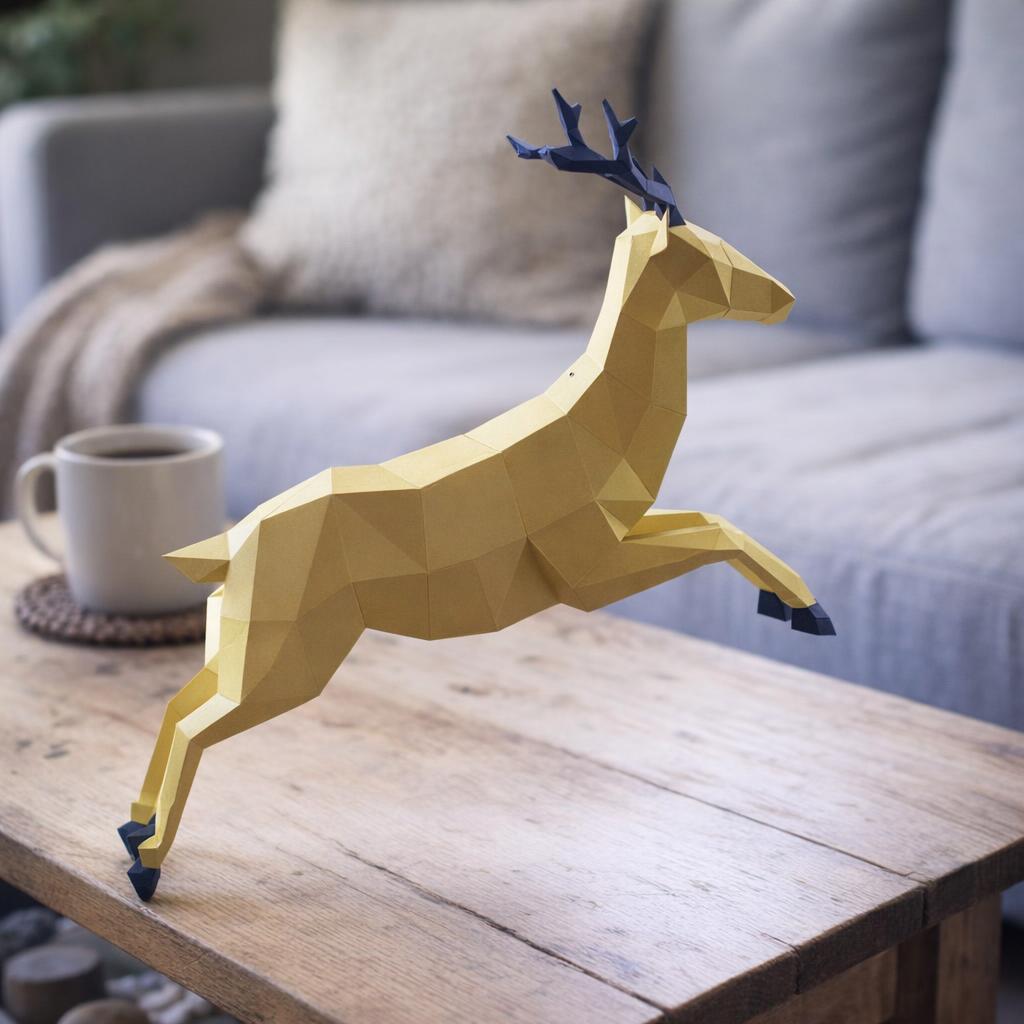
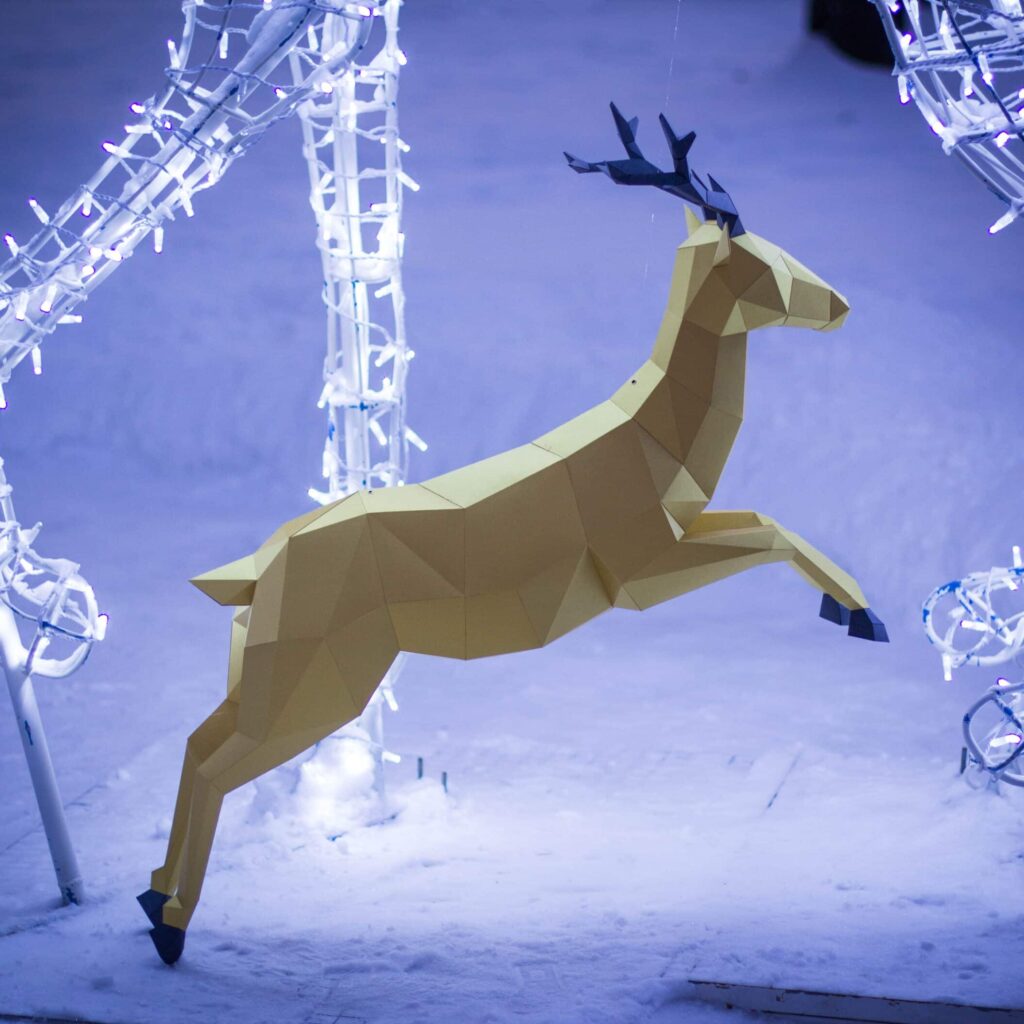
- Reindeer and animals – Cut out a reindeer silhouette from cardboard, paint it or cover it with brown paper. Add a red paper nose or pom-pom and you’ve got Rudolph the reindeer! With a hole and a ribbon, he becomes an adorable Christmas tree hanging. You can do the same with doves (a symbol of peace), deer, etc.
- Small pretend gifts – Wrap small empty boxes in beautiful gift wrap and add a ribbon. Group these mini-packages at the foot of the tree or on the table: it’s a beautiful effect at virtually no cost (just recycled gift-wrap scraps)!
This list of ideas is not exhaustive; let your imagination run wild. The Internet is full of models and tutorials for anything you can imagine… and even beyond (there are, for example, tutorials for making a complete paper art nativity scene, or miniature cardboard Christmas villages). Embark on the paper DIY adventure, even on small projects: the satisfaction of seeing your creation finished is immense ????.
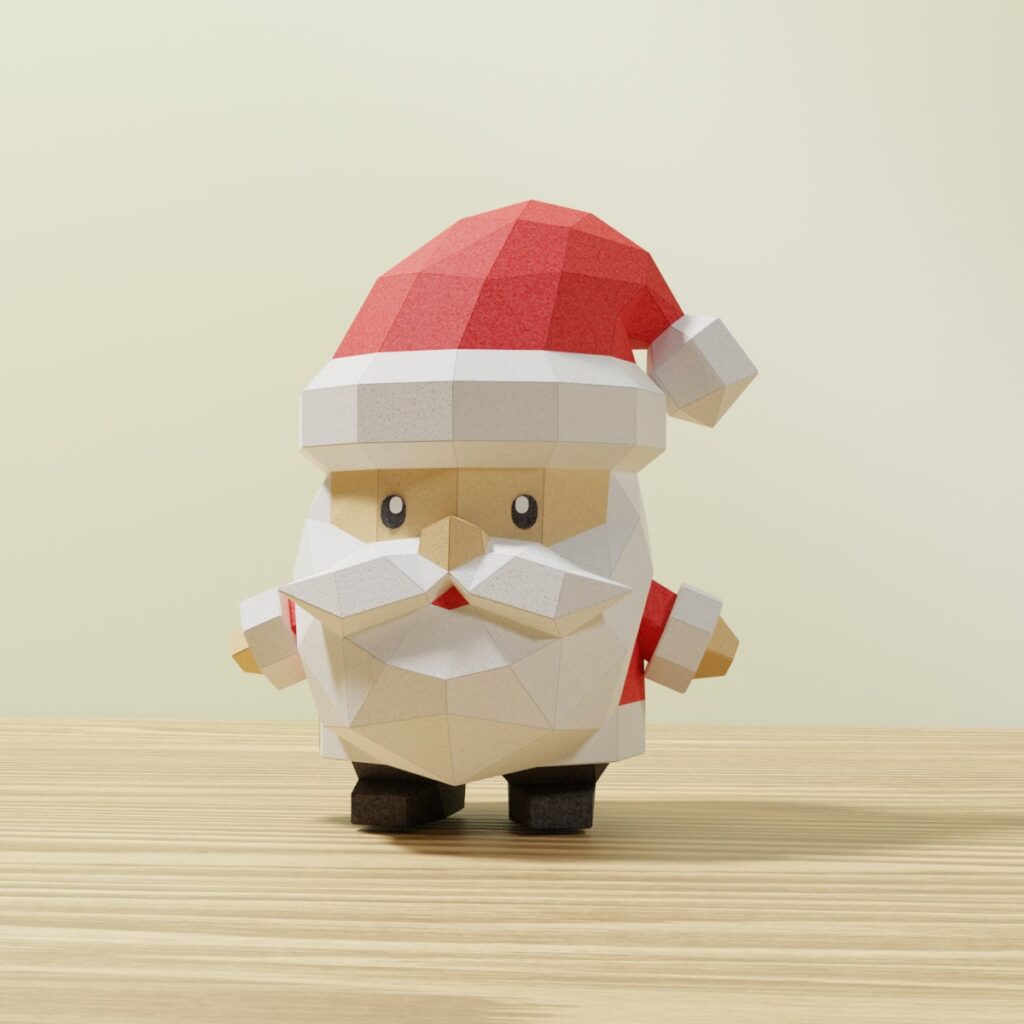
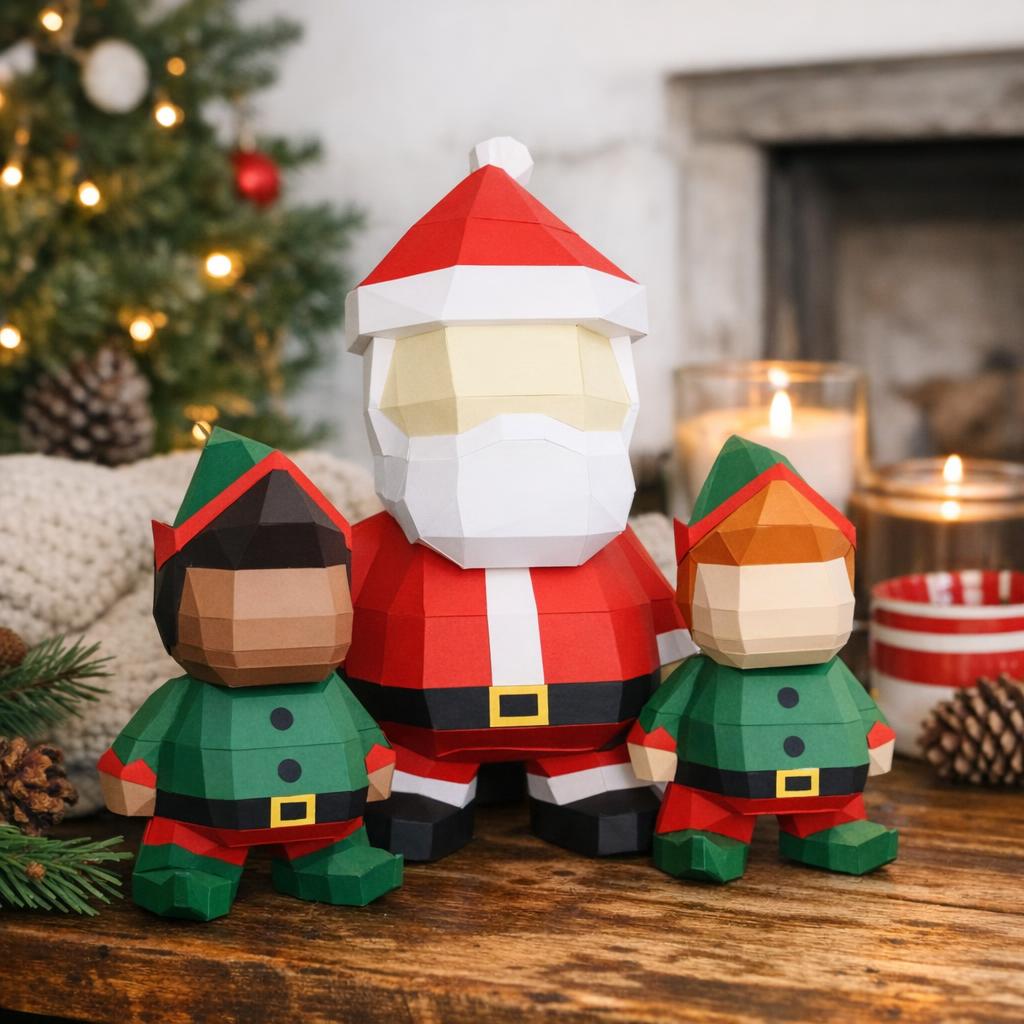
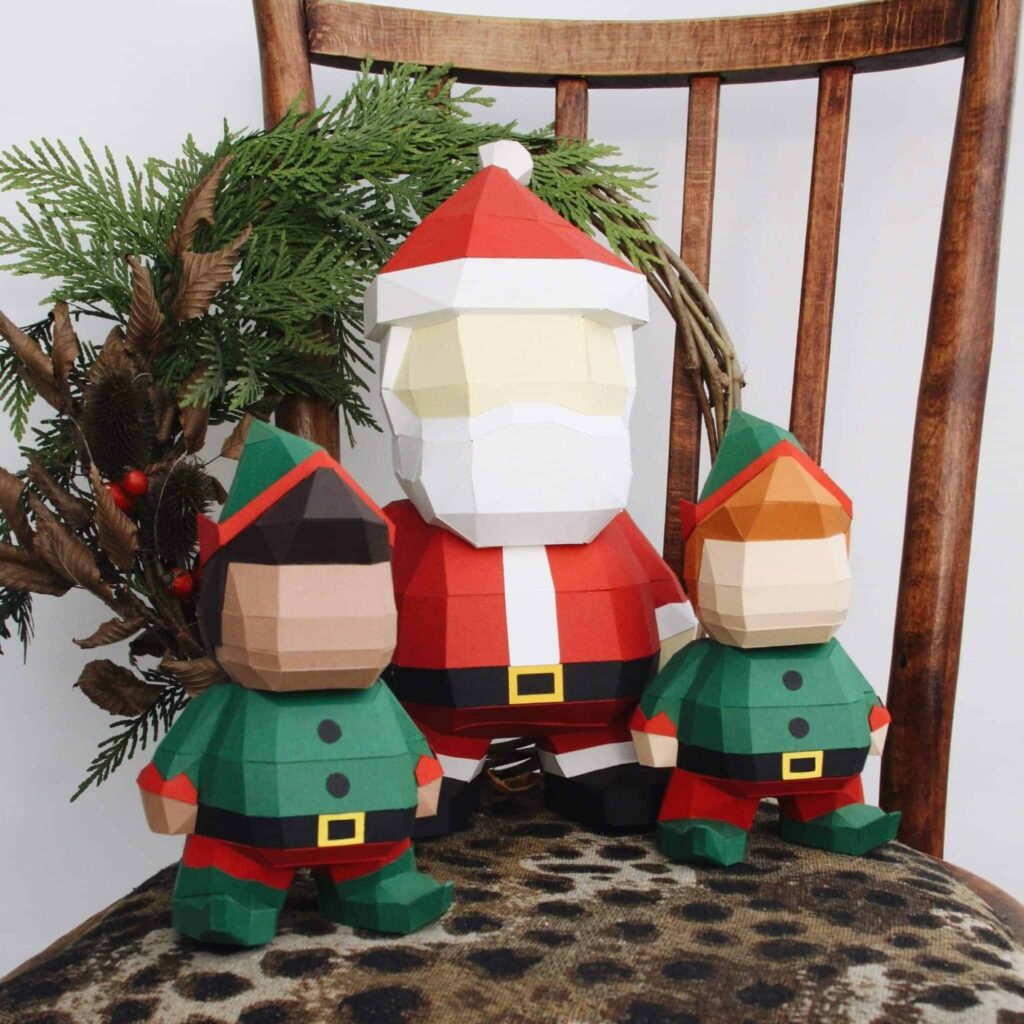
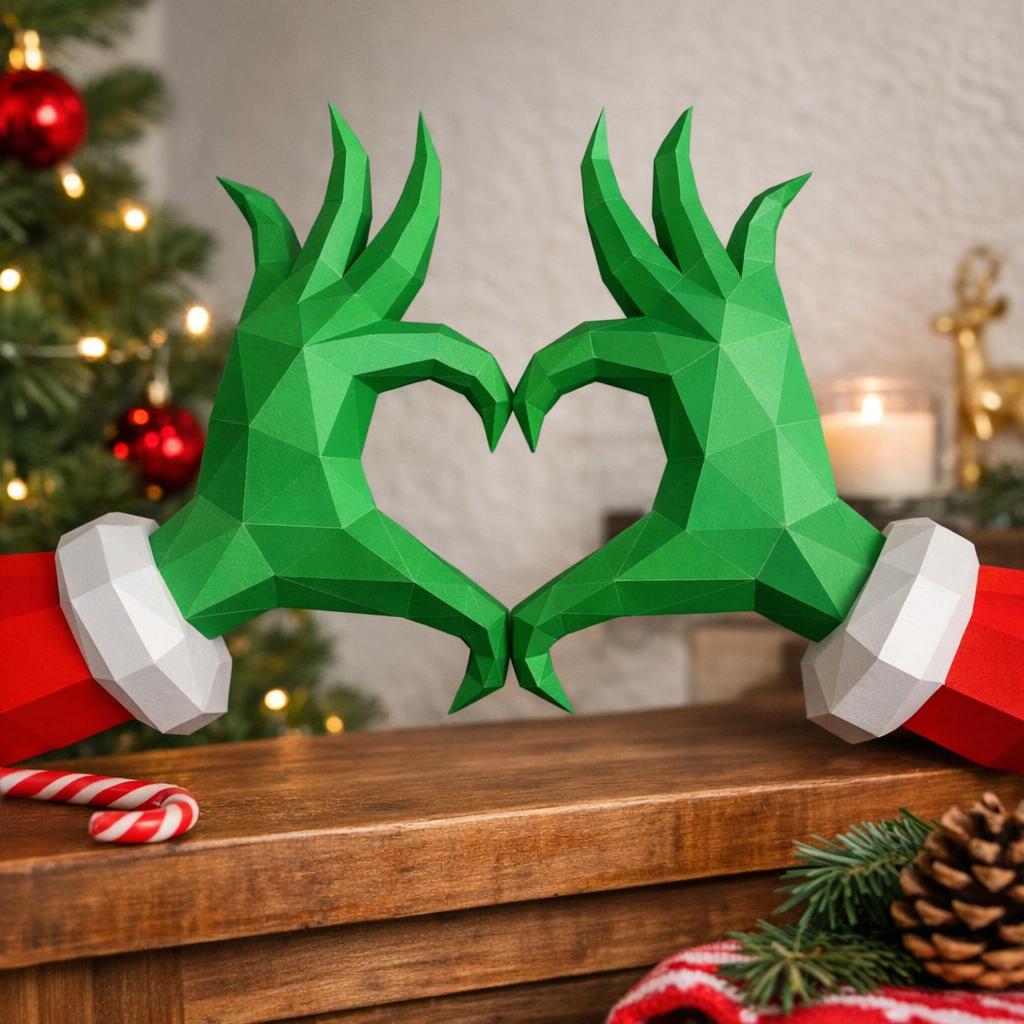
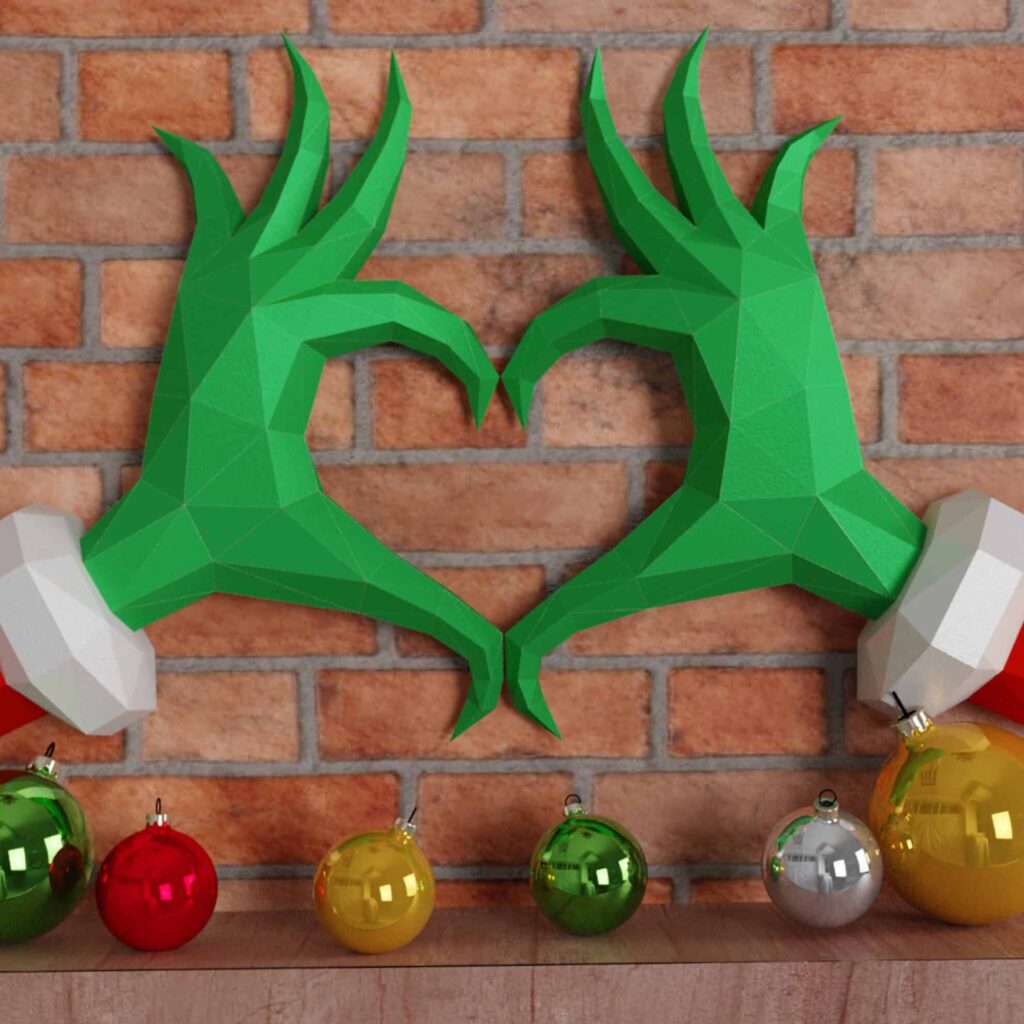
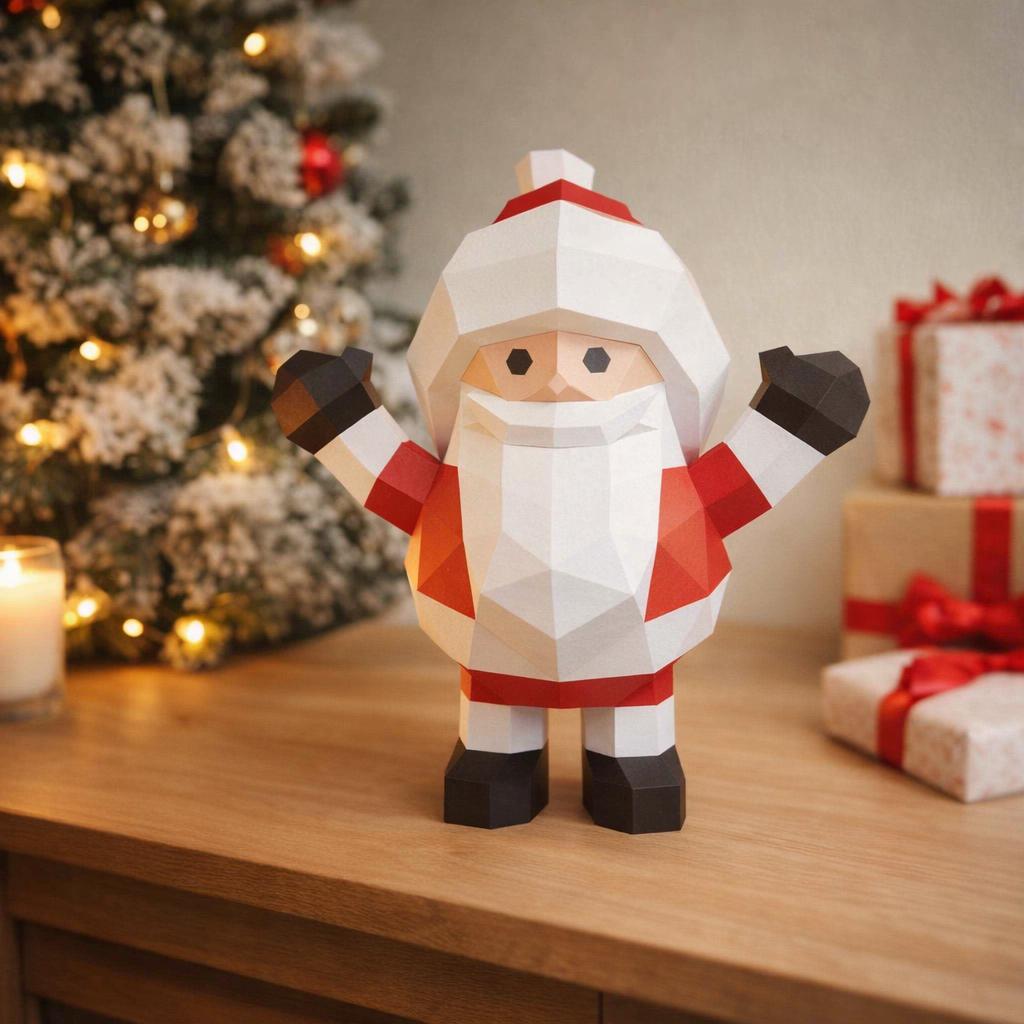
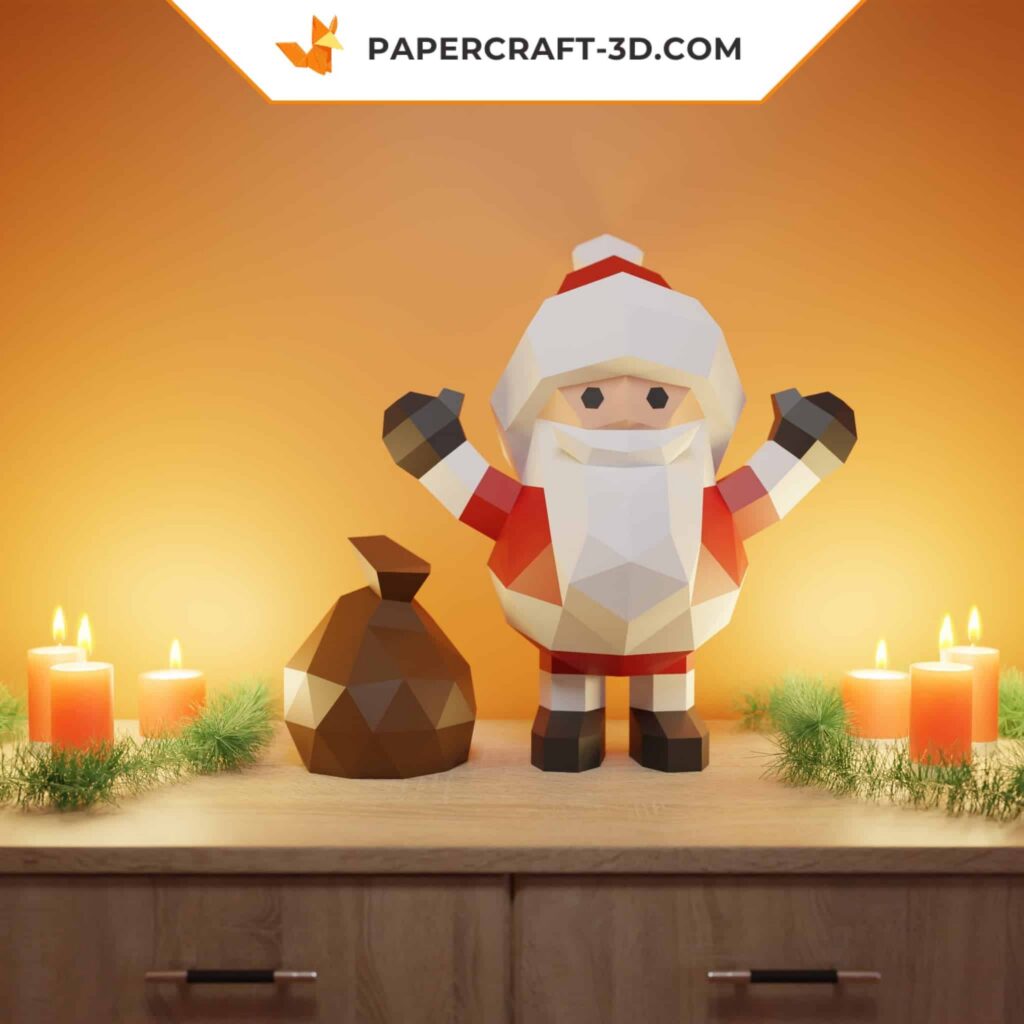
Papercraft 3D: add volume to your paper decorations
Now let’s talk about a more “advanced” paper hobby trend, which will be of particular interest to you if you like objects in volume: 3D papercraft. This name covers paper models that can be assembled to create sculptures or models, often with a modern geometric design. It’s somewhere between origami (for the art of folding) and model making (for the meticulous assembly).
The principle: you start with a pattern printed on cardboard paper, which represents the two-dimensional faces of an unfolded 3D object. Each piece is cut out, folded along the lines (inwards or outwards), then the numbered tabs are glued together in the right order. Little by little, the shape is built up in volume: for example, a reindeer head made of paper polygons, a 3D origami Christmas tree, and so on. It takes a little patience, but the result is amazing.
As RWR Crafts summarizes: Papercraft, or the art of creating 3D models from paper, is a discipline that will appeal to precision enthusiasts. […] Armed with thick paper, glue and patience, you’ll be able to assemble some impressive projects.
. There you have it: the perfect activity for those who love creative challenges and the “3D puzzle” aspect of self-assembly.
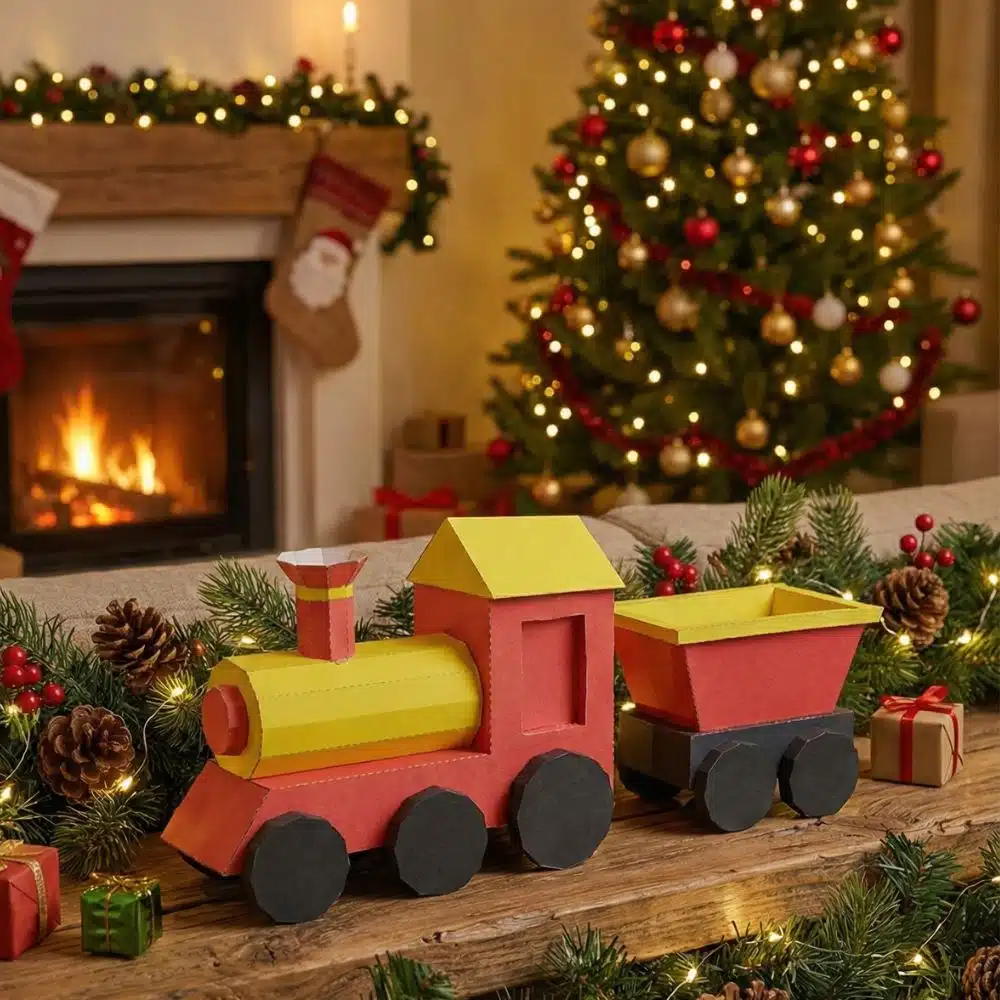
For Christmas, imagine what you could make in papercraft:
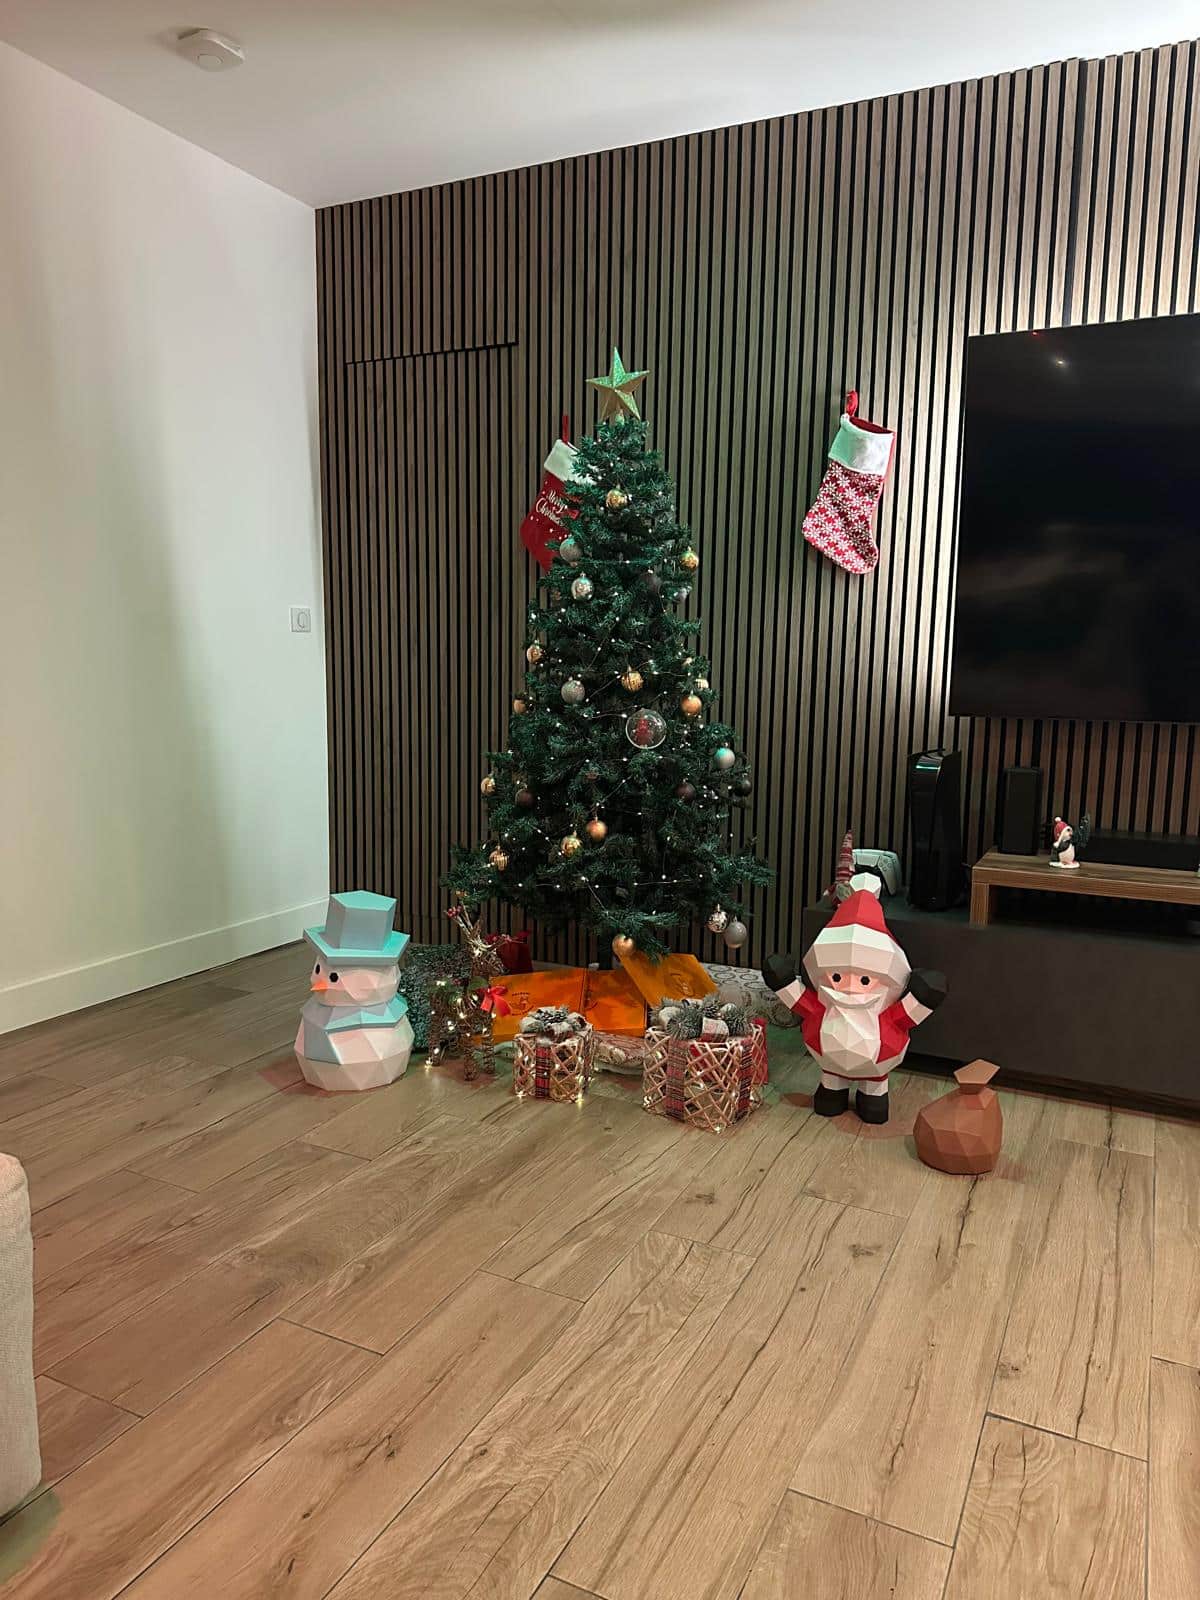
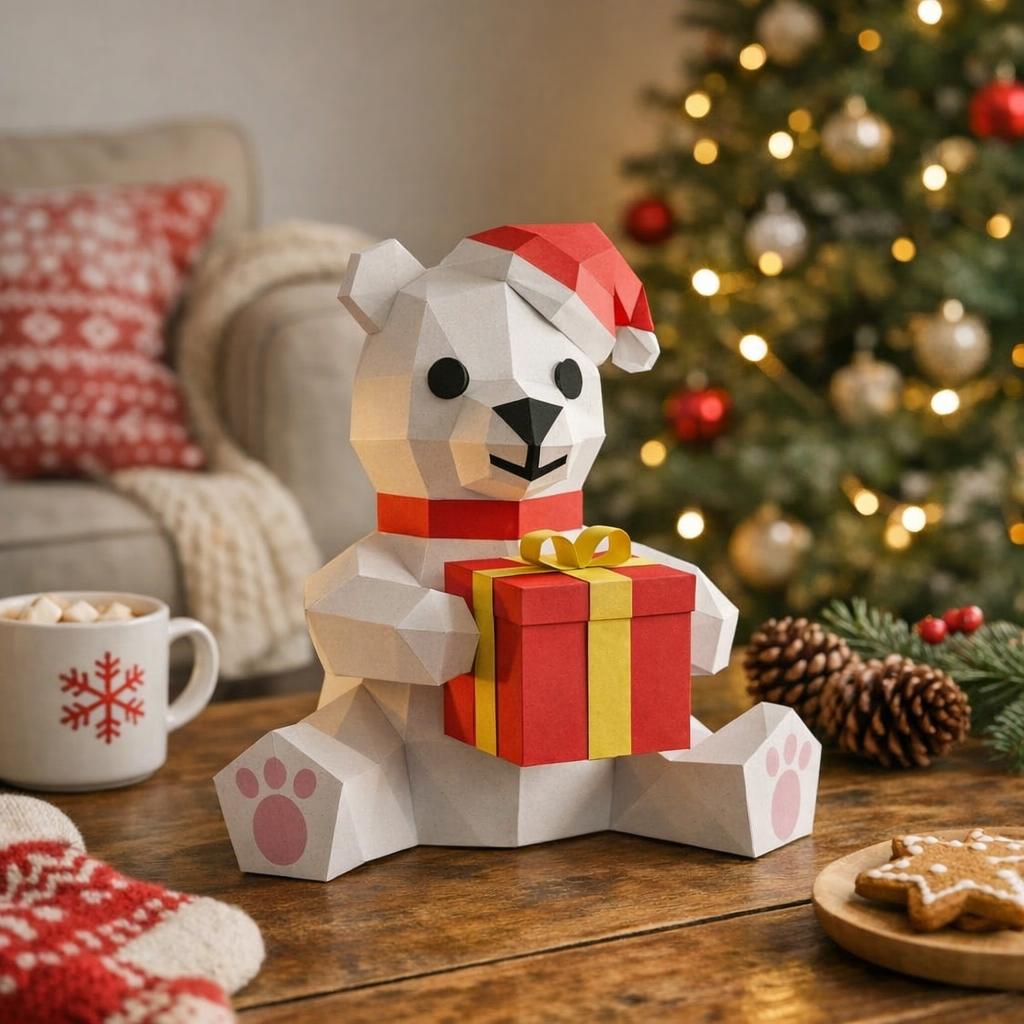
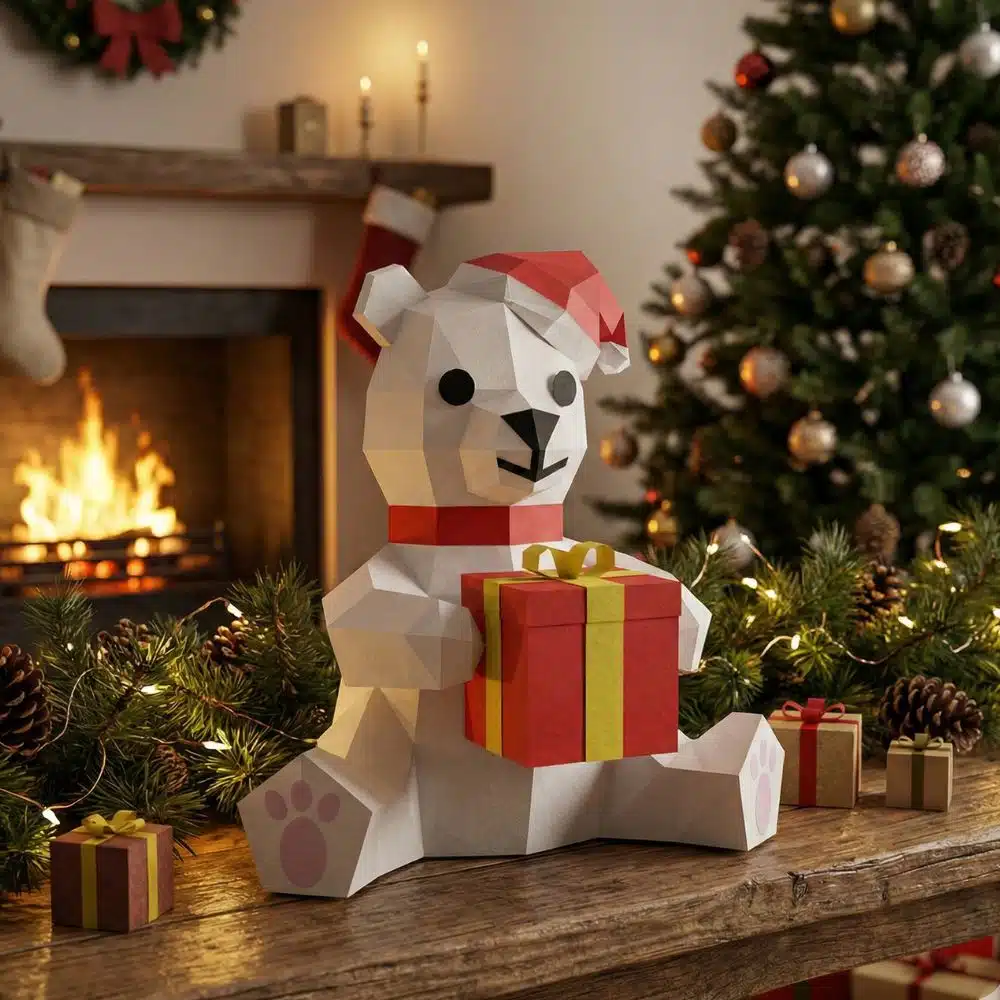
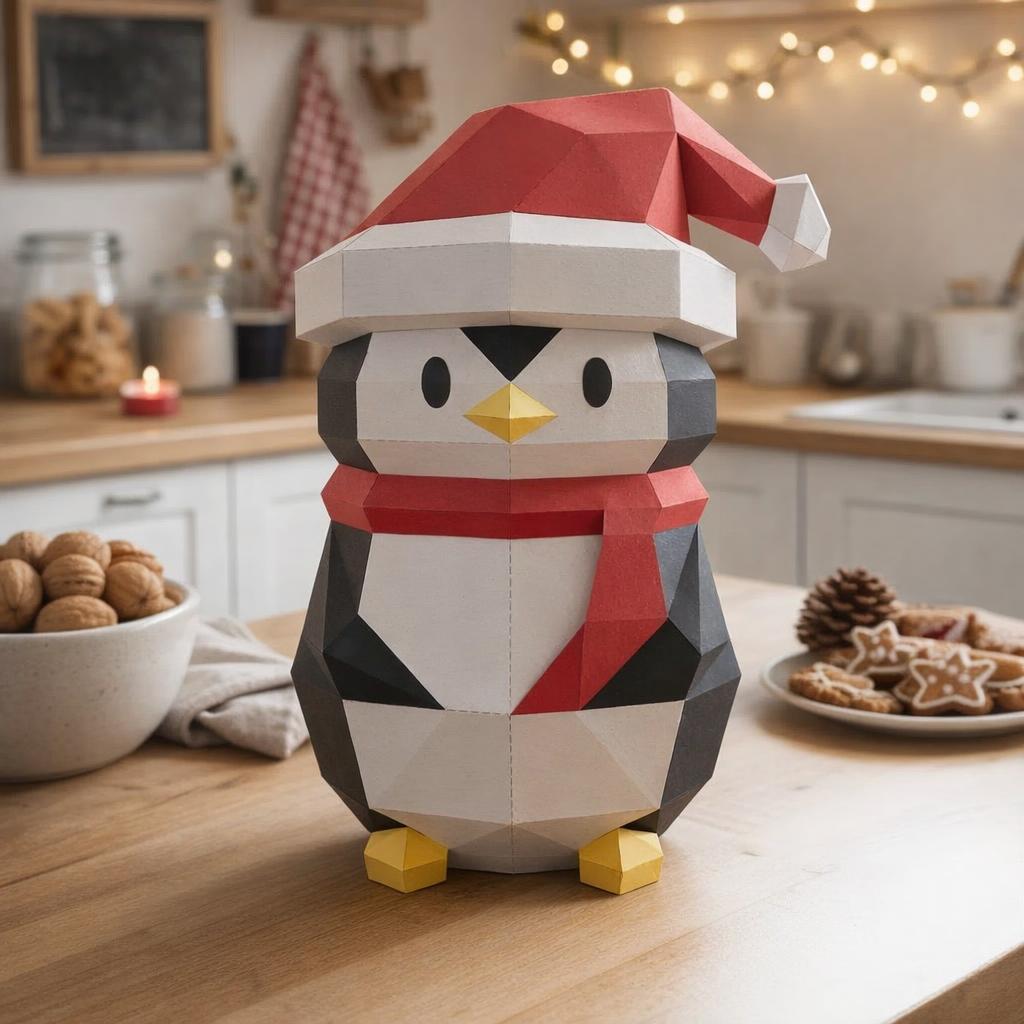
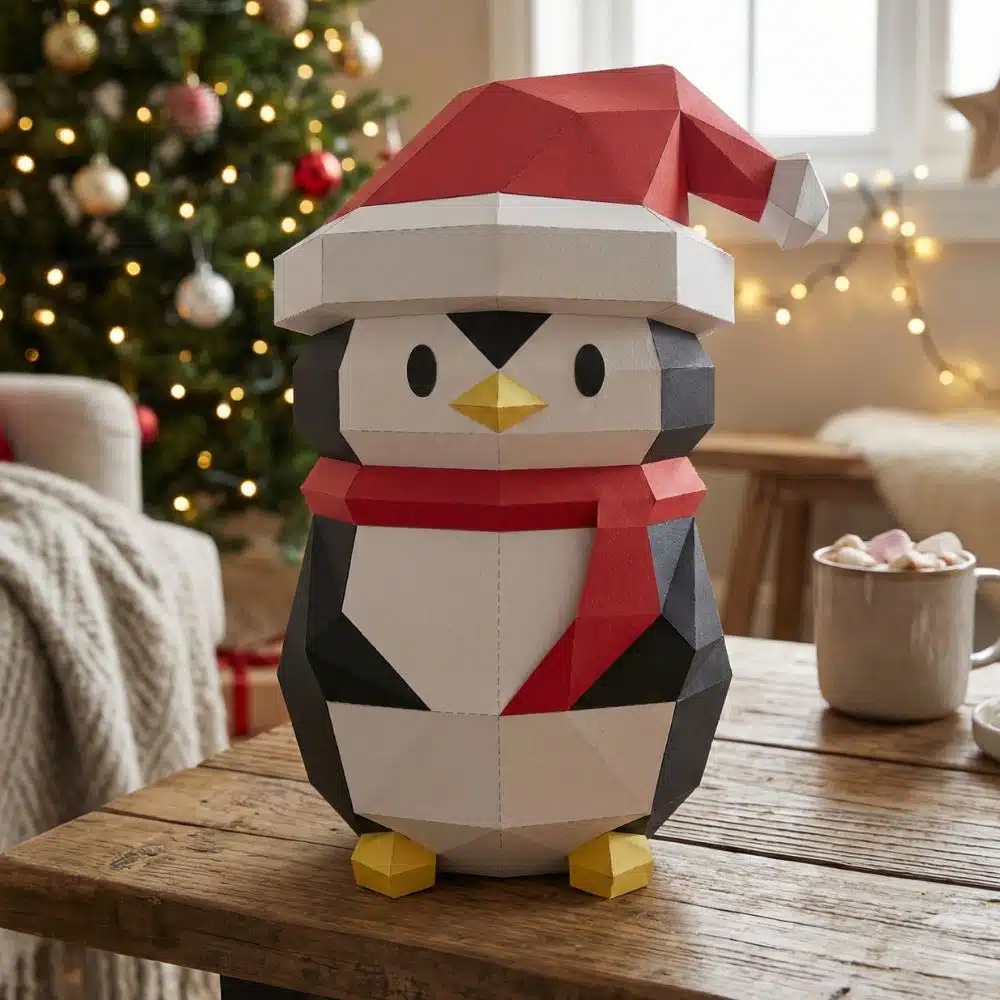
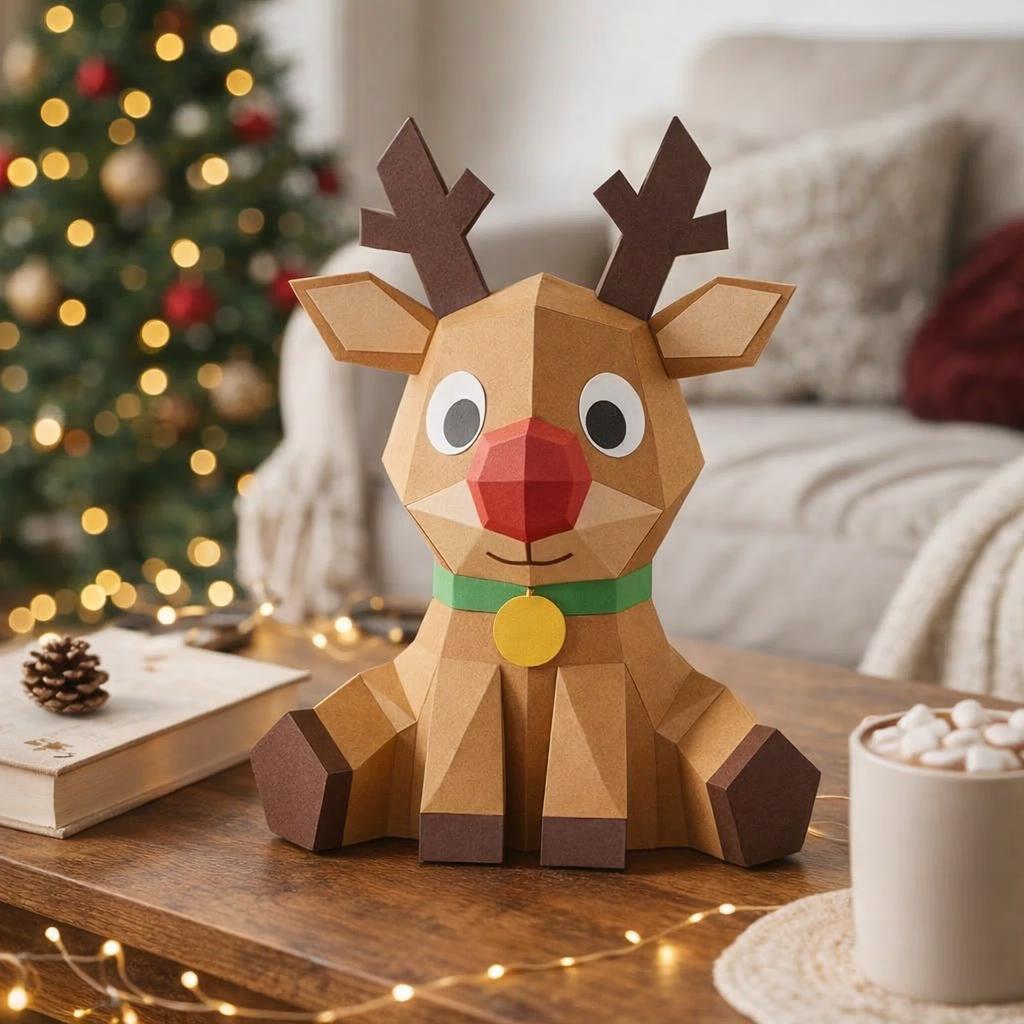
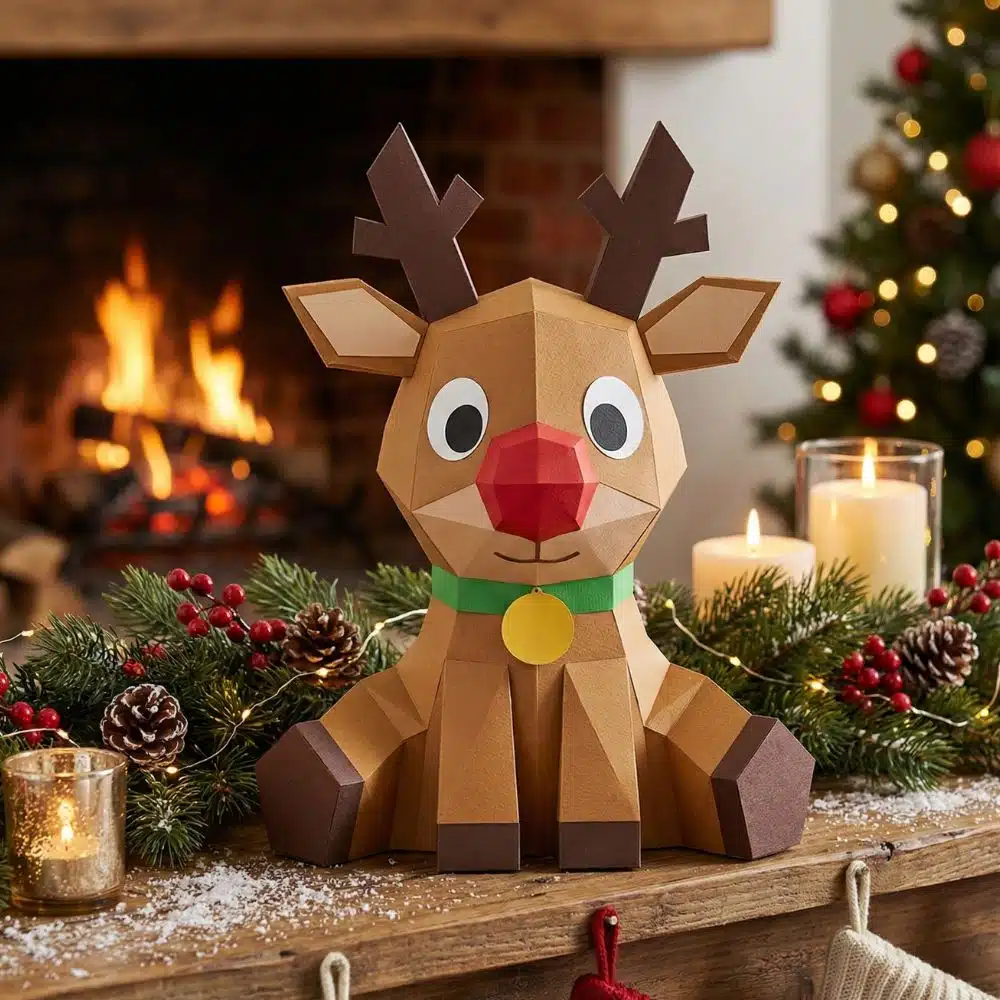
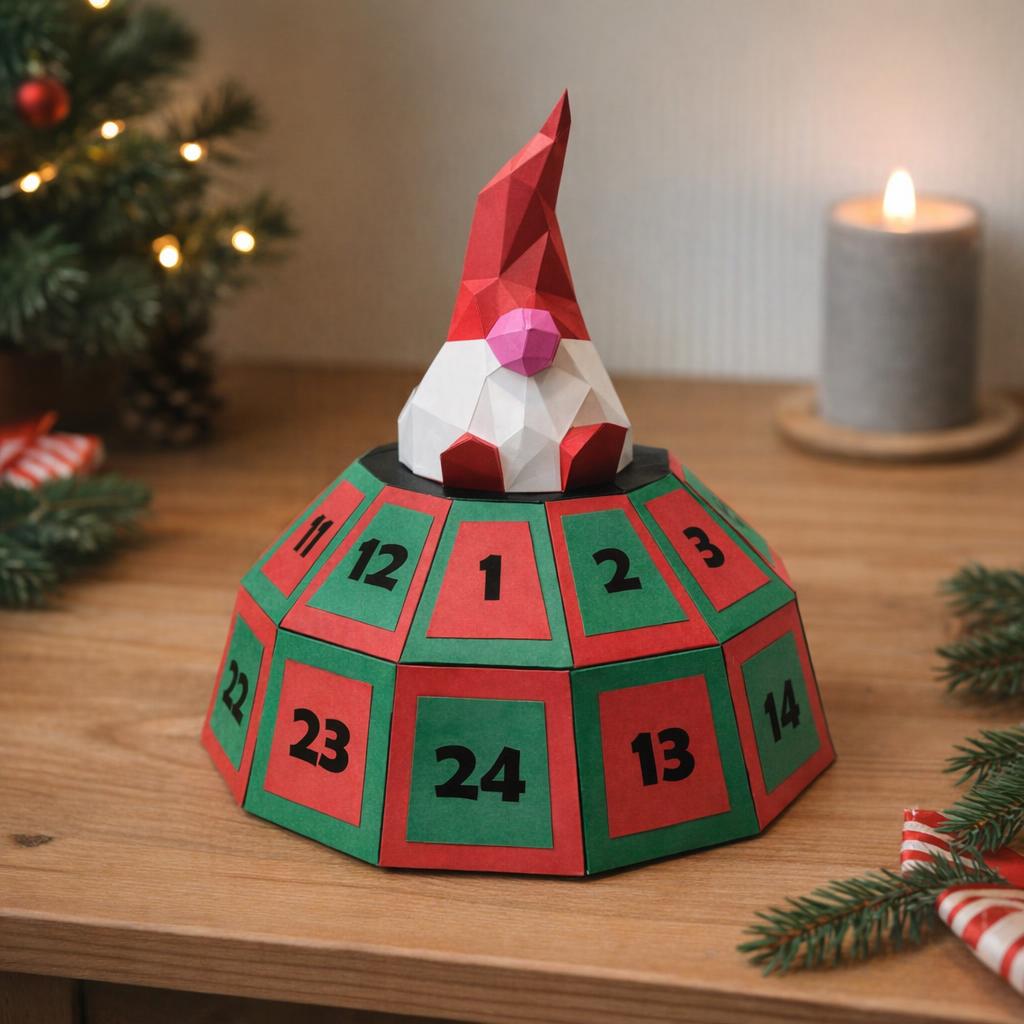
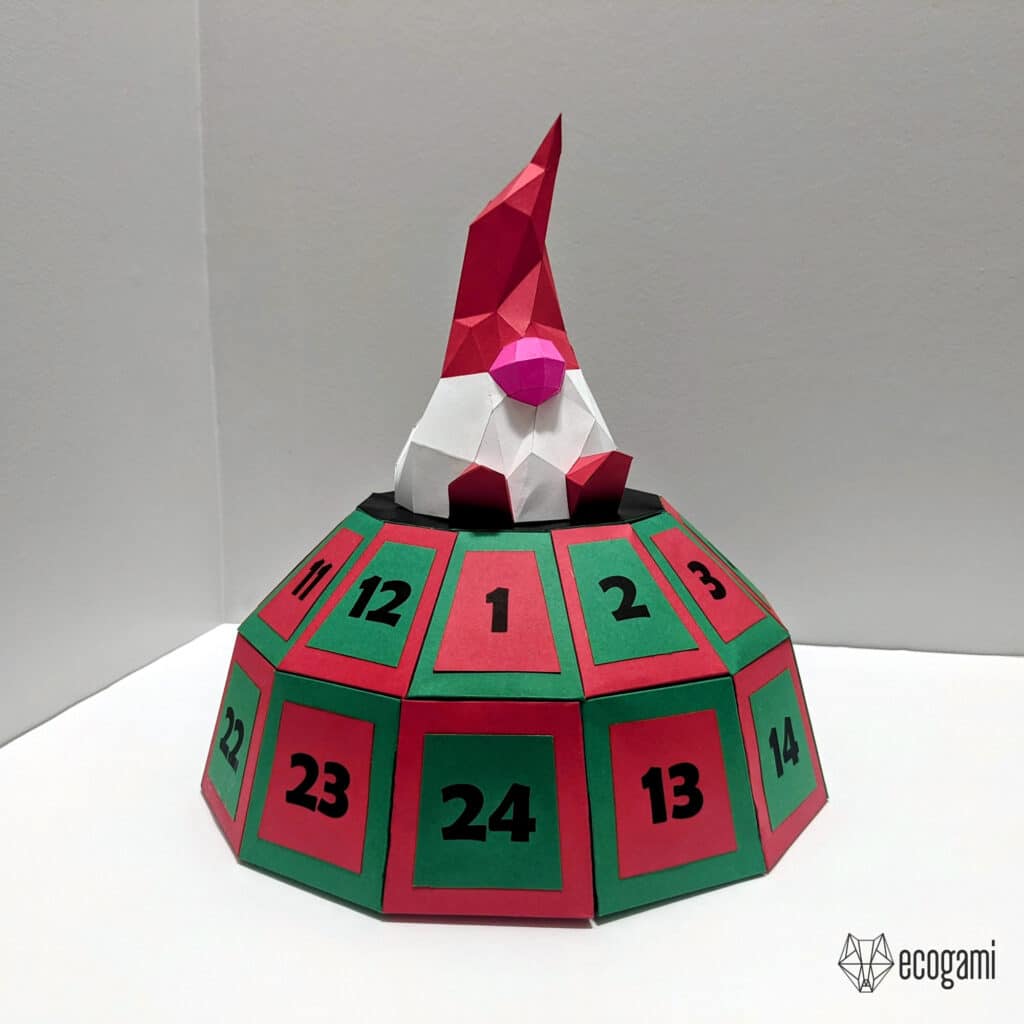
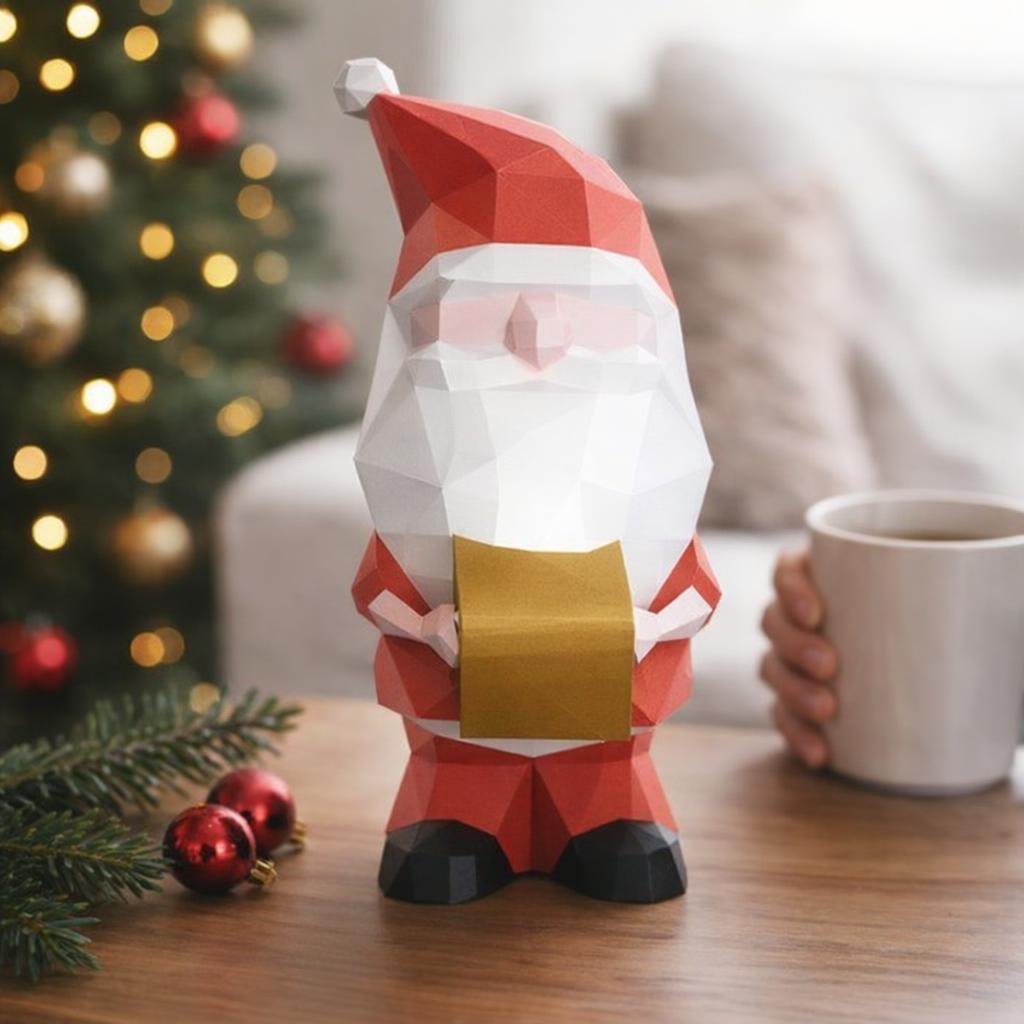
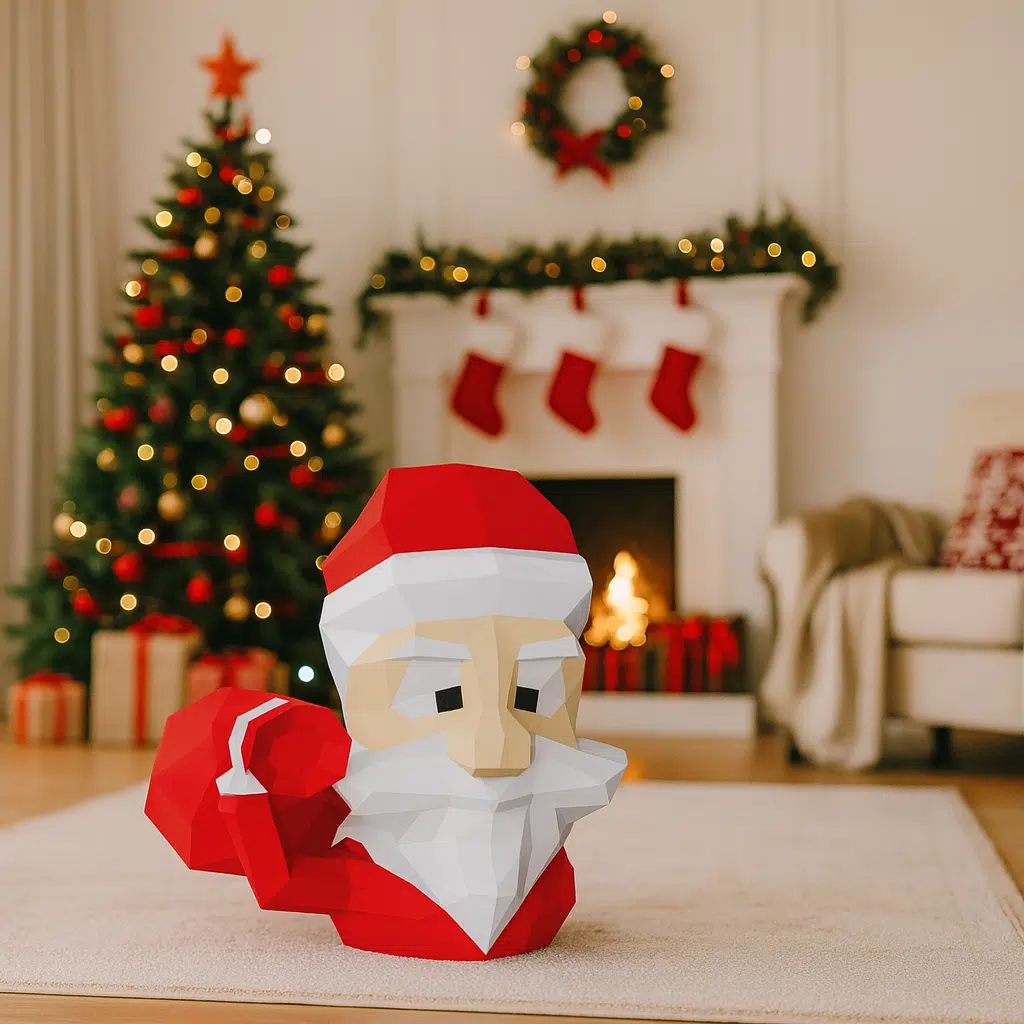
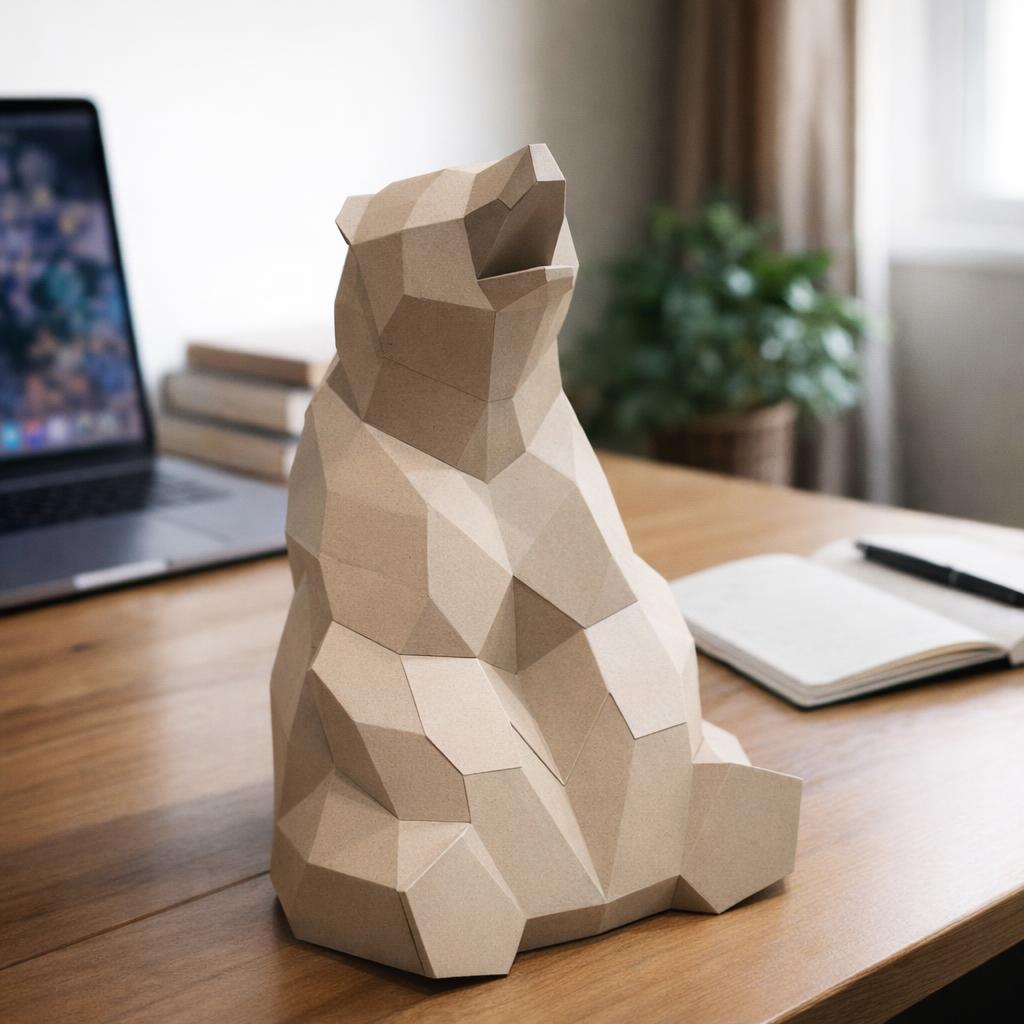
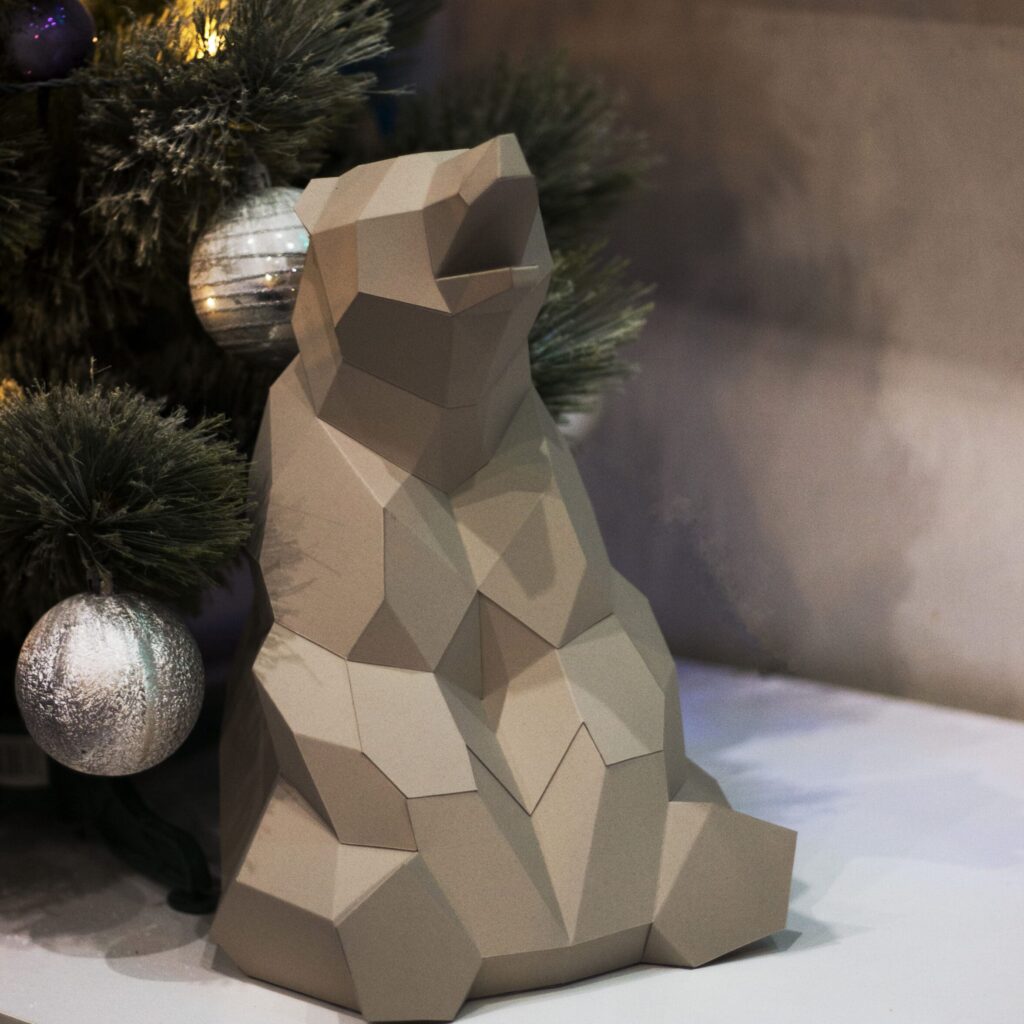
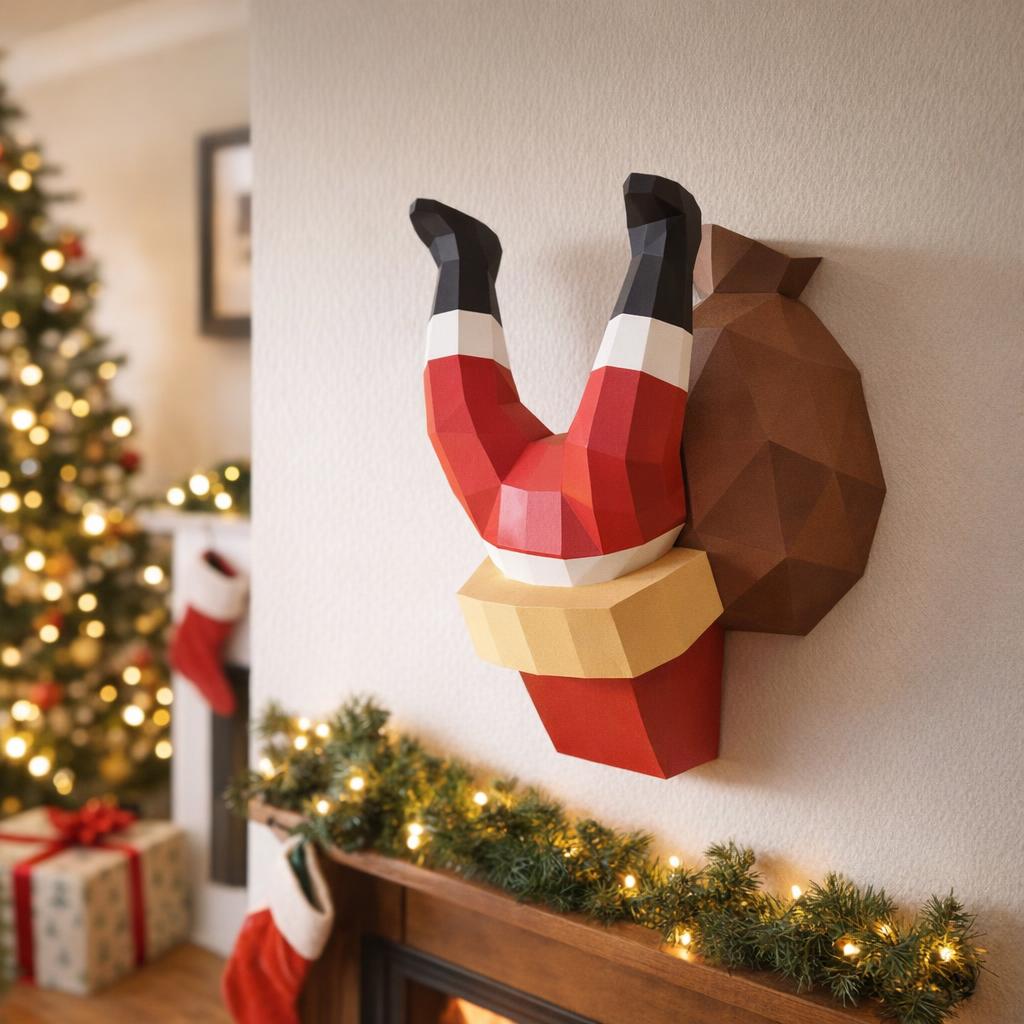
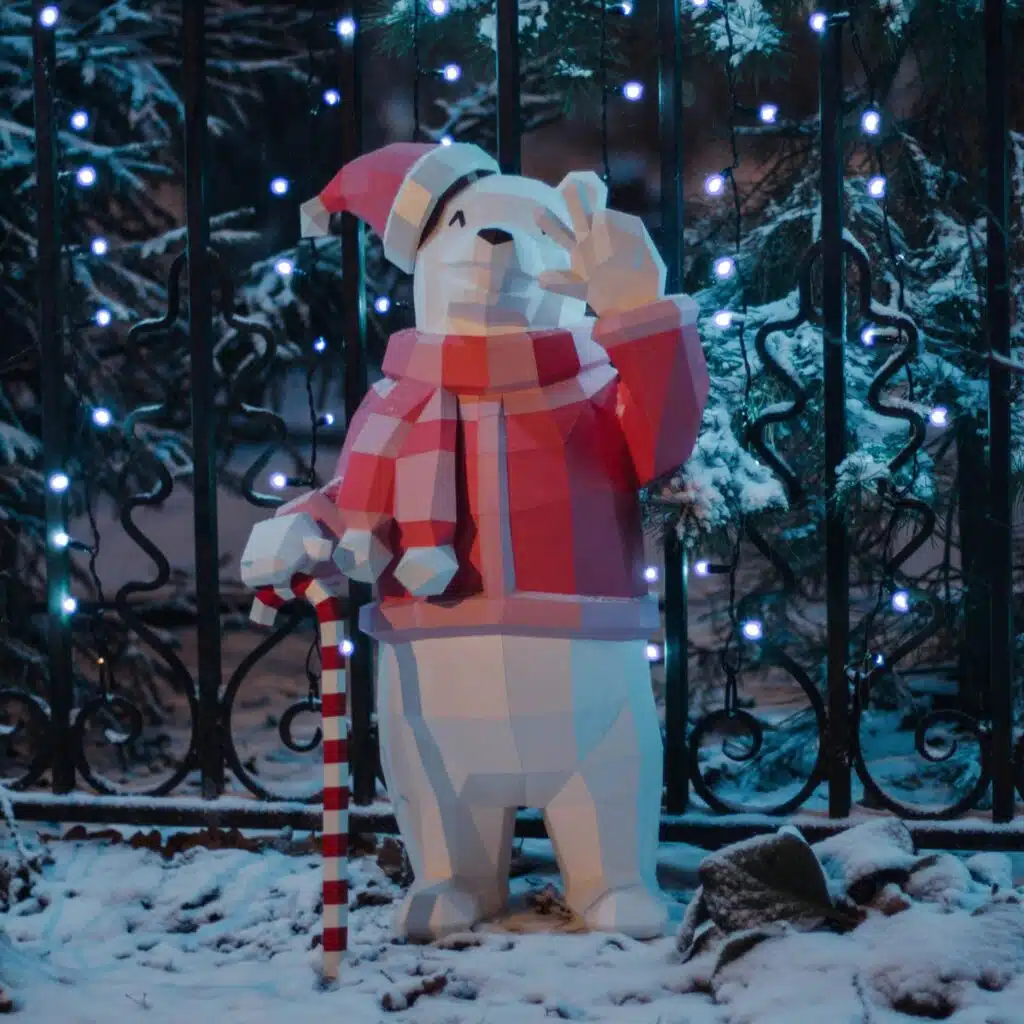
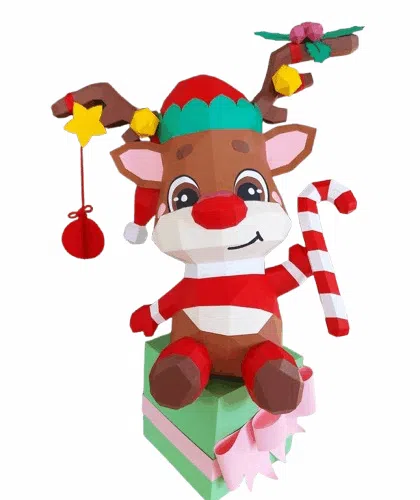
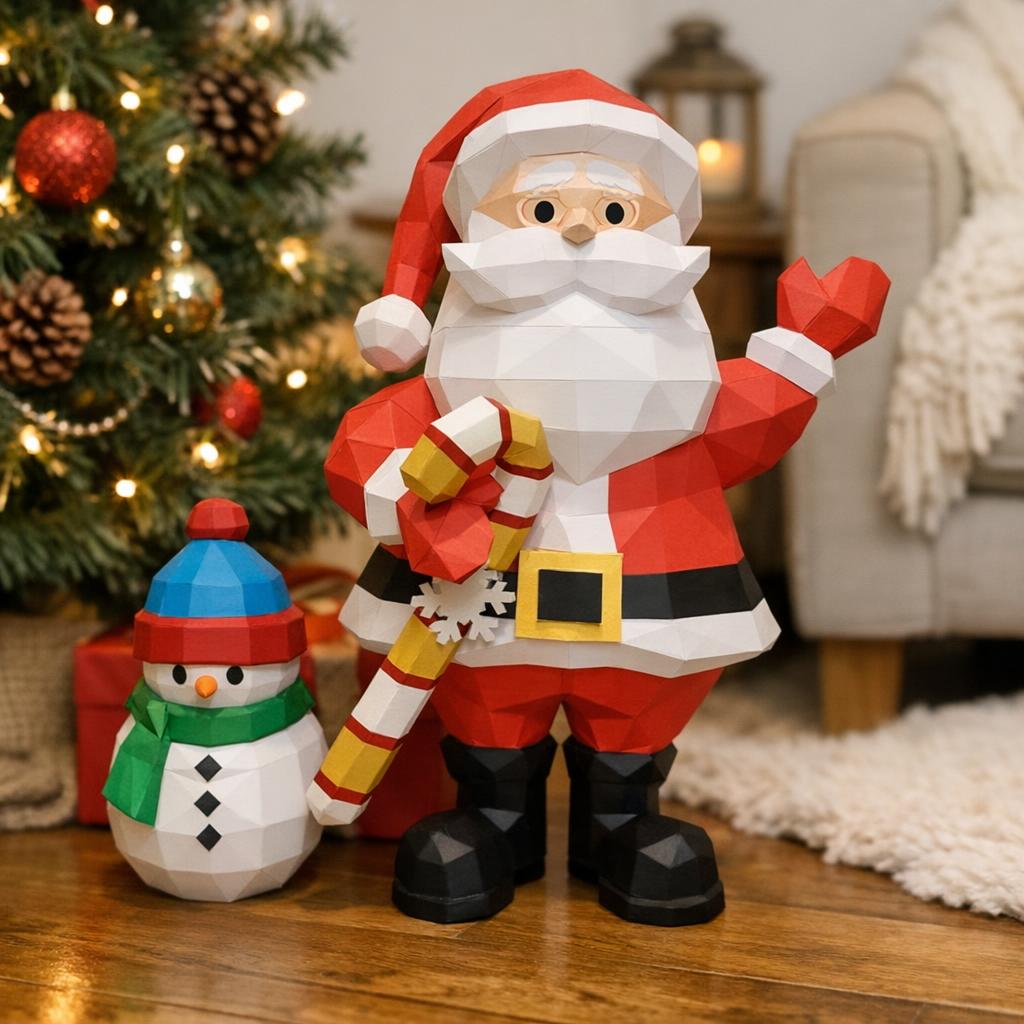
- Paper reindeer trophy – A classic: the polygonal reindeer head to hang on the wall, with a red nose if you want to get fancy. In brown or colored paper, it’s a great decorative element. Our kits include papercraft reindeer antlers, which are always a big hit.
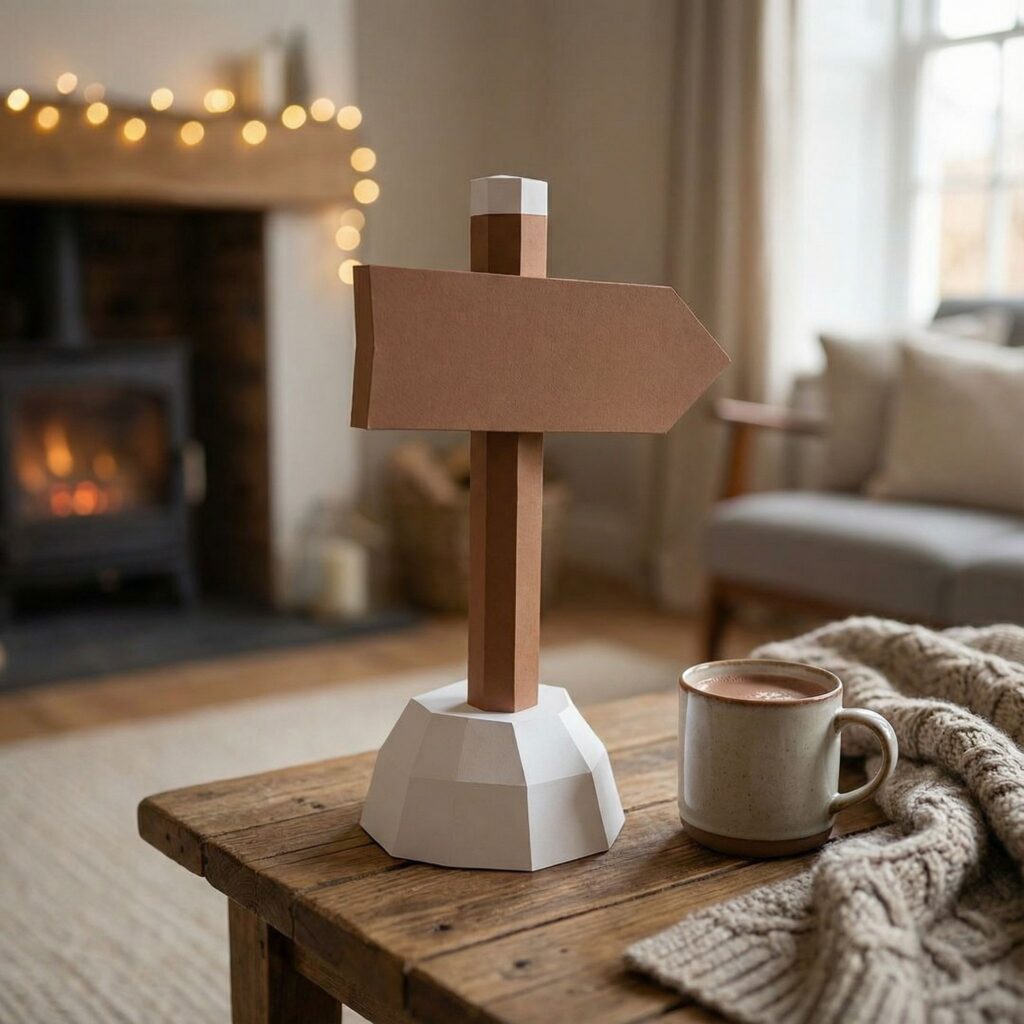
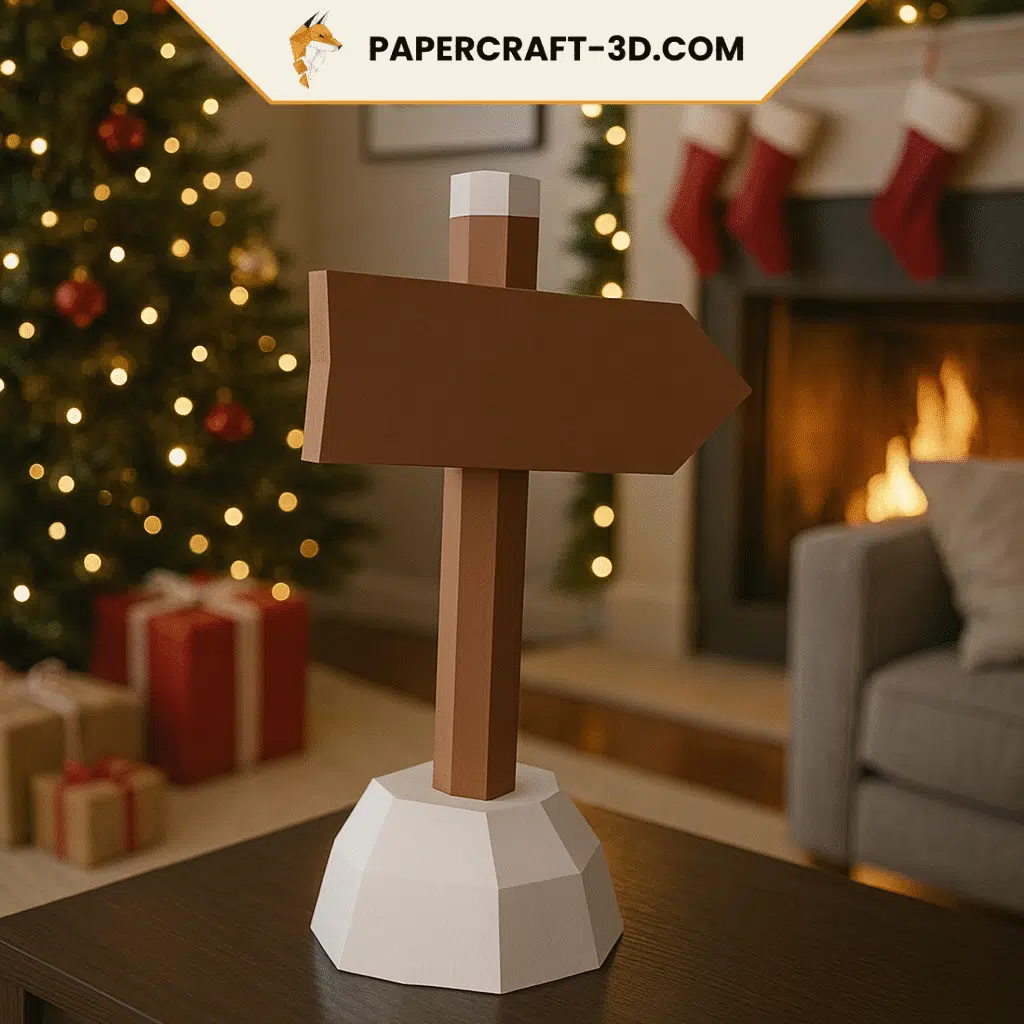
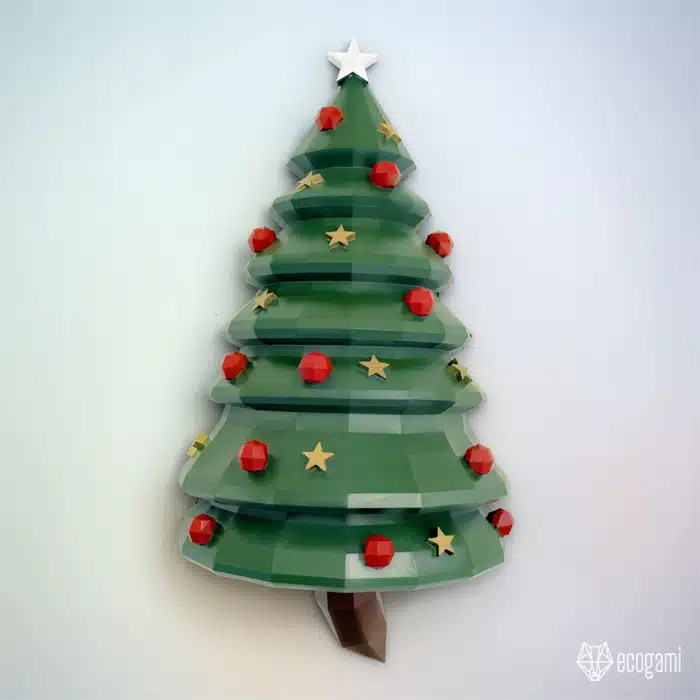
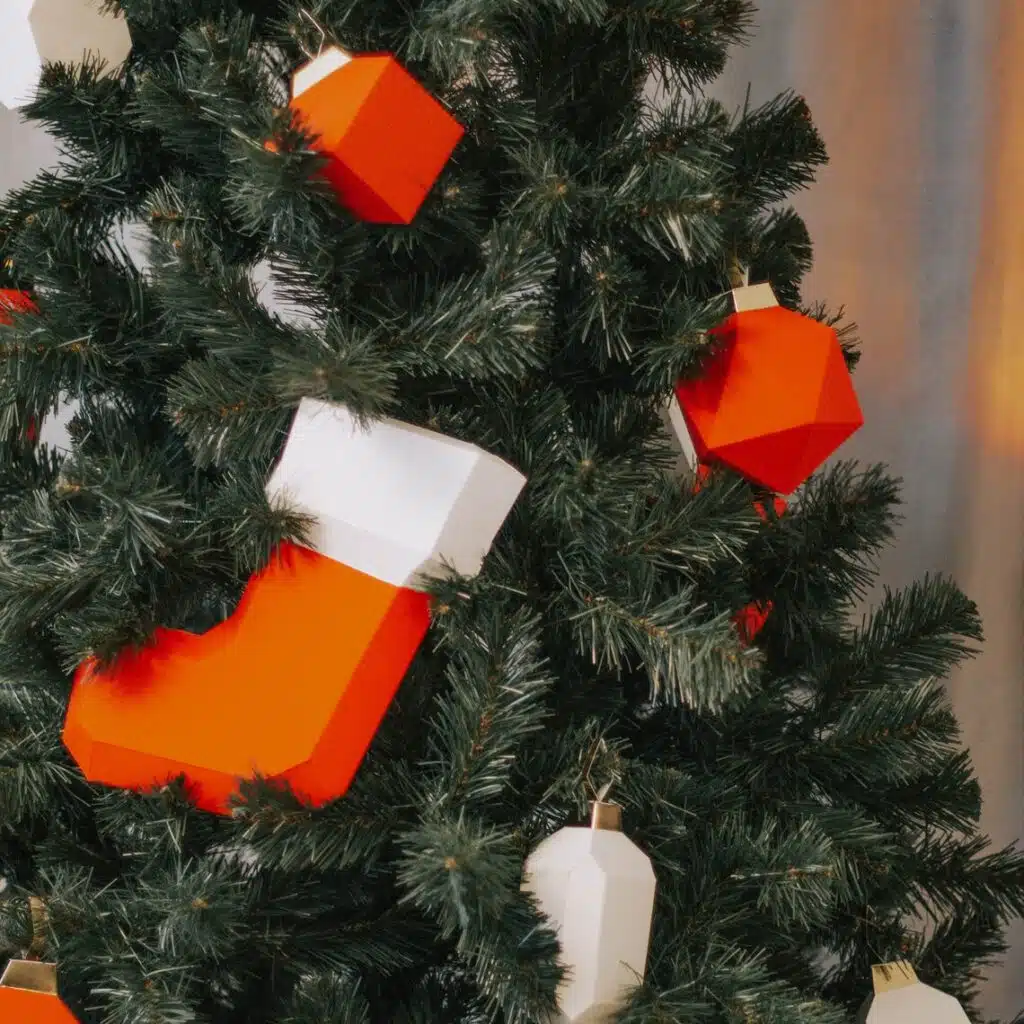
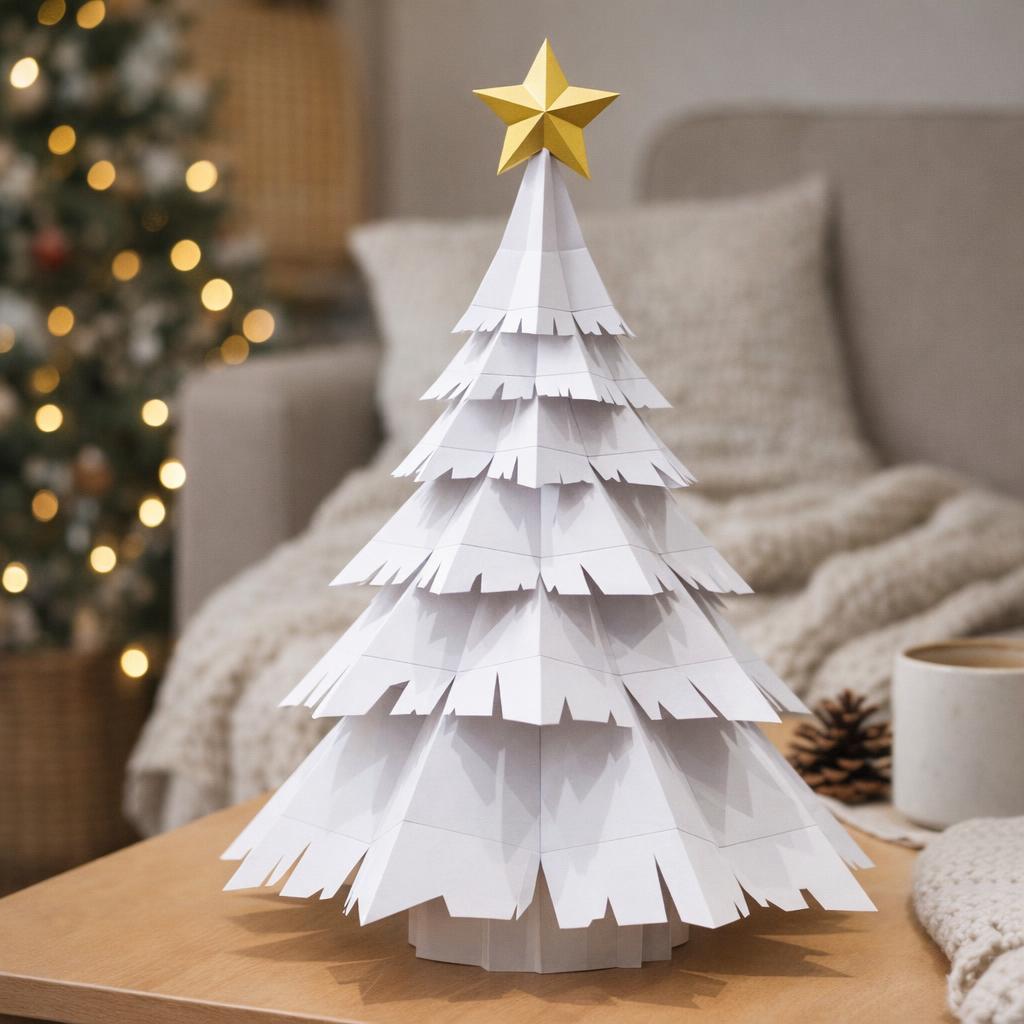
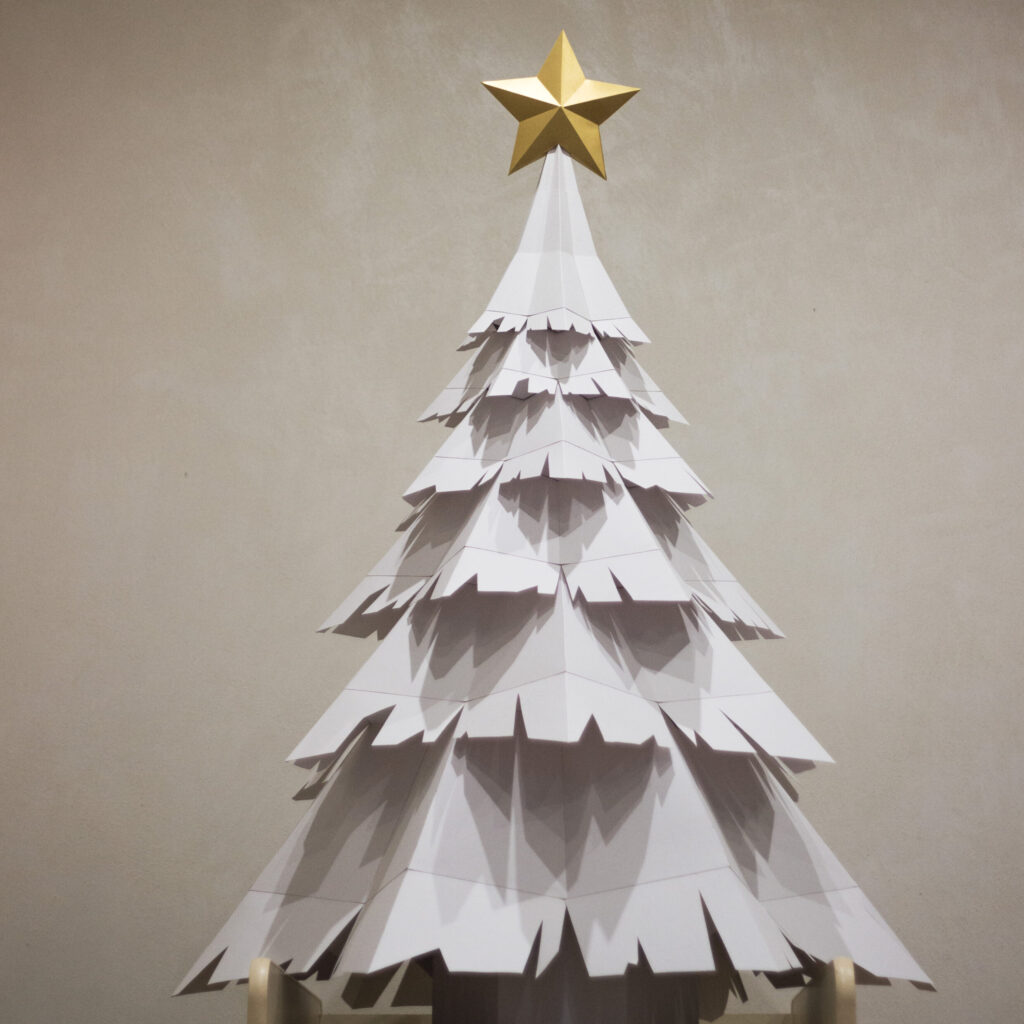
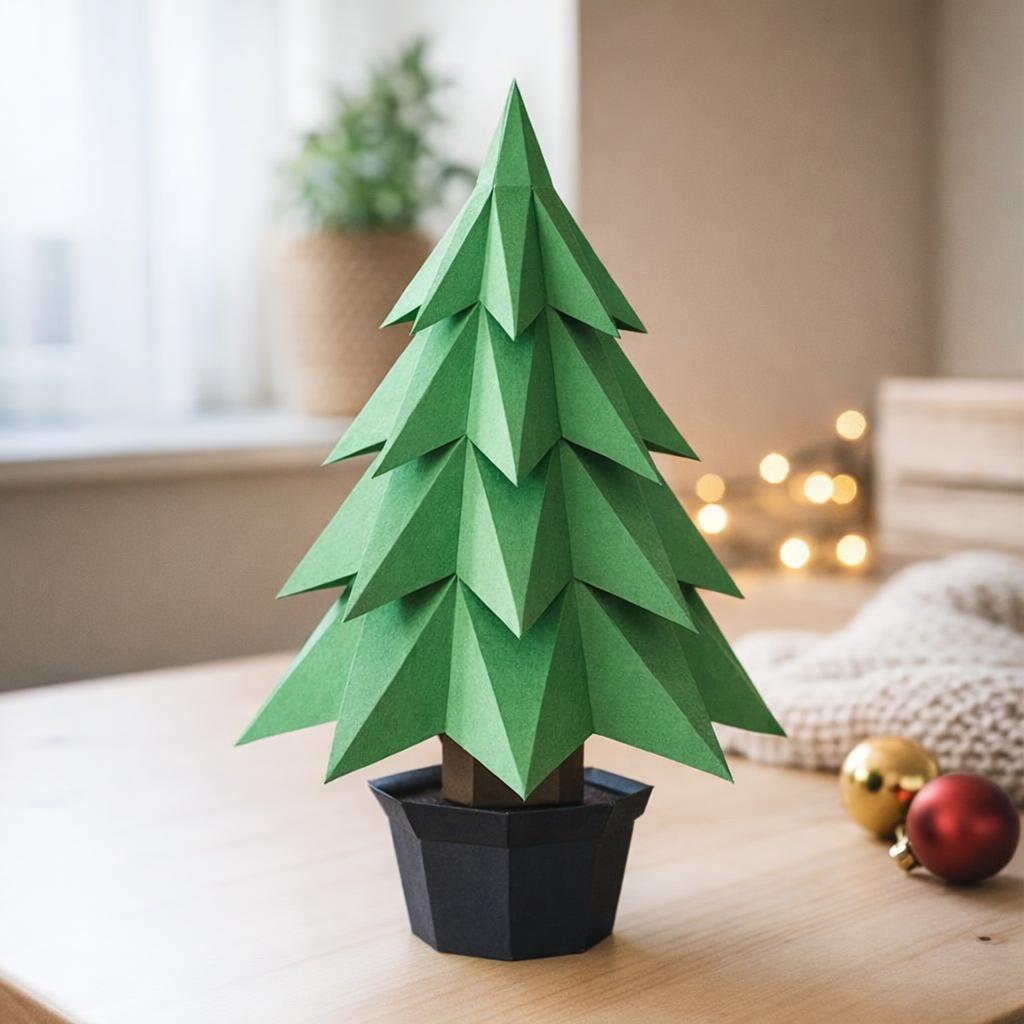
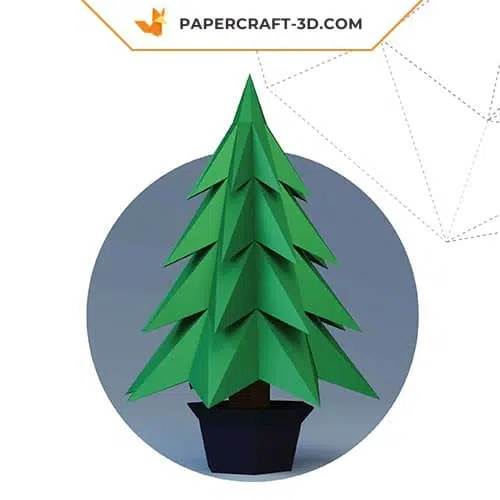
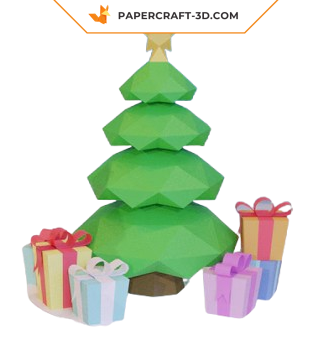
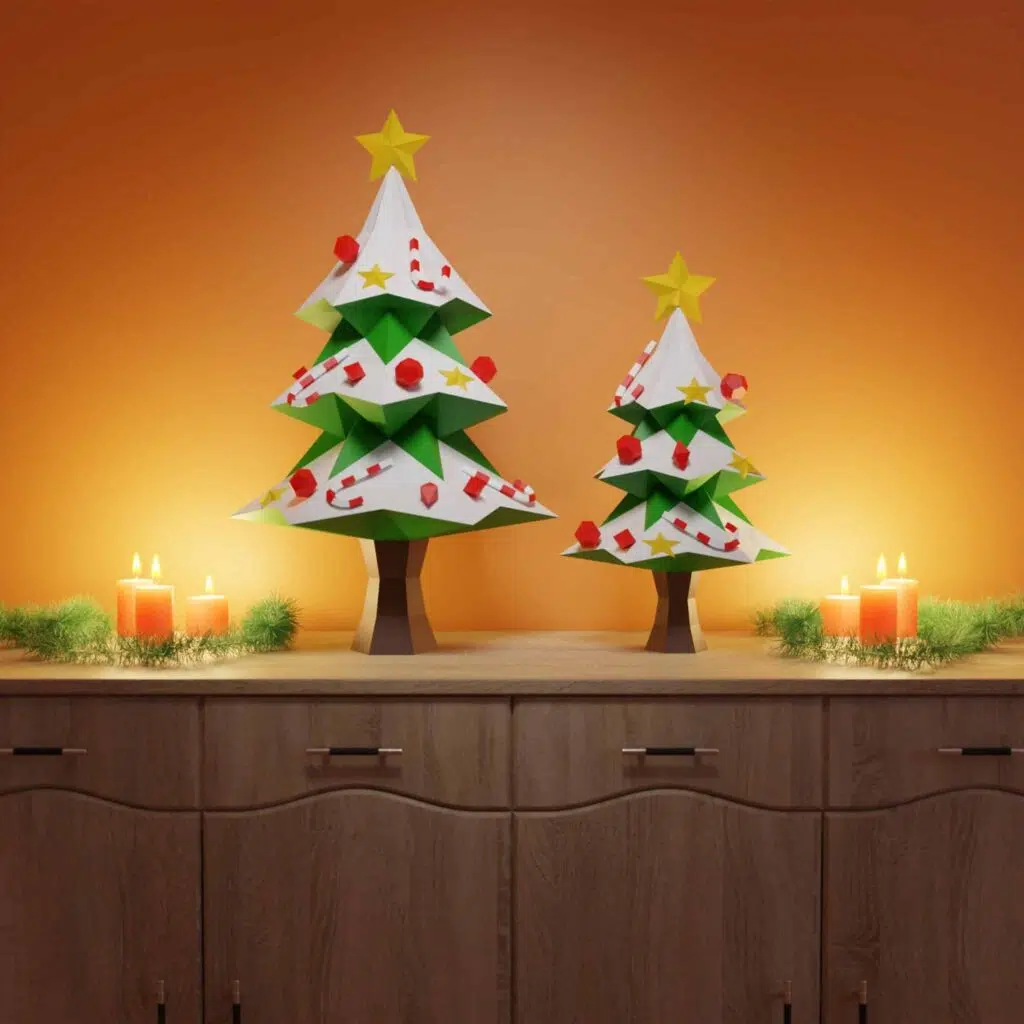
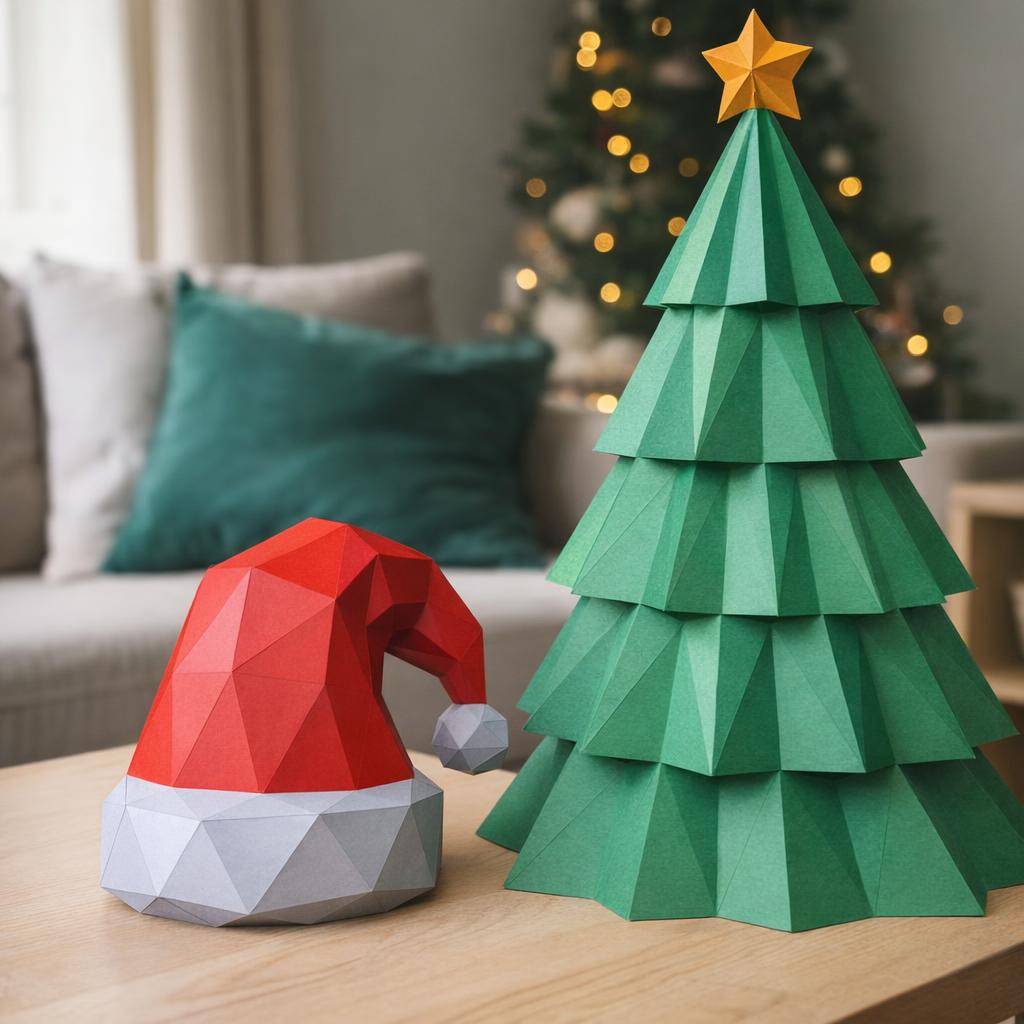
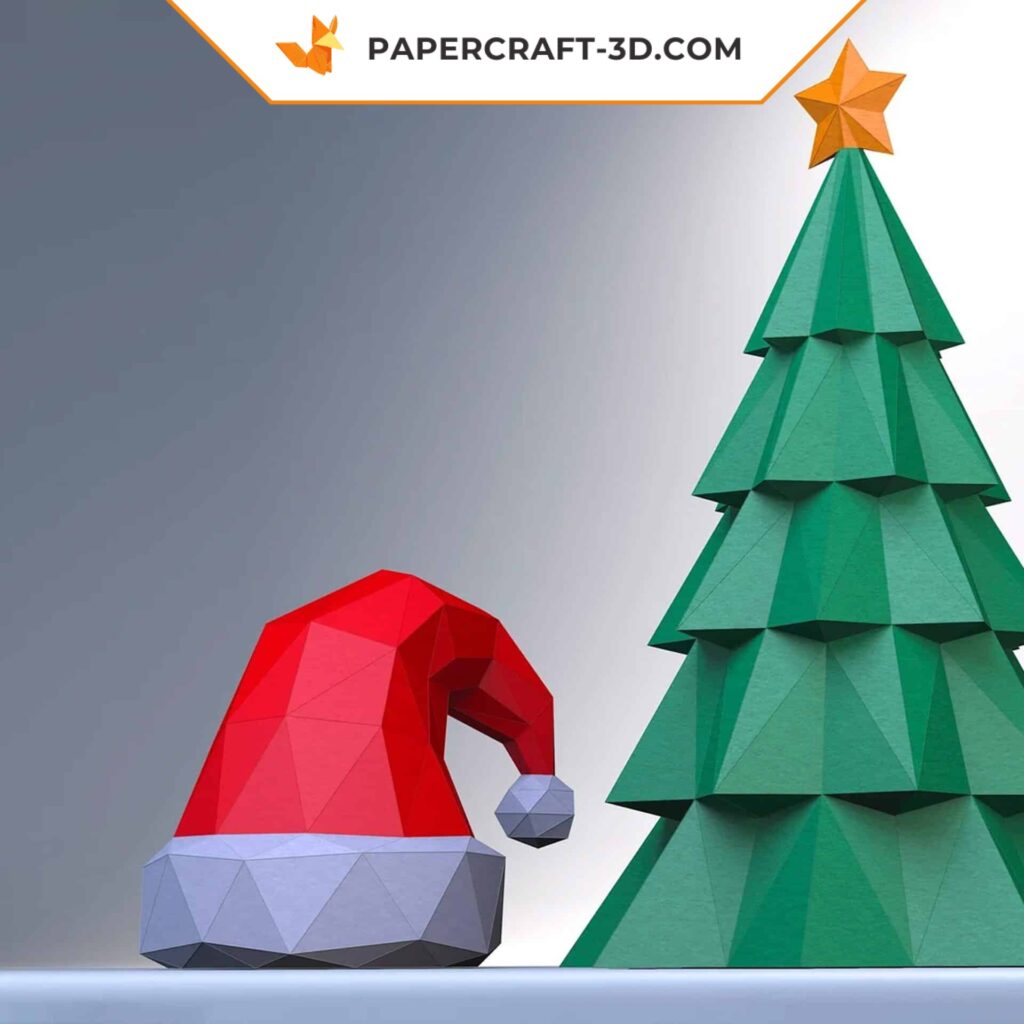
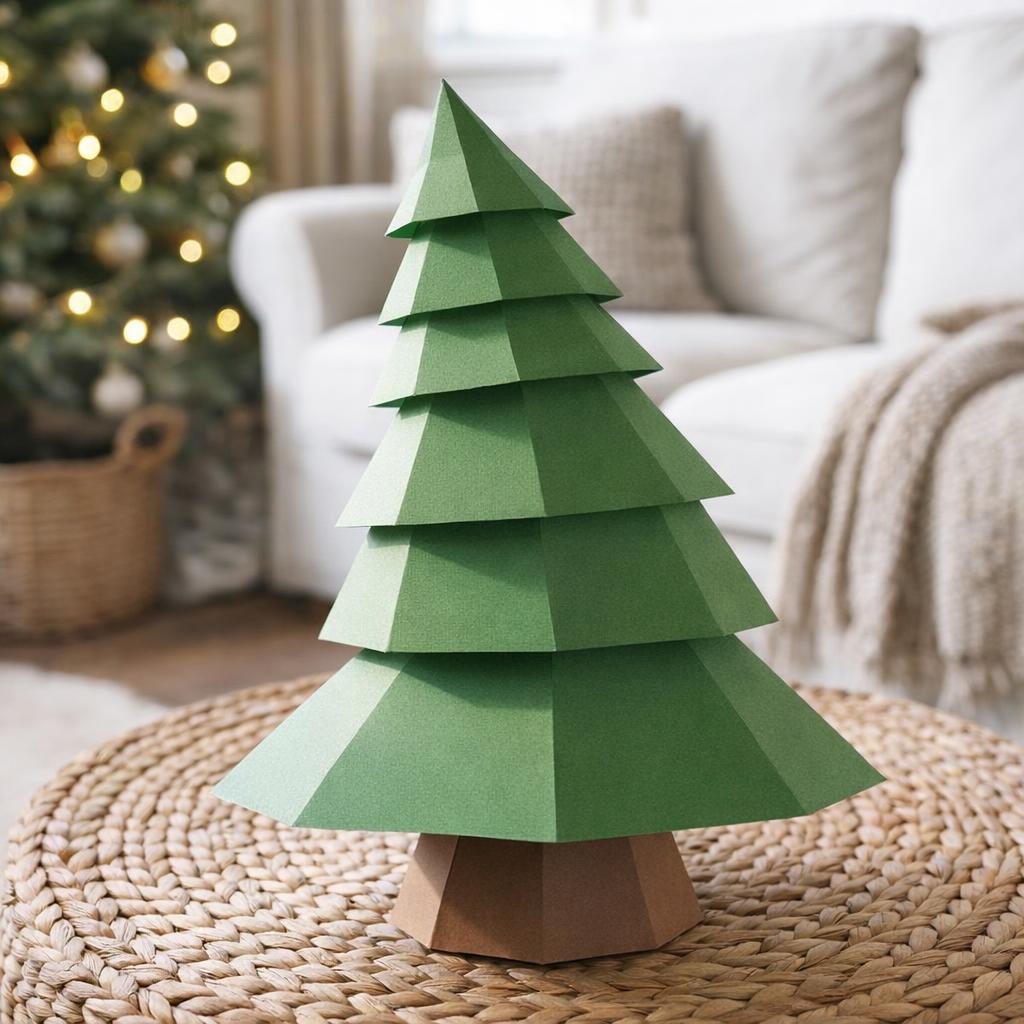
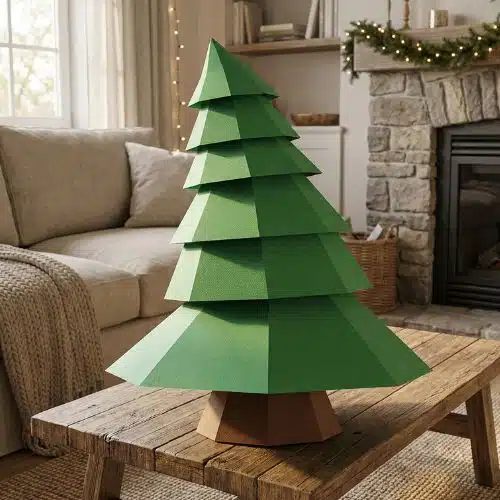
- Geometric Christmas tree – Instead of (or in addition to) a real tree, build a papercraft tree: it has flat, low-poly faces, can be any color you like (traditional green, snow white, designer red…), and won’t lose its thorns ????. We offer several 3D origami tree models in different sizes.
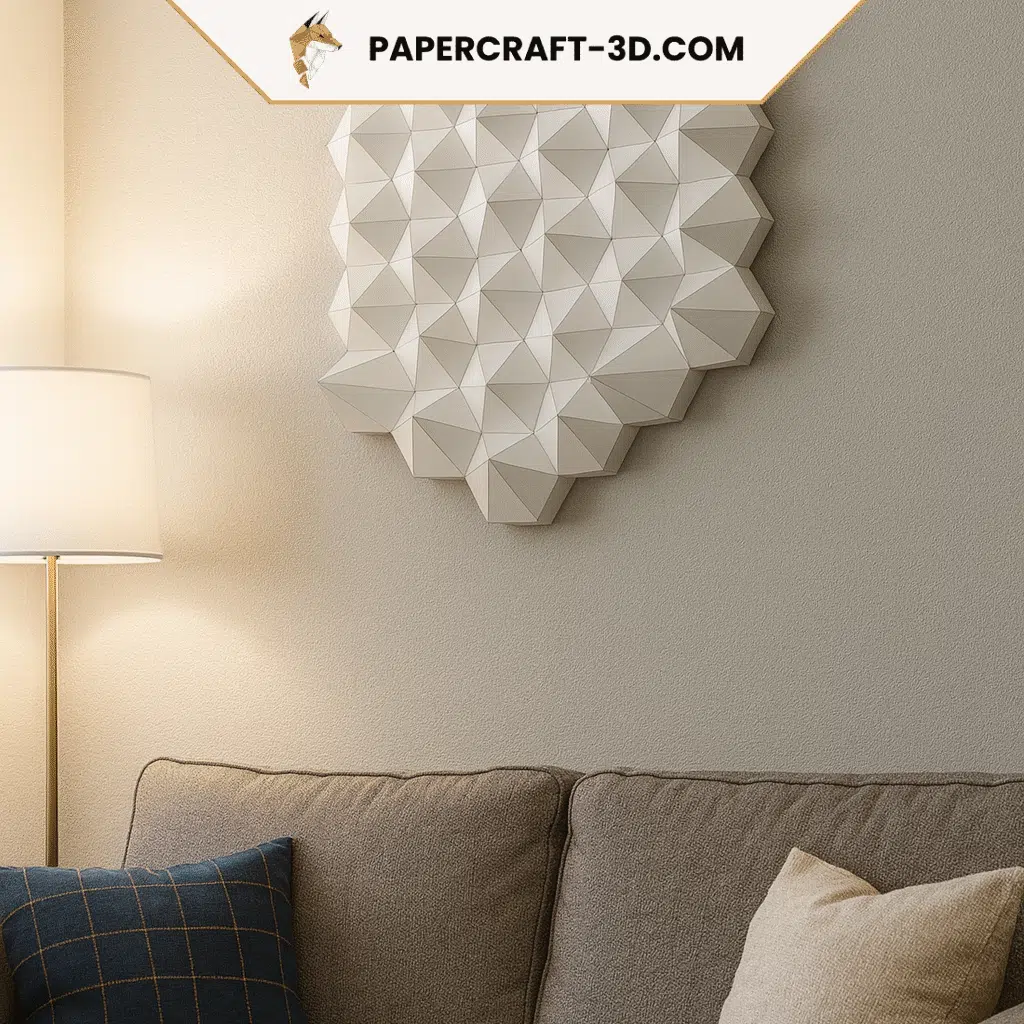
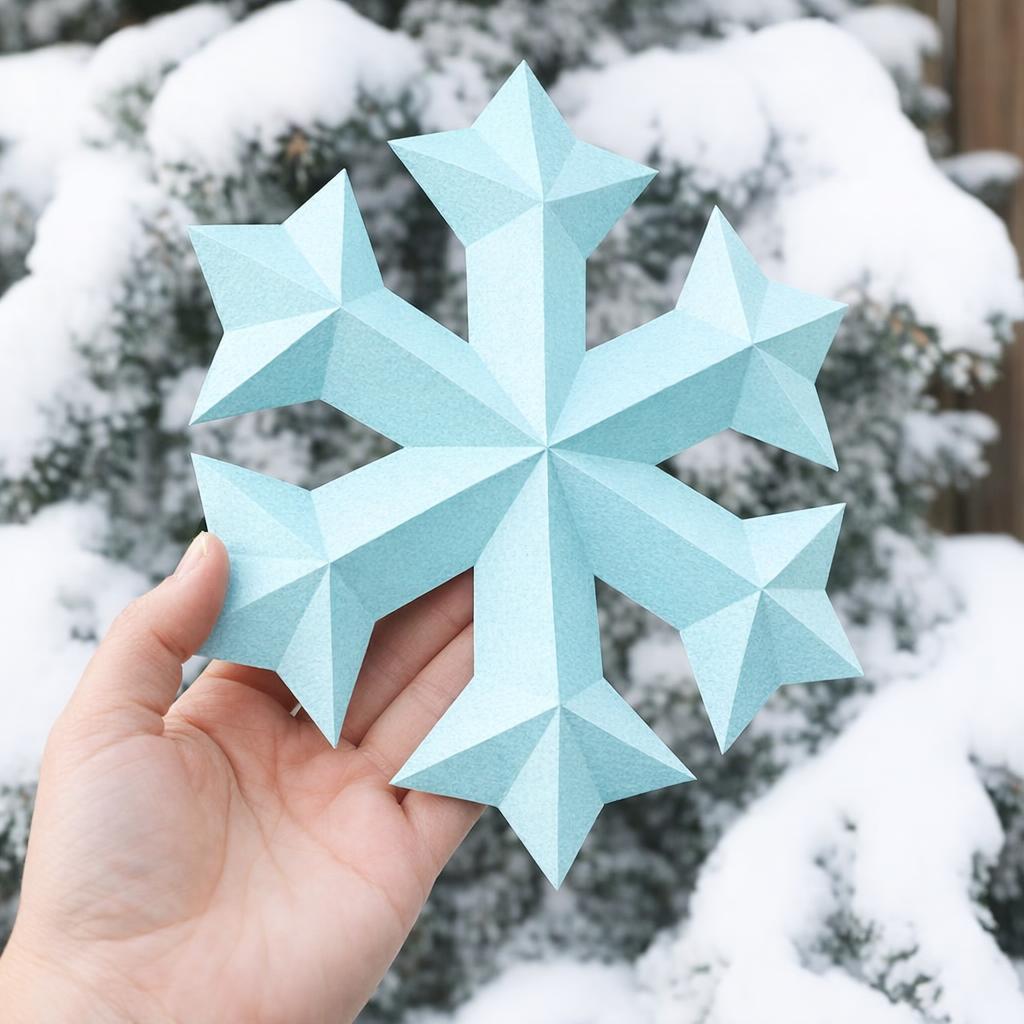
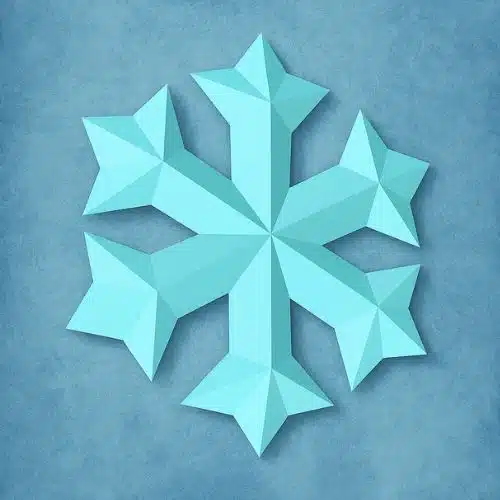
- 3D stars to hang or place on the mantel – Magnificent, volumetric stars measuring approx. 30 cm, which can be placed on the mantel or hung as a festive ceiling light. With gold or silver glitter paper, the effect is chic! These highly symmetrical papercraft stars are an instant eye-catcher.
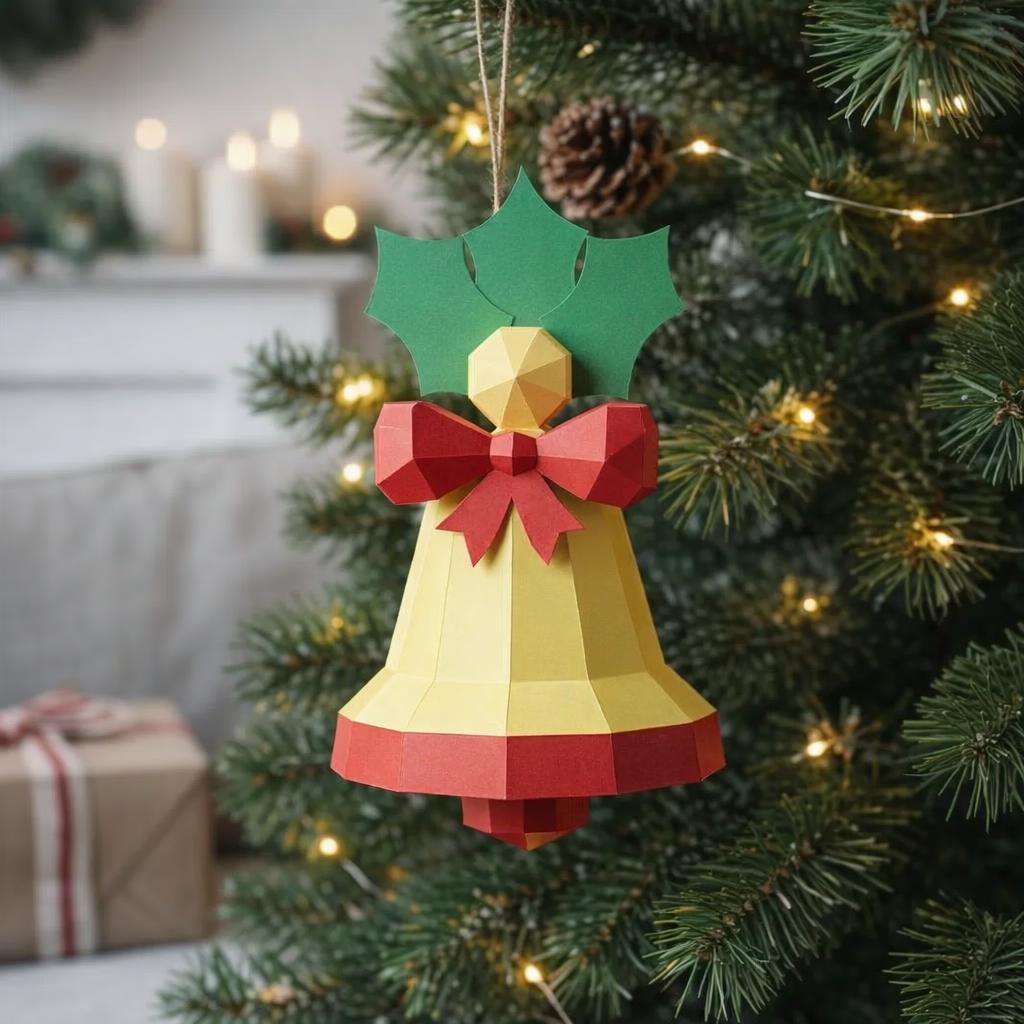
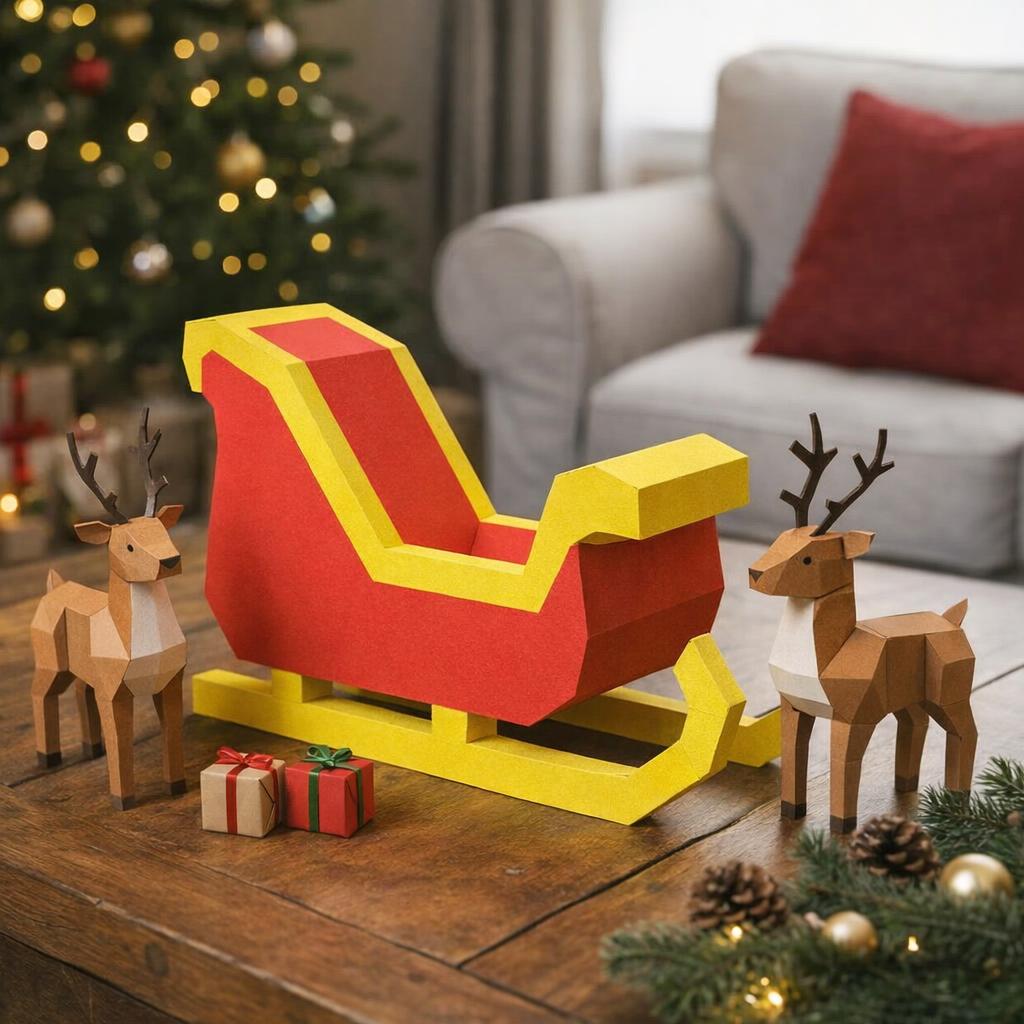
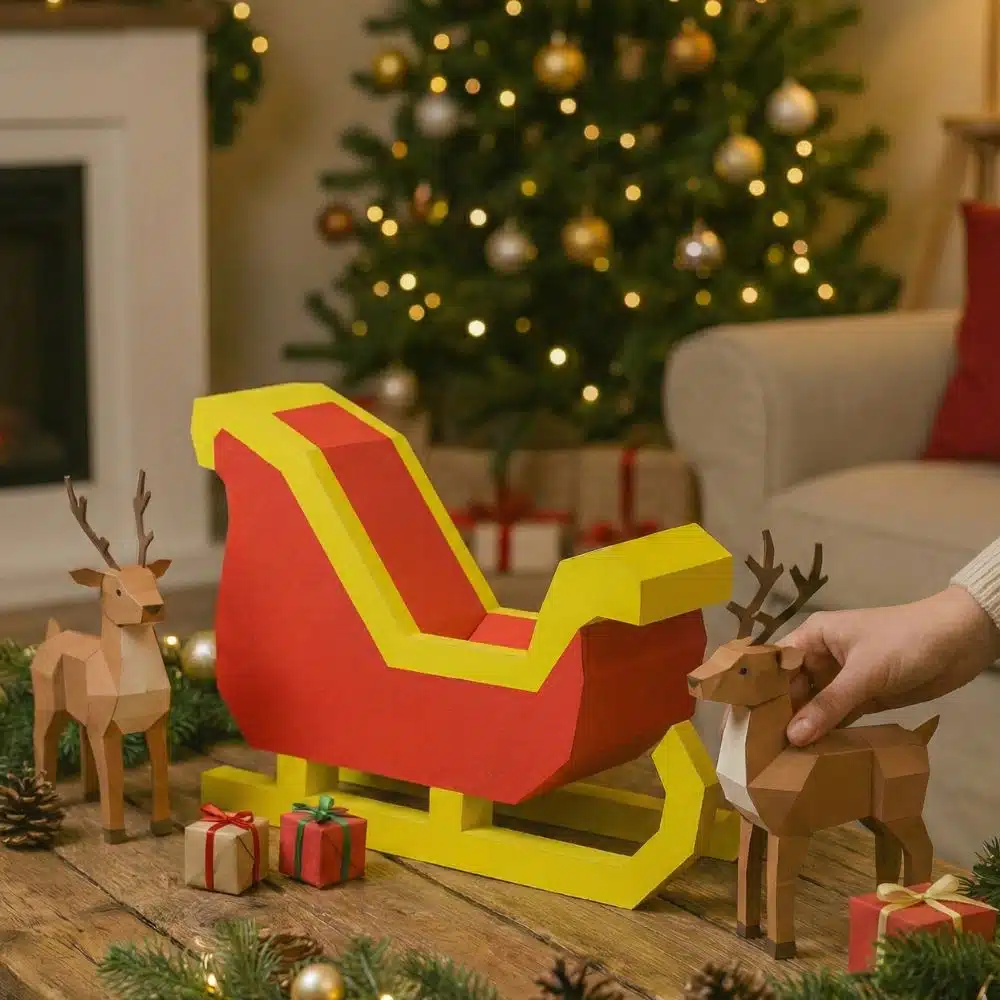
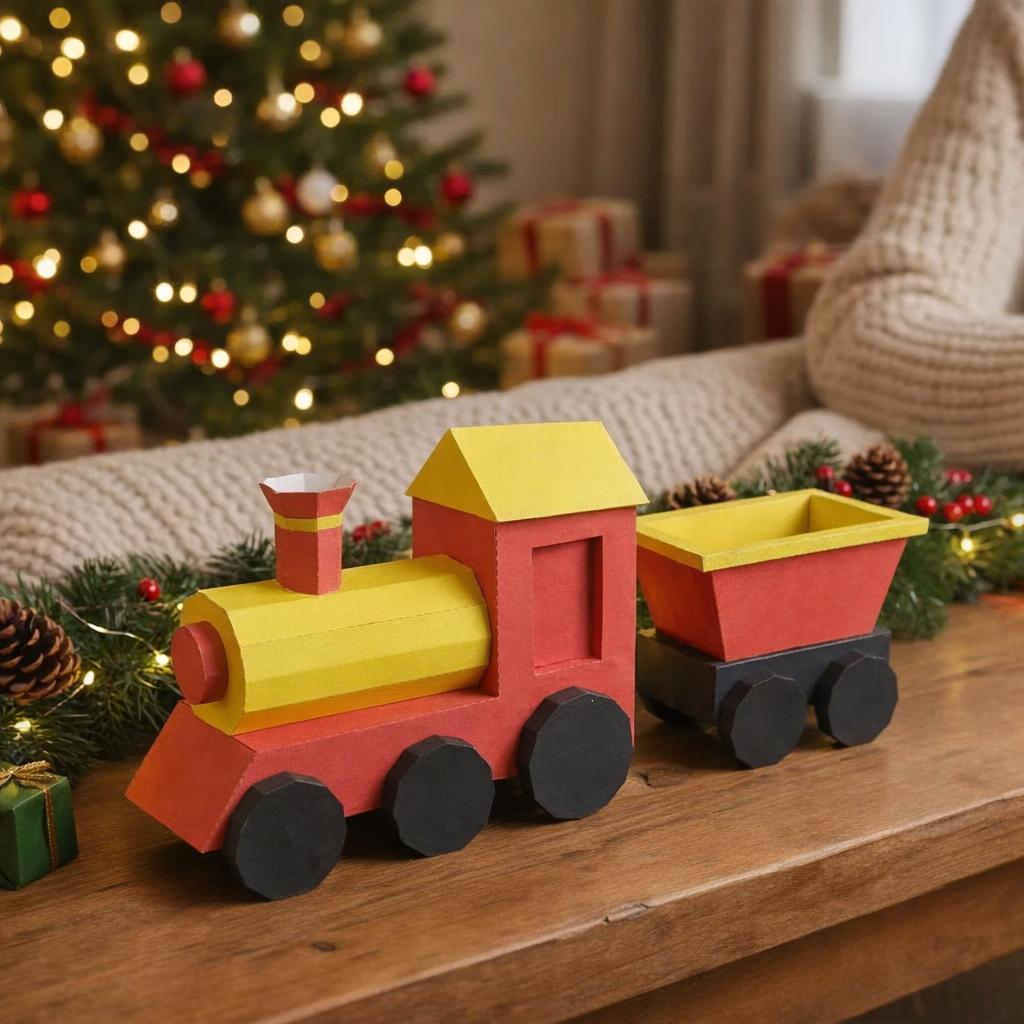
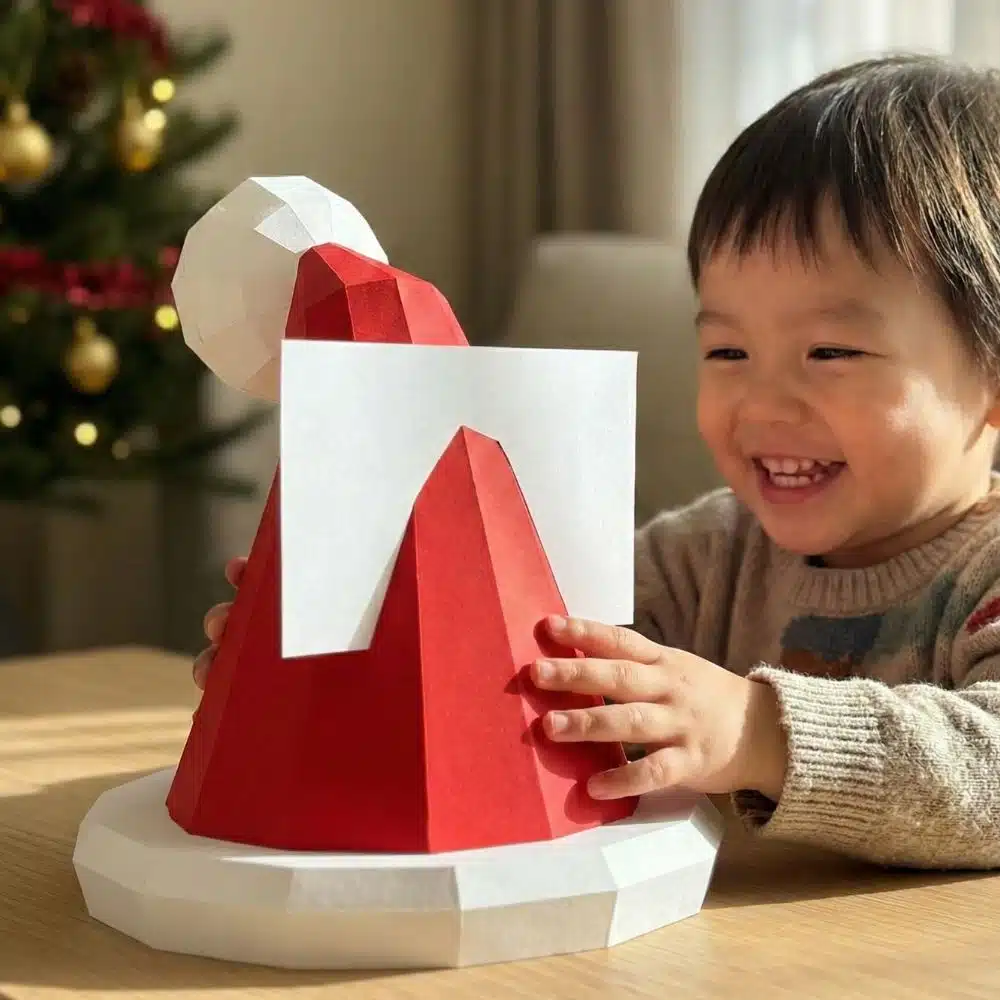
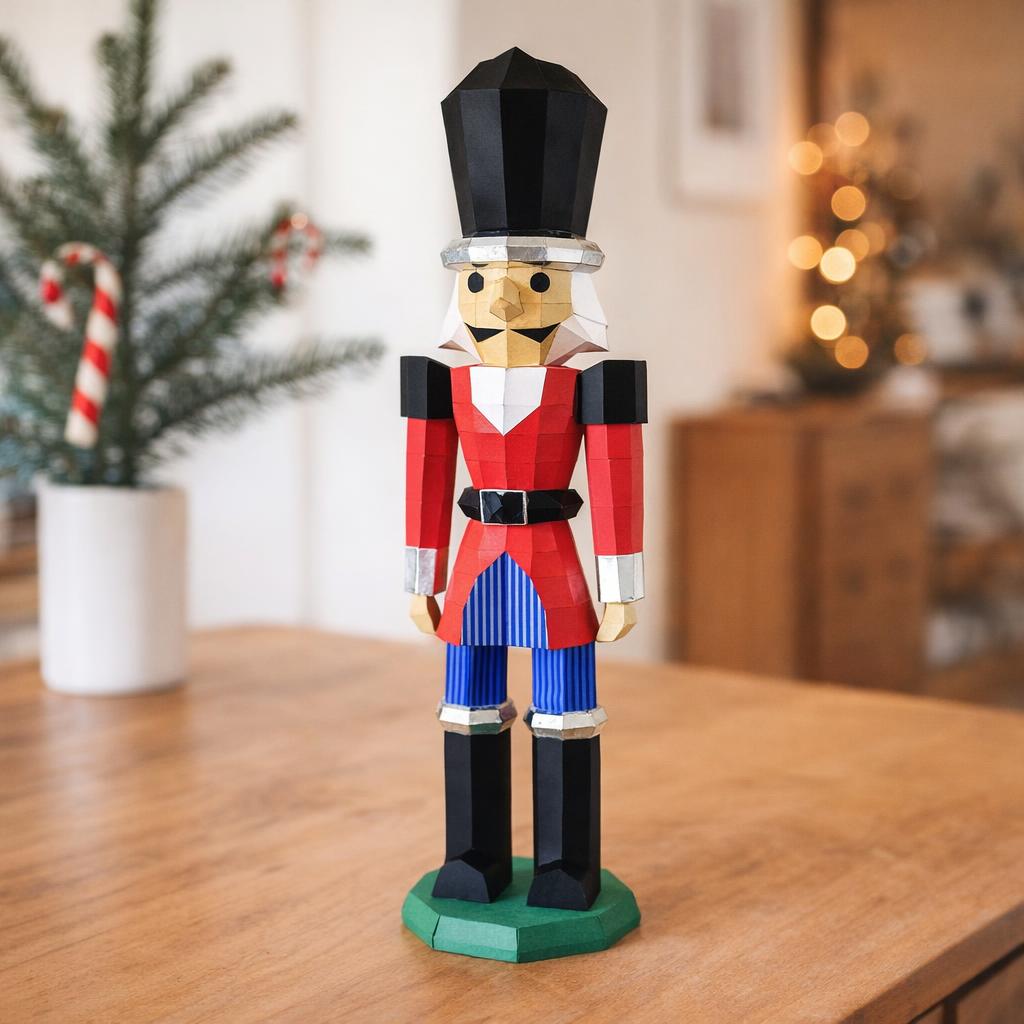
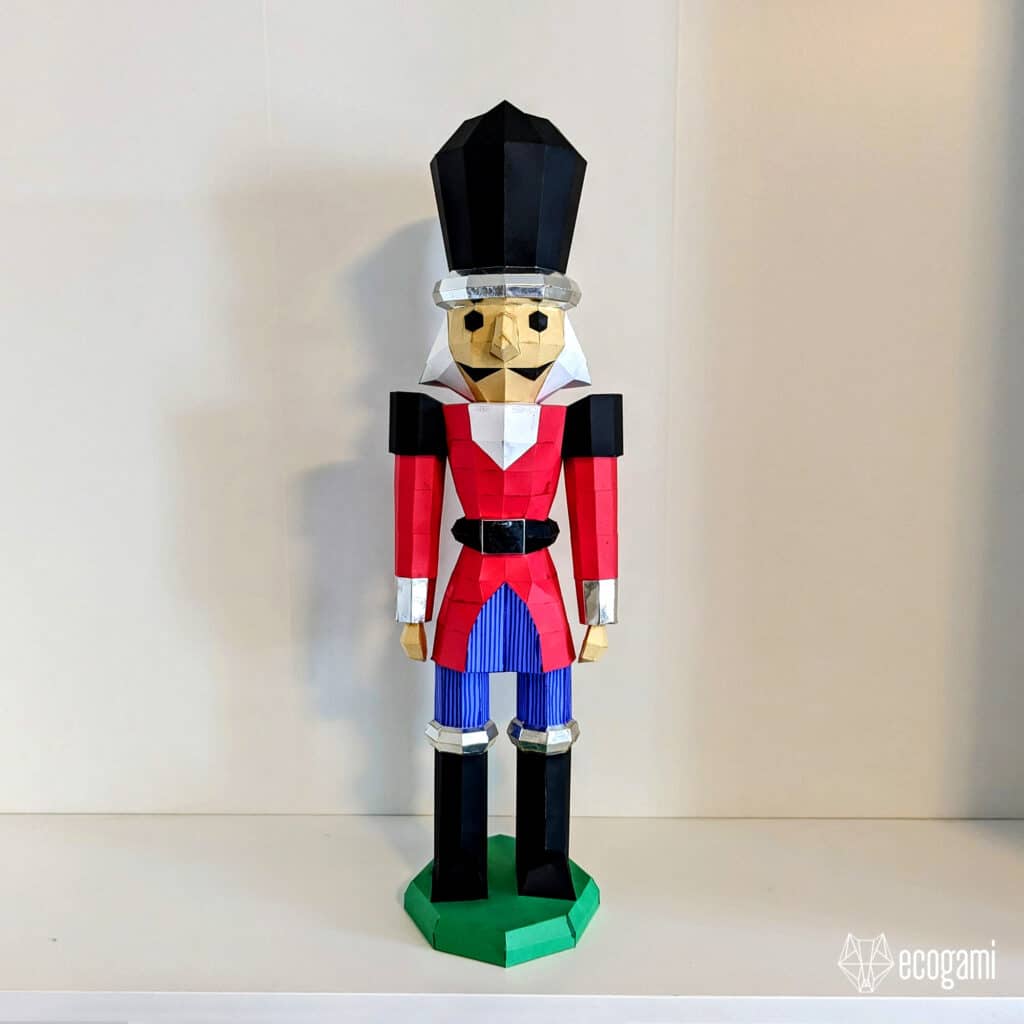
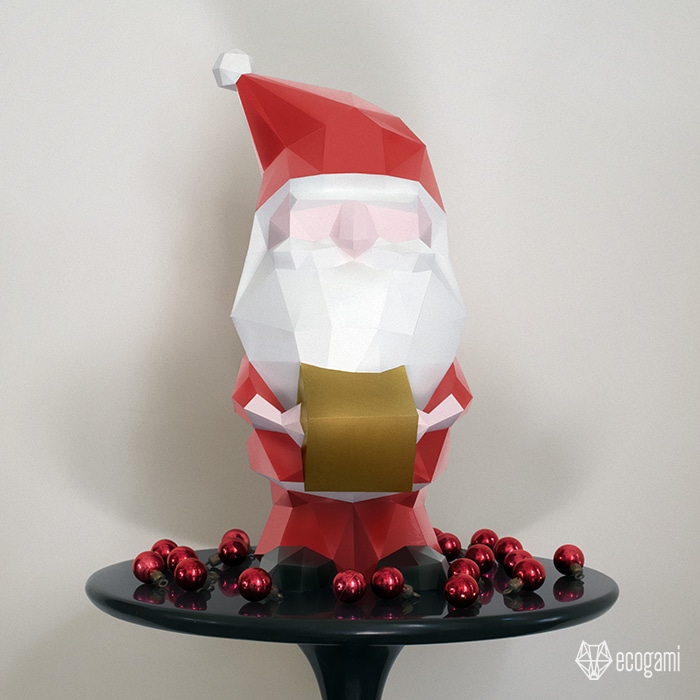
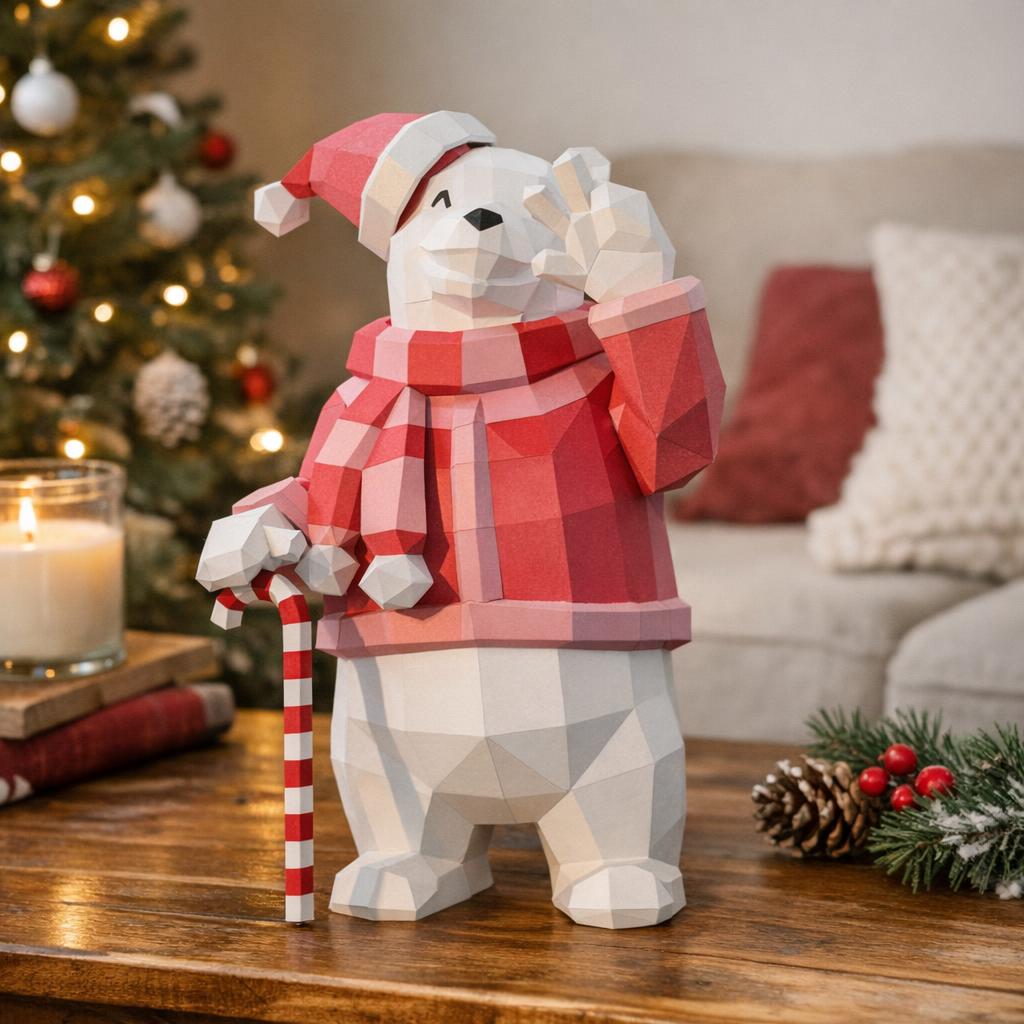
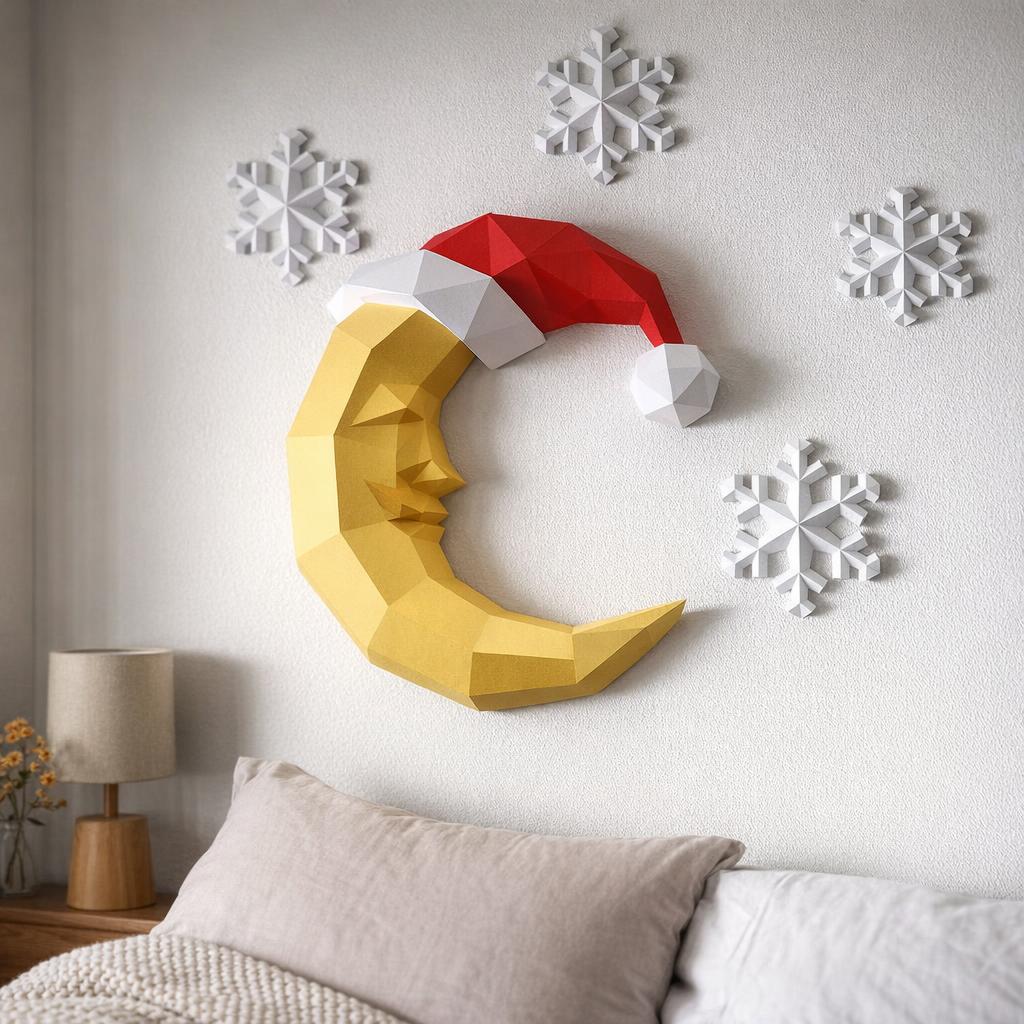
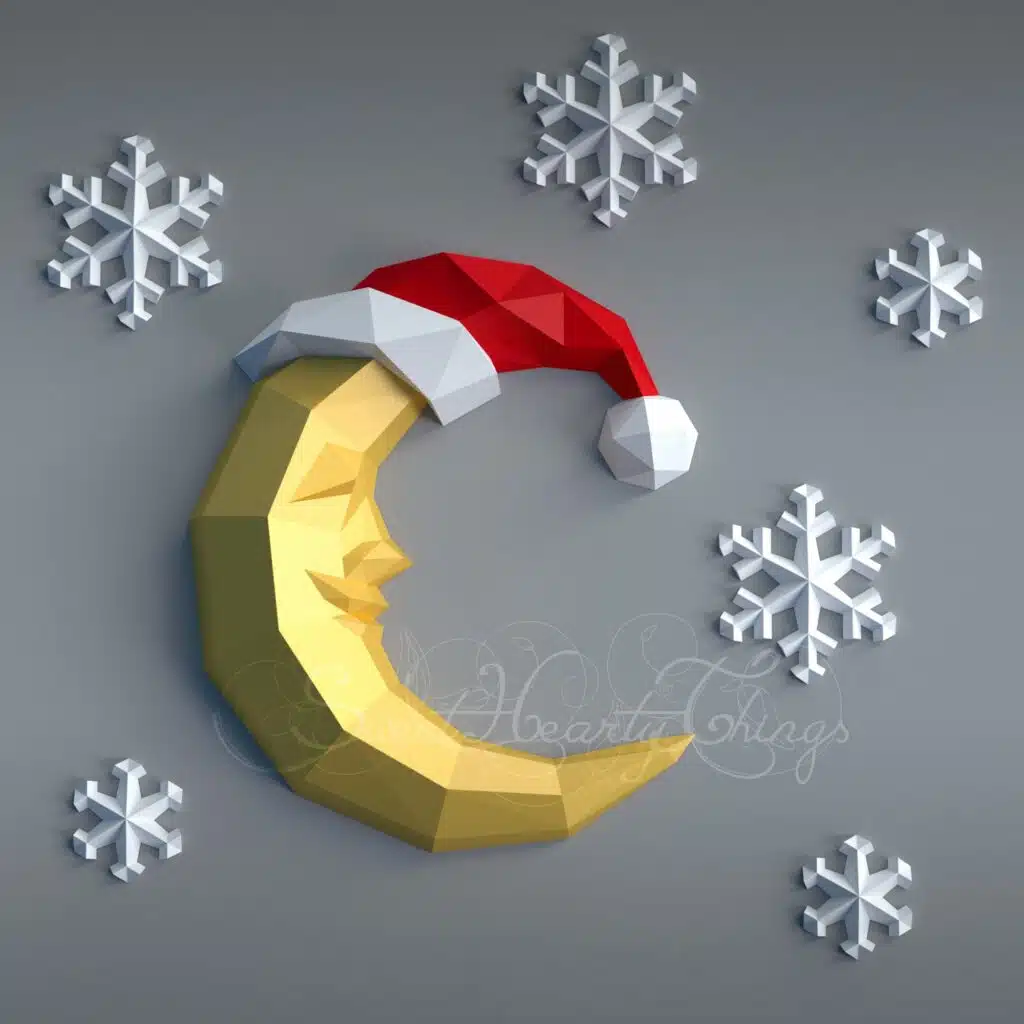
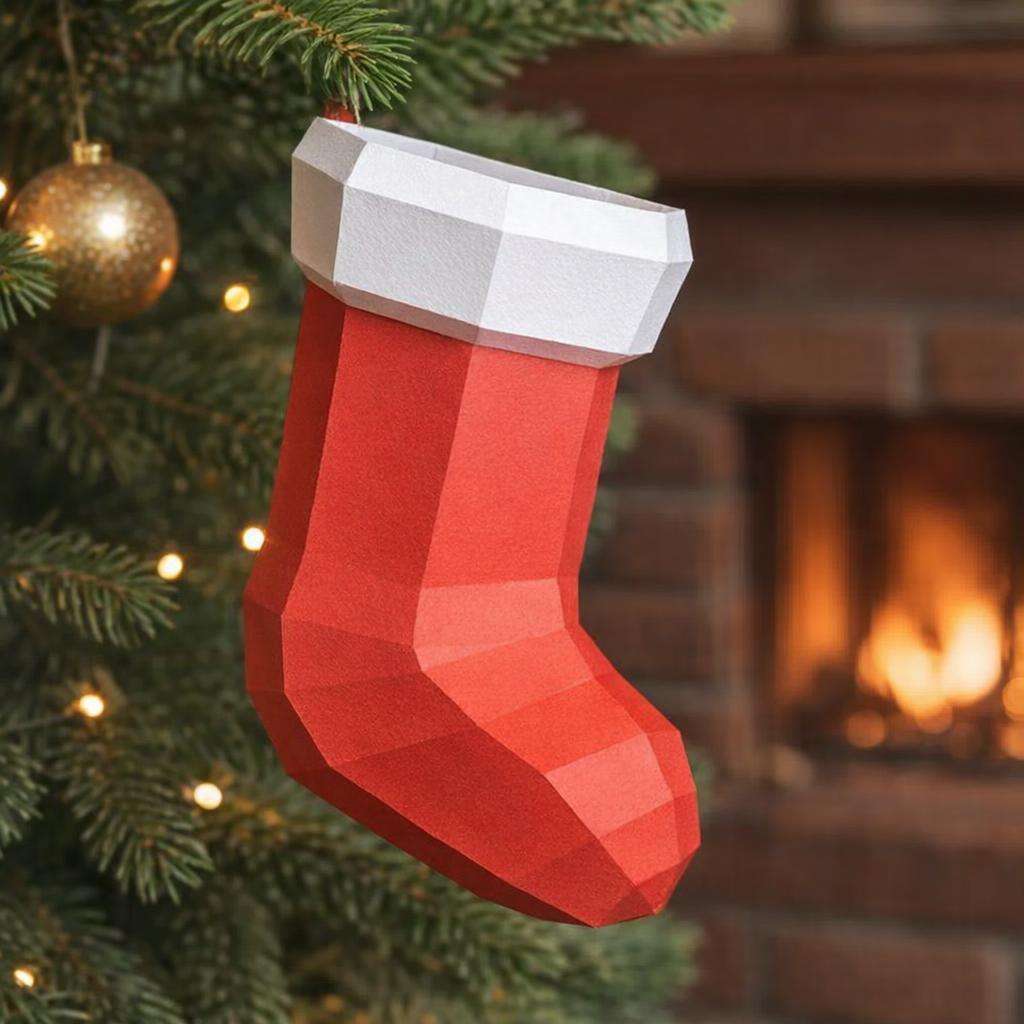
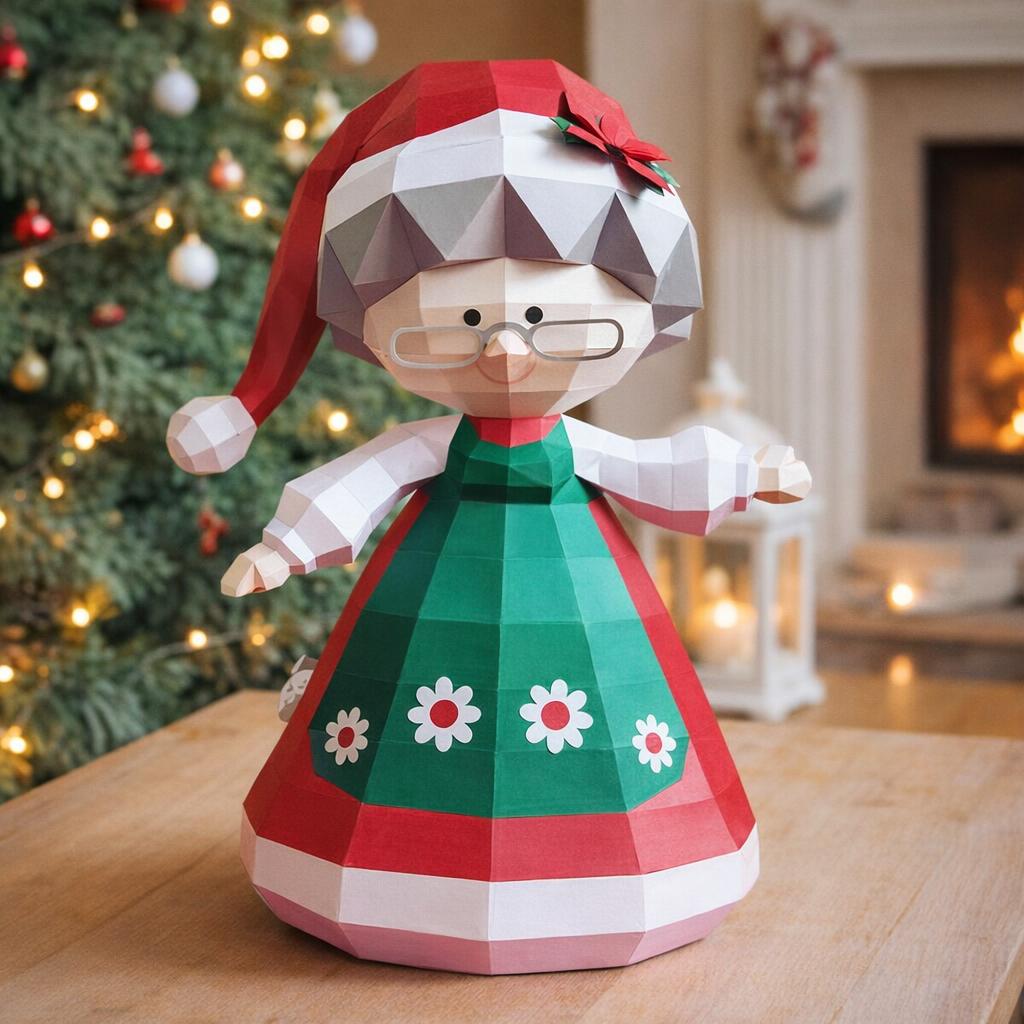
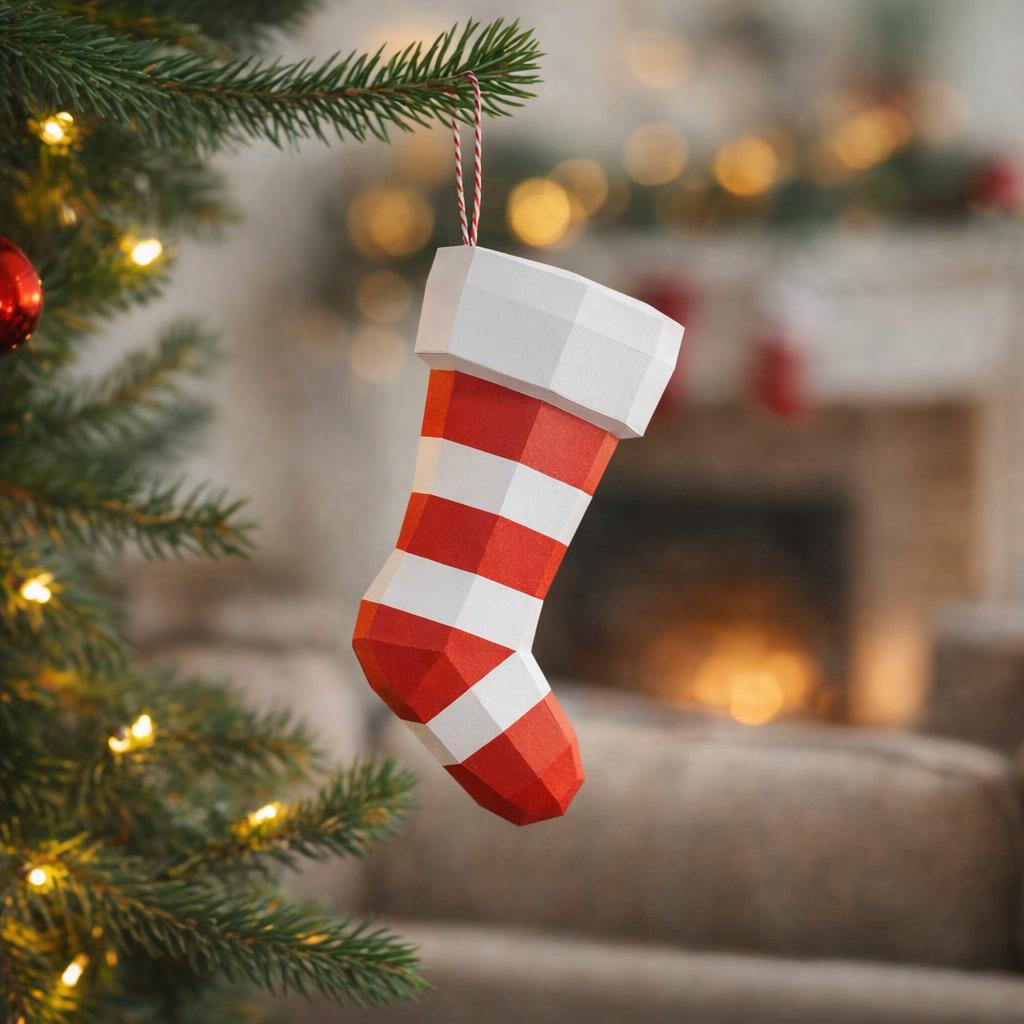
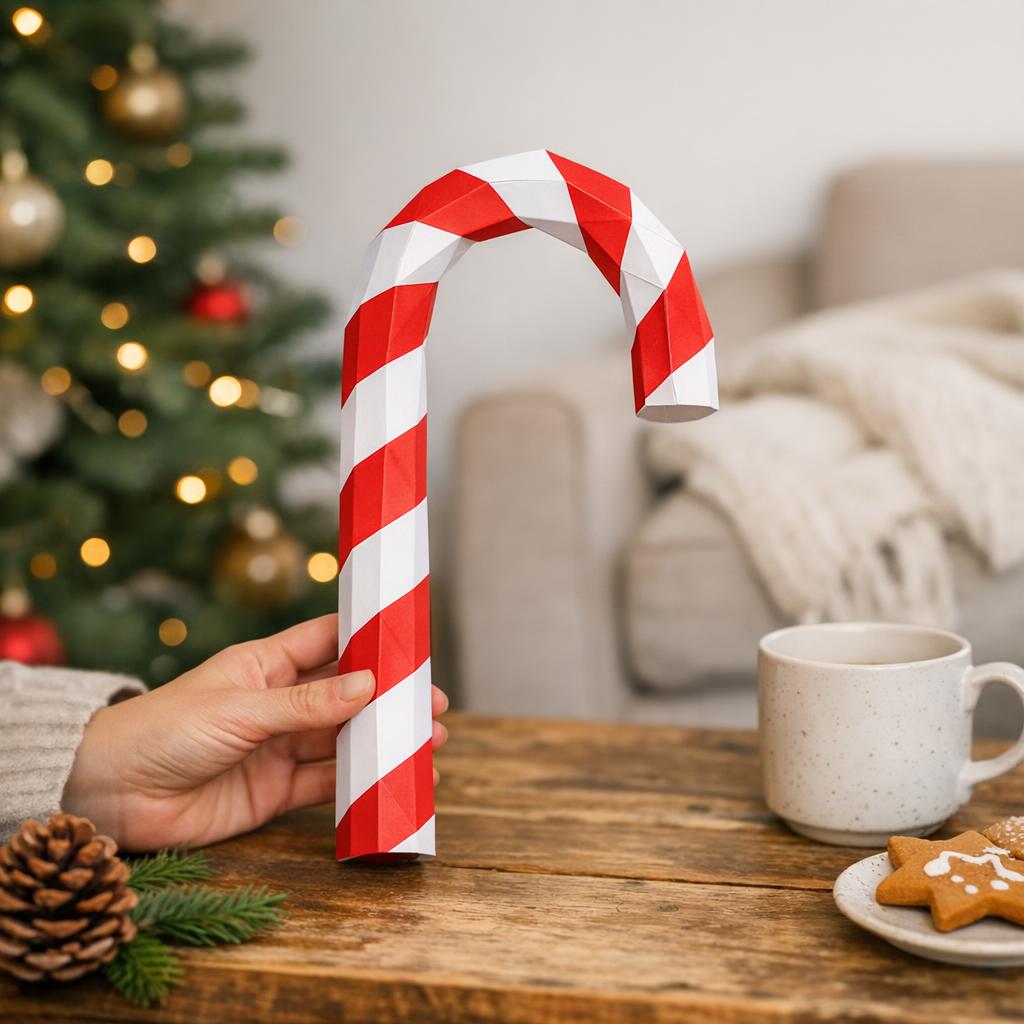
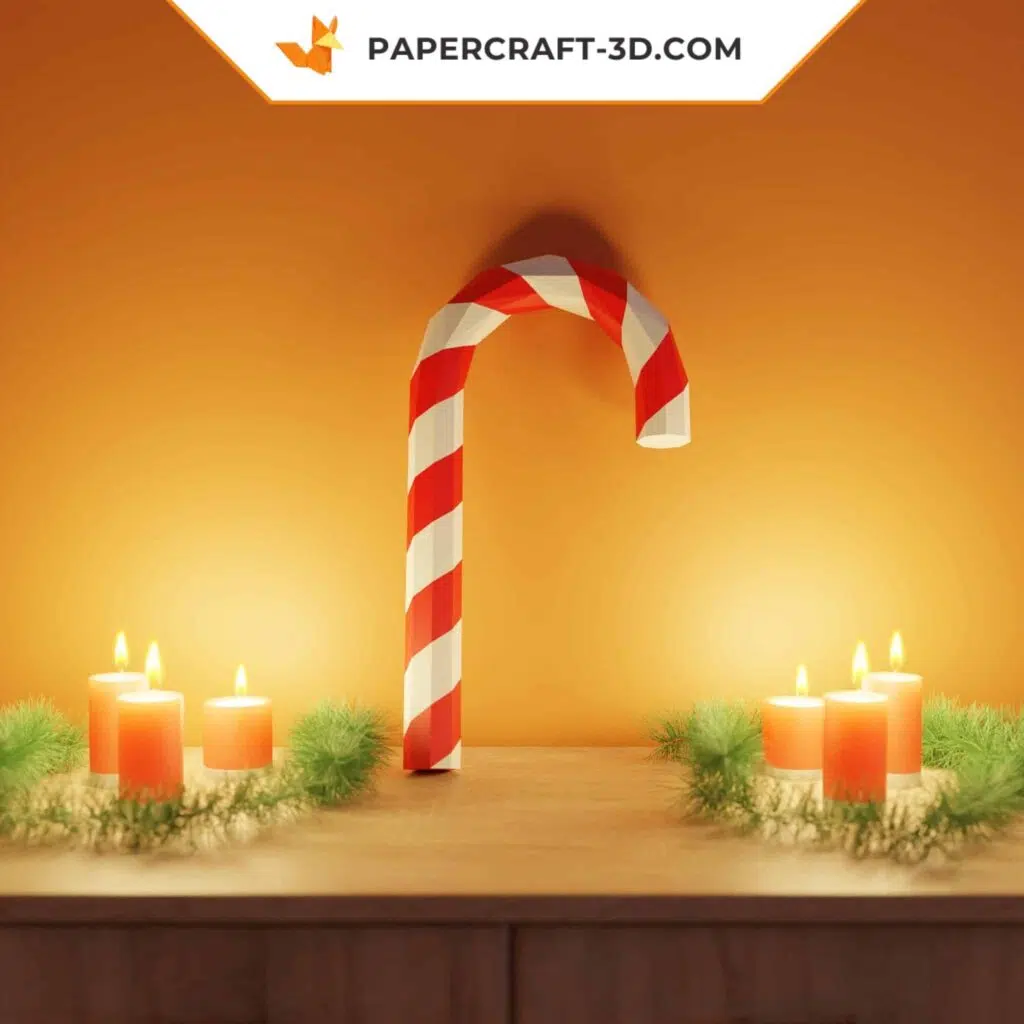
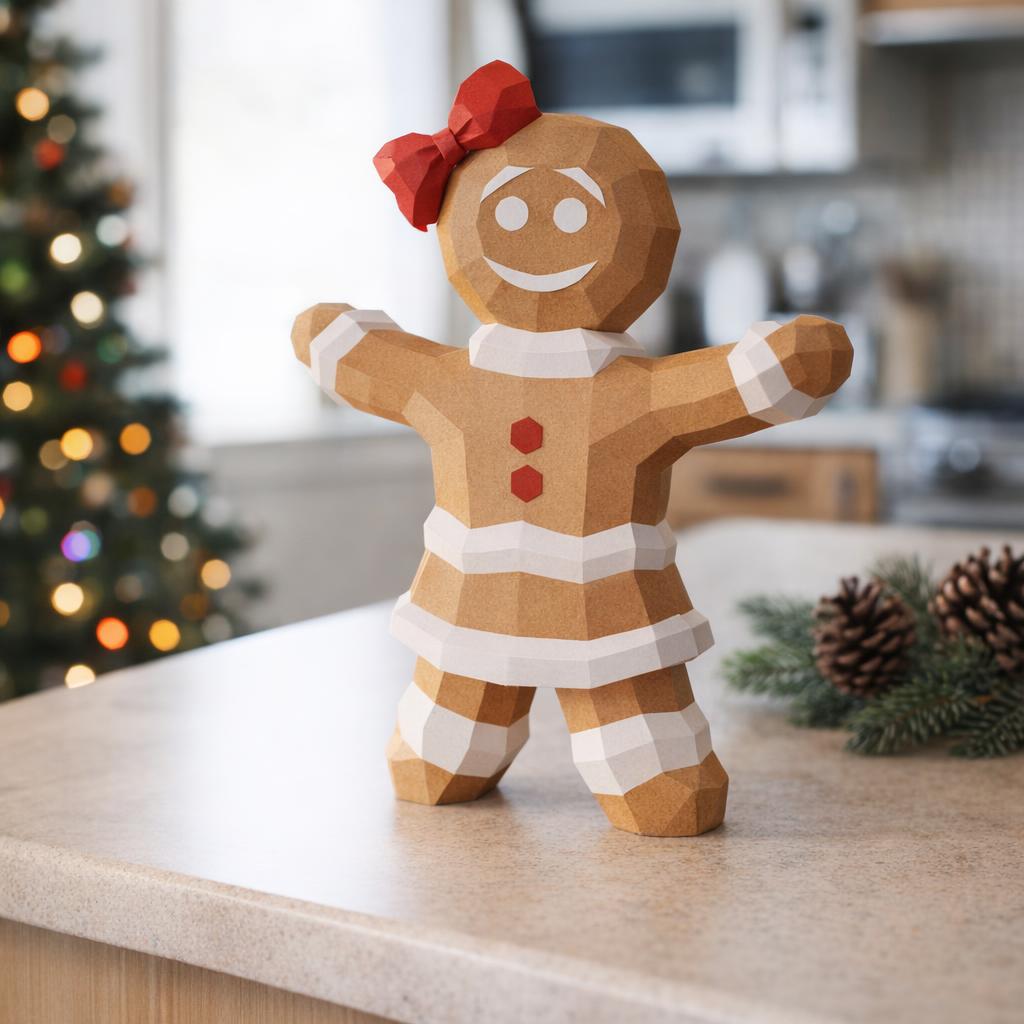
- Papercraft Christmas figures – For example, a little polyhedral Santa, or a snowman, or even a 3D Santa’s sleigh… The possibilities are endless. We even have a kit for a set of small 3D origami Christmas objects (gifts, candy canes, Christmas canes, etc.) – perfect for sprinkling on the table or at the foot of the tree.
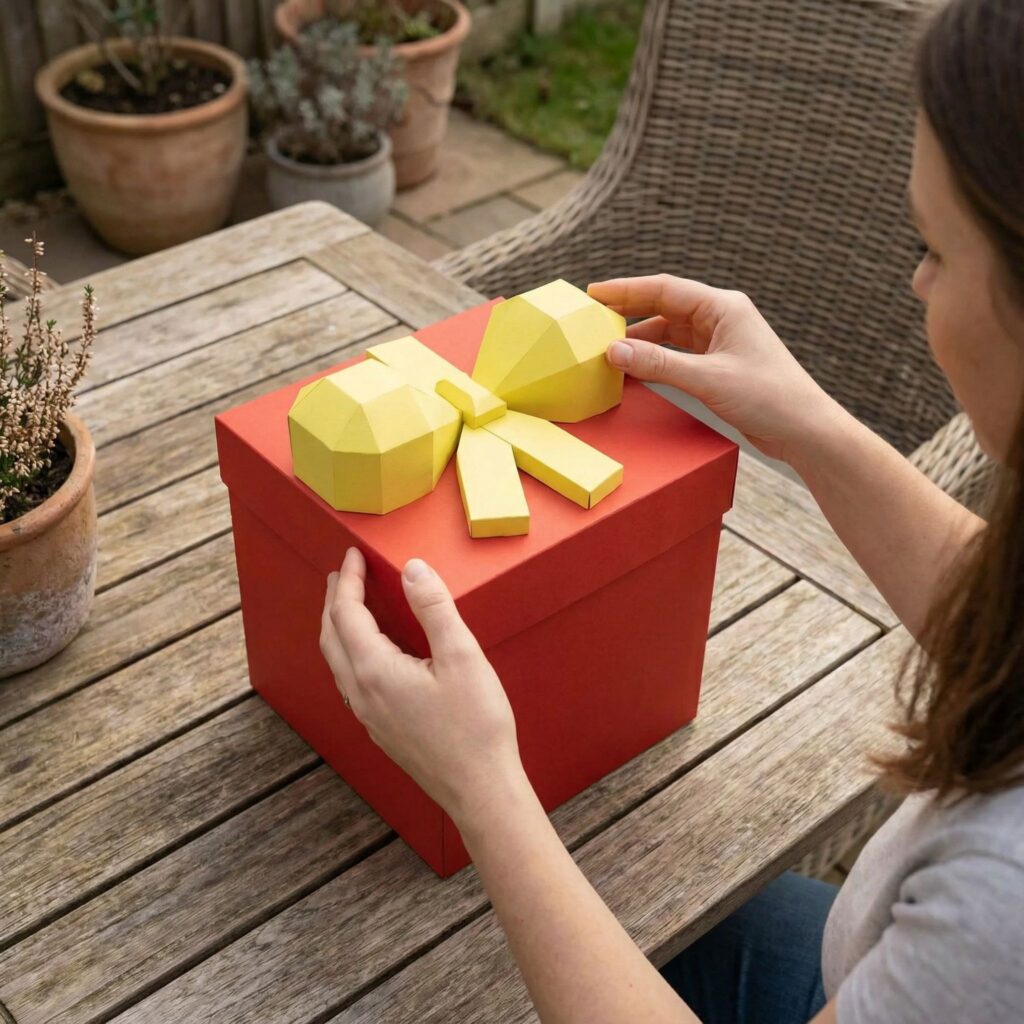
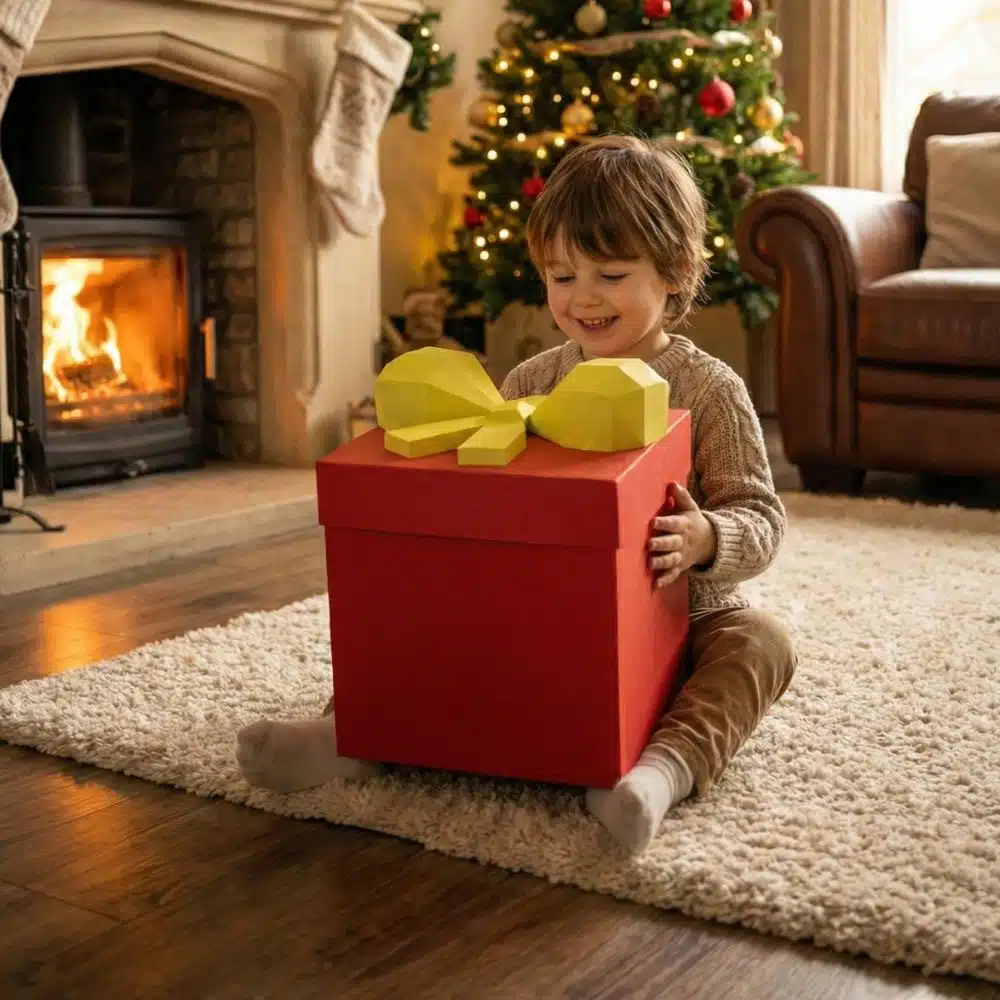
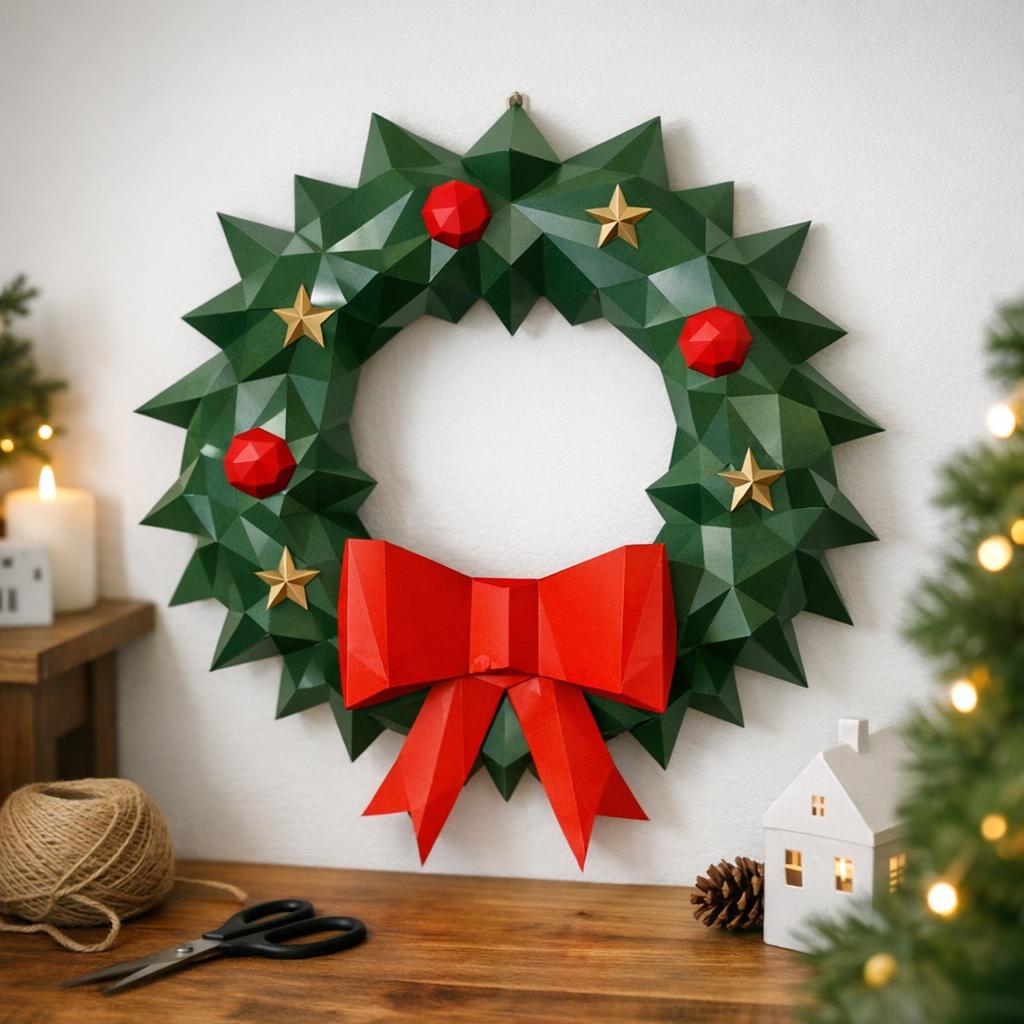
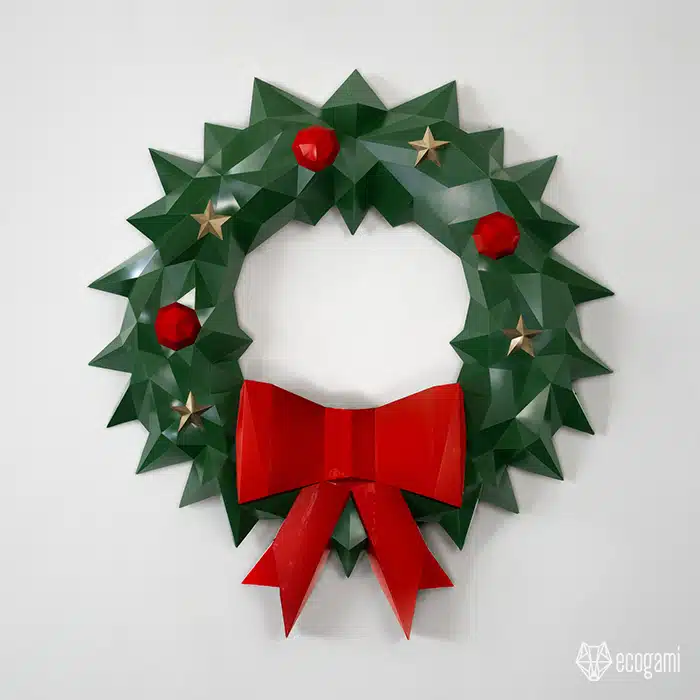
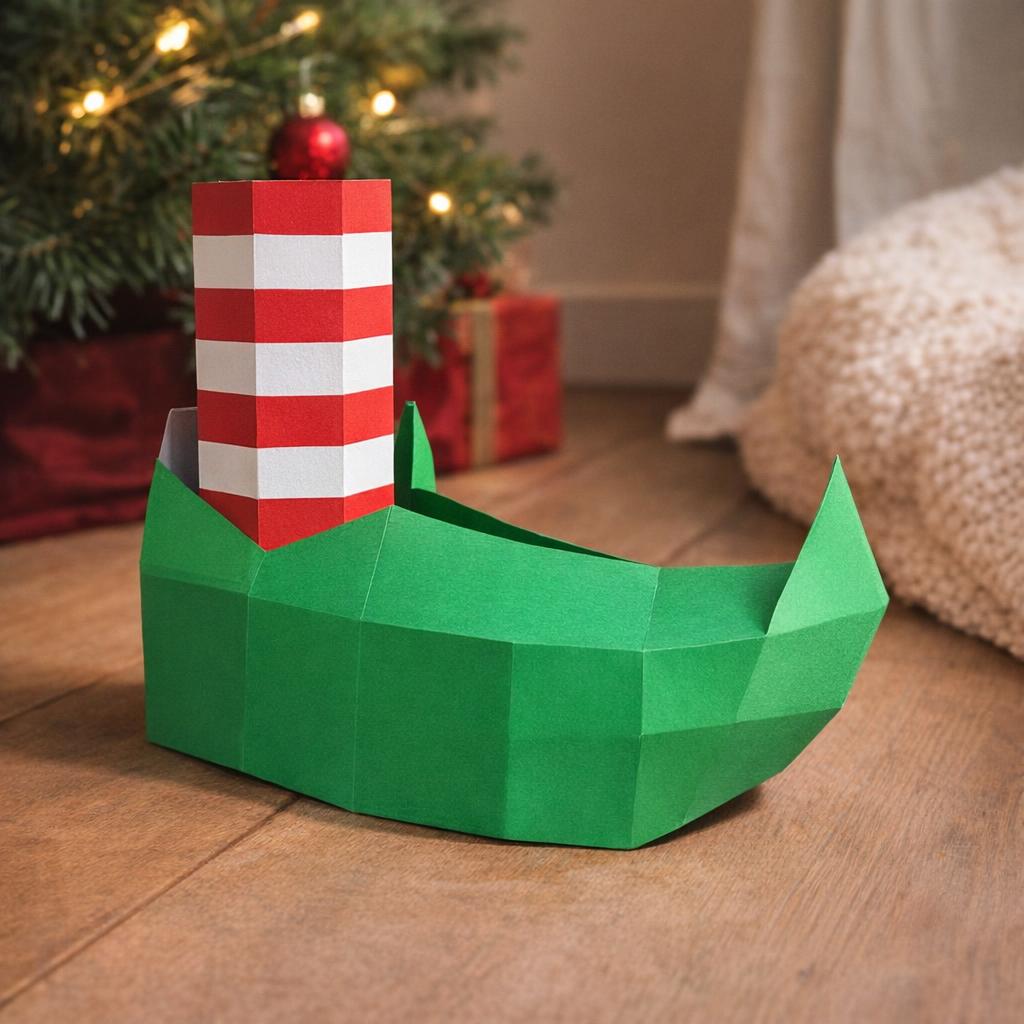
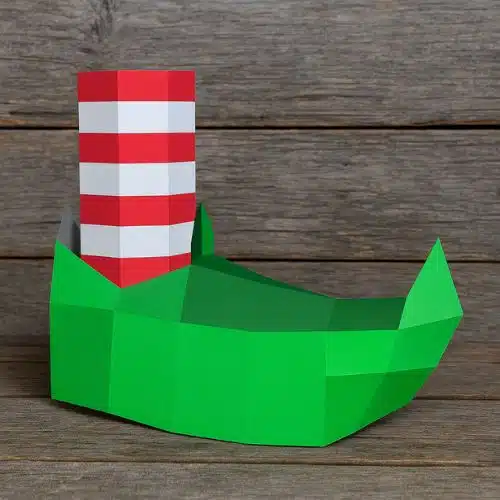
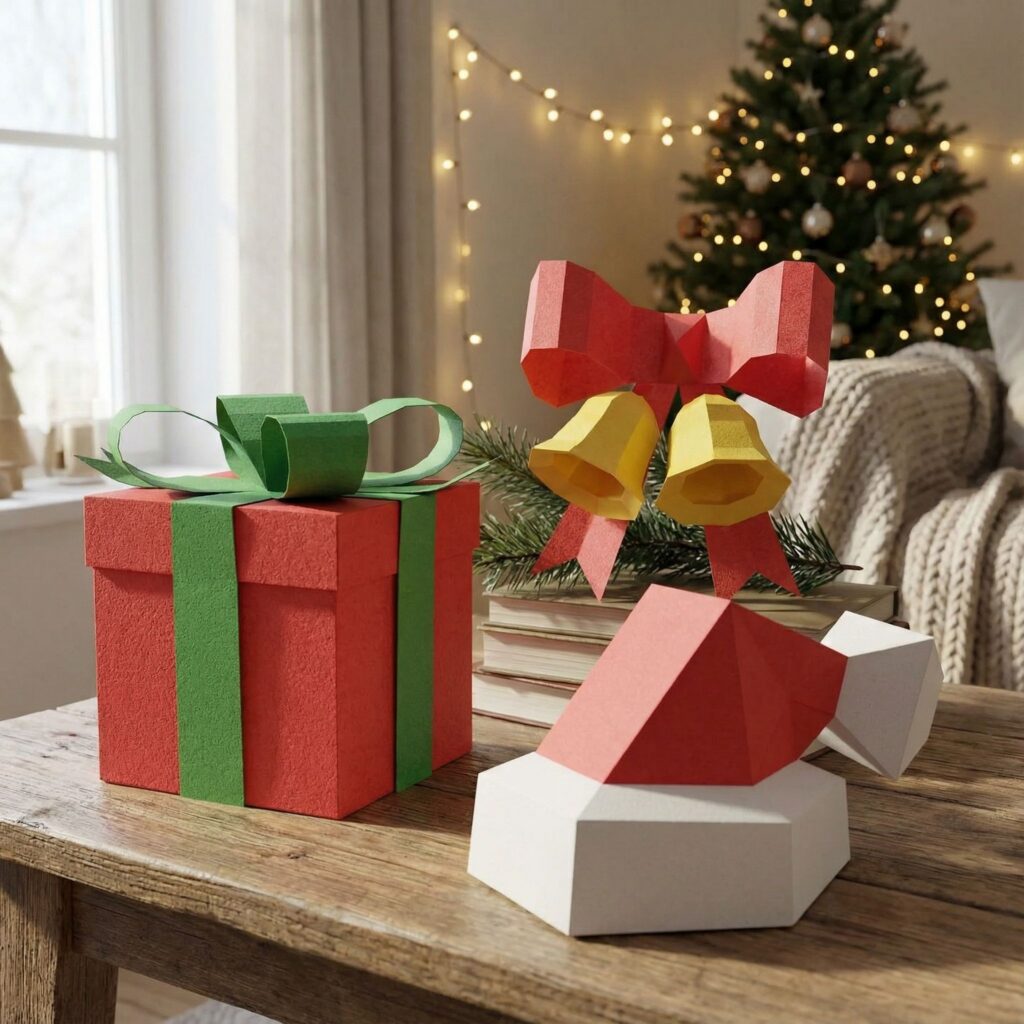
- Accessories and ornaments – Papercraft door wreaths (yes, in volume!), 3D Advent wreaths, or gift boxes in the shape of paper houses… You really can imagine it all. Including festive masks (reindeer masks, elf masks), for homemade costumes on New Year’s Eve.
Advantages of 3D papercraft: your decorations gain in presence and originality. They’re no longer just flat elements stuck to the wall: they’re objects in their own right, and can become central pieces of your Christmas décor. A paper reindeer on a sideboard is much more eye-catching than an ordinary garland!
Of course, papercraft requires a little more time and attention to detail. If you’re just starting out, start with easy models (level 1 or 2 on our difficulty scale). For example, a 20 cm Christmas tree or a small star. It may take you 1 hour to assemble. Then, with experience, you’ll be able to try your hand at more complex models (allow 3 to 5 hours for a large trophy, for example).
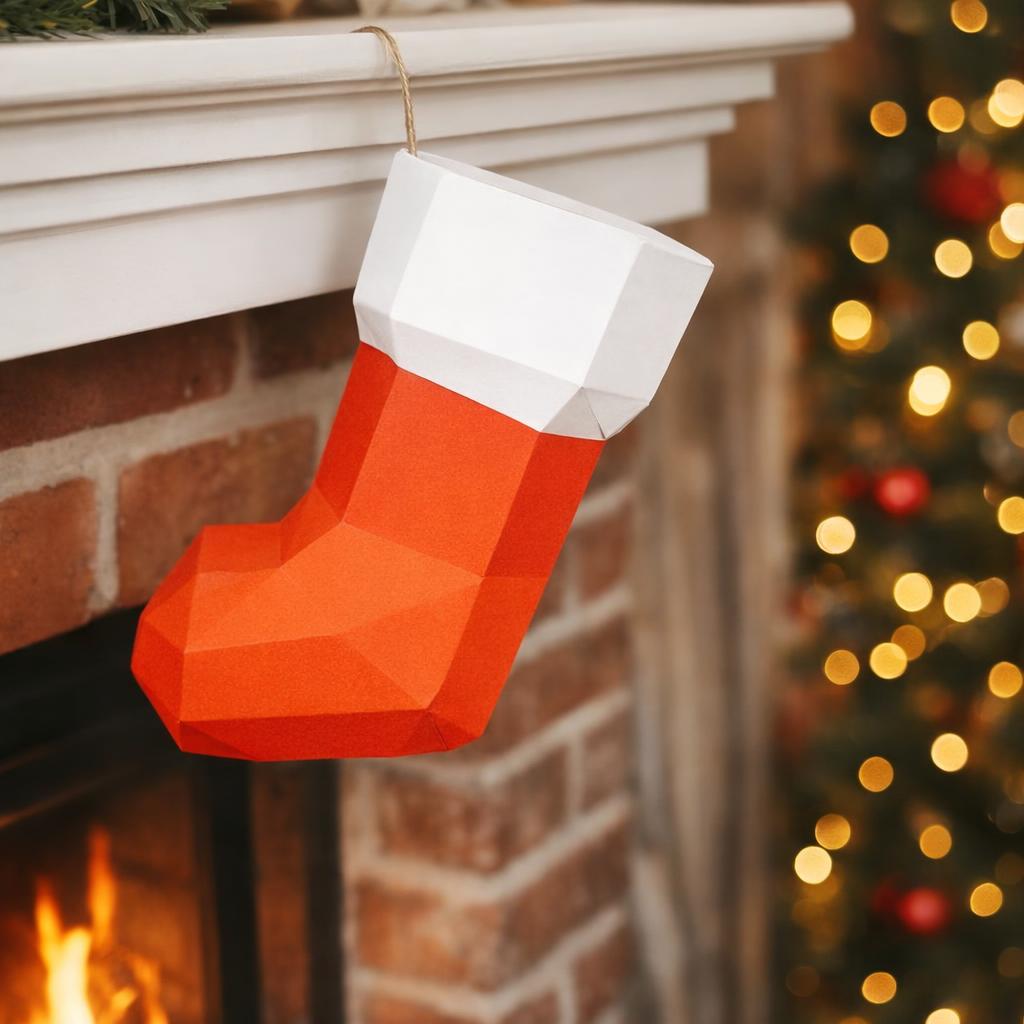
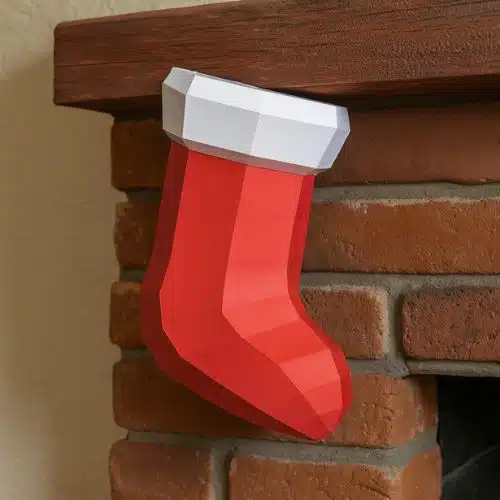
The best way is to buy a complete papercraft kit: you’ll have all the parts already printed (or pre-cut, depending on the kit) and ready to assemble, with an instruction manual. At Papercraft-3D.com, we offer over 1,500 3D origami and papercraft models, in printable PDF versions or as physical kits. Our special Christmas collection includes Christmas trees, snowflakes, reindeer, socks, Santa Claus, etc., so you can create a complete 100% DIY decoration by mixing our kits with your own creations.
A little feedback to reassure you: many people initially believe that papercraft is “too hard for them”. Then they try a model… and they’re won over. ” I love putting this butterfly together, it’s so easy and looks great on my wall – I recommend it!” one customer told us after her first try. All you have to do is get started and take it step by step. And why not make it an activity for couples or friends? With two people, it’s even more fun to take turns cutting and gluing.
Finally, note that papercraft goes well with the previous ideas. For example, you could add cut-out paper snowflakes to your papercraft reindeer trophy, or insert a small LED garland inside an openwork papercraft tree to light it up… Mix and match techniques: DIY is a playground!


Equipment and tools: the perfect designer’s kit
As mentioned above, the material requirements are simple. Let’s summarize what you need to make your Christmas creative workshops a success:
- Scissors: a good pair of scissors is all you need for many projects. Make sure they cut well (paper cleanly, without tearing). For small shapes, a pair of precision scissors (thin blades, like sewing scissors) is a plus.
- Cutter or scalpel: indispensable for cutting inside motifs (lantern windows, fine flake details). Always work on a support (cutting board) to avoid damaging the table, and with care.
- Glue: white universal glue (Cleopatra-type vinyl glue or school glue) works for most papers. Apply a thin layer to avoid soaking the paper. Hold for a few seconds, as it sets quickly. For children, use glue sticks (cleaner). For gluing that requires speed or on thick cardboard, a hot-glue gun can be useful, but beware of little ones (risk of burns). Double-sided tape is a good, clean alternative for certain assemblies (such as closing a shape from the inside).
- Pencil, ruler, eraser: for tracing your designs before cutting, or for marking reference points. A metal ruler will also help you make straight folds (paper is folded by folding it against the edge of the ruler, for example).
- Punch or needle: useful for piercing small holes (to pass a wire through a decoration, or to mark the beginning of an interior cut-out where you’ll slip the scissors). A simple nail or a large needle stuck in cork can be used as a craft punch.
- Twine, ribbons: hang your decorations or decorate them. A red and white baker’s twine gives a traditional look, a satin ribbon an elegant one… Choose according to your style.
When it comes to organization, remember to protect your workspace (especially with any glitter or paint!). Work on a large, well-lit table. Keep a damp cloth or paper towel nearby to wipe up glue spills.
If you plan to make papercraft regularly or in quantity, you can invest in bonus tools:
- Bone folder: this plastic or bone tool marks folds clearly without damaging the paper. Very useful for folding papercraft tabs quickly, or making beautiful origami folds on thick paper.
- Electronic cutting machine ( Cricut or Silhouette type): this is a plotter that cuts paper according to a vector pattern. If you’re a big fan of DIY paper, this investment could change your life. You can use it to cut out your flock shapes, labels, etc., with surgical precision. Some Papercraft-3D models come with compatible files (SVG/DXF format), so you don’t have to cut anything manually: the machine does the work, and all you have to do is fold and paste ????. It’s like the Rolls Royce of high-tech do-it-yourselfers.
- Color printer: to print patterns on your paper or templates. For example, you can print a wood pattern on a sheet and then cut a star into it for a rustic effect. Or simply print color papercraft patterns from our PDF kits. A good inkjet printer will do the trick (prefer normal quality printing on 160g bristol; no need for super-high quality, which may over-ink the paper).
But again, all this is optional. There’s a lot you can already do with the basic equipment everyone has at home. And that’s what makes DIY paper so accessible.
Safety and storage instructions
To make the most of your paper decorations, take care with fire, and store them carefully so they last a long time.
⚠️ Safety: beware of fire and heat
Paper decorations can burn if you’re not careful. Adopt these simple reflexes:
- No flames nearby: Don’t place a paper flake directly on a candle, or glue paper cut-outs to a hot halogen lamp, etc. If you light candles on the table, make sure there are no paper garlands or ribbons hanging over them. If you light candles on the table, make sure there are no paper garlands or ribbons hanging over them. Ideally, replace conventional candles with decorative LED candles that safely imitate the flame (many are now very realistic). In fact, the French civil security authorities recommend that you *”pay particular attention to decorated candles (paper, ribbons, etc.) “* to avoid accidents.
- Electric garlands: preferably use LED garlands, which hardly heat up, and in good condition (no bare wires). Avoid leaving a lit garland stuck to a paper decoration for hours without supervision. The risk is small, but you can never be too careful. Turn off lights when you go to bed.
- Flame-retardant materials: If you’re organizing a public event (school, office), be aware that there are M1-rated (non-flammable) flame-retardant paper or sprays available for treating paper. At home, this isn’t compulsory, but if you’re really concerned, you can spray your large paper pieces with a flame-retardant spray (available from drugstores). It’s invisible and adds a safety margin.
- Secure fastenings: hang your hanging decorations securely to prevent them from falling on a heat source (e.g. a paper hanging that comes loose and lands in the fireplace… that would be a bummer). Use quality adhesive paste or secure hooks.
In short, be as vigilant as you already are with your real Christmas tree or your electric garlands. Paper is fine, as long as you keep it away from the fire. Every year, there are fires caused by a too-dry tree or a misplaced candle; but a well-used paper decoration won’t let you down ????
???? Sustainability: preserve and reuse your paper decorations
One of the advantages of paper DIY is that, unlike ephemeral decorations that we throw away, we can reuse our creations year after year. Here’s how to keep them in good condition:
- Dust removal: at the end of the season, if your paper hanging baskets have gathered dust, wipe them down with a soft feather duster or blow gently over them (a hairdryer in cold air mode works well for removing dust without damaging them).
- Clever folding: many paper decorations can be folded flat. For example, giant rosettes/starbursts in paper bags: don’t glue them completely, preferring to fix them with a paper clip or a knotted thread, so that you can flatten them once the festivities are over. Similarly, a paper garland can be wrapped around a piece of cardboard to prevent tangling and creasing.
- Storage box: store everything in a cardboard box or large, thick envelope. Avoid damp (cellar) or too hot (uninsulated attic) places, as paper doesn’t like humidity or extreme temperature variations. An inside cupboard is perfect.
- Labeling: write “Décos Noël – Fragile” on the box. This way, you or your loved ones will know to take good care of it and not accidentally throw it away the following year thinking it’s an old parcel ????.
Properly preserved, your paper decorations can live through several Christmases. Some people reuse cut-out snowflakes for 5 or 6 years without any problem. And if one or other ornament gets damaged, it’s no big deal: it’ll give you a chance to make a new one! The aim is not to be disposable, but to create a little “treasure trove” of handmade decorations that you’ll be happy to return to every year – just as you would if you were bringing out your traditional garlands and baubles.
F.A.Q. – Your frequently asked questions
❓ How to make a paper Christmas star easily?
Answer: The easiest way to make a paper star is to start with a basic shape and fold it. For example, the 5-pointed star: cut a strip of paper about 1.5 cm wide and 30 cm long. Tie a loose knot at the beginning of the strip, then flatten it to form a pentagon (5 sides). Then fold the long strip around this pentagon, following the sides, until only a small end remains; slide this end inside the pentagon. The result is a small, flat 3D star (the “lucky star” technique). Alternatively, for a larger star, you can fold the tips separately and glue them together. Another super-easy option: cut two identical stars from thick paper, slit one from top to bottom to the center, the other from bottom to top, and fit them into the slits: you’ll have a volume star that stands upright.
❓ Which paper to use for Christmas origami (snowflakes, cranes…)?
Answer: For origami, we recommend using a thin but strong paper, typically traditional origami paper (approx. 80 g/m²). It folds well without breaking, and holds marked folds. It comes in packs of square sheets in various colors. Alternatively, standard printing paper (70 to 90 g) can be used for simple folds (stars, fir trees). Avoid card stock for pure origami: too thick, it “cracks” on tight folds. For cut-out snowflakes, a sheet of printer paper is more than enough; for decorative origami that you want to hang up (like cranes or flowers), you can even use washi paper or light gift paper for pretty patterns.
❓ How long can you keep paper decorations?
Answer: for a long time! If stored away from humidity and direct light, paper decorations can last for many years without worry. The paper doesn’t “turn”, at worst it can yellow slightly after 5-10 years for low-end white paper, but most of the time the colors remain stable. I personally have paper snowflakes made 8 years ago that I bring out every Christmas ????. Just store them properly (see our storage tips above: box, tissue paper between fragile items, etc.). This way, you reuse from one year to the next and enrich your collection over time.
❓ Is DIY paper suitable for children?
Answer: Yes, absolutely! In fact, it’s one of the children’s favorite Christmas crafts. Little ones can tackle simple tasks (painting a leaf, tearing crepe paper to make confetti, applying glue sticks). Children aged 6-7 and over love cutting out snowflakes (with round-tipped scissors under supervision): the magical effect of the snowflake appearing as it unfolds always amazes them. Around 8-10, they’ll be able to make paper garlands and easy little folds (stars, fir trees) with a little help to follow the instructions. And creative teens can get right into papercraft or complex origami if they’re motivated! Just make sure you adapt the activity to their age to avoid frustration or danger (for example, use plastic punches rather than a cutter with youngsters). But overall, making paper decorations is fun, educational (working on fine motor skills and patience) and rewarding for children.
❓ How can I make my paper decorations more solid or shiny?
Answer: If you want to “finish” your decorations to give them a more robust or sophisticated look, here are a few tips:
- To solidify them: you can apply a coat of varnish-glue (Mod Podge, for example) to the surface of your decorations. This will stiffen the paper and protect it from humidity. Note that the paper will darken slightly when wet with glue, but as it dries, most will return to their normal color. Test on a small area first.
- Another solution: laminate your cut-outs. Either with a laminating machine (for flat elements such as under-glass stars or place cards), or simply by covering the paper with transparent adhesive paper (like a self-adhesive book cover). This can be useful, for example, for paper Christmas coasters.
- For shine: use glitter! Apply a little glue to certain areas of the decoration and sprinkle with glitter, shaking off the excess. Or use metallic/glitter markers to draw glittery patterns on your creations (veins on leaves, star outlines, etc.). You can also glue on small rhinestones, sequins, pearls… depending on the desired effect.
- For color: don’t hesitate to paint your paper creations if the original paper isn’t the right color. A can of gold paint can transform ordinary cardboard cut-outs into magnificent golden decorations. Spray faux snow can frost the edges of your paper snowflakes for an even more wintry look.
In short, paper is a base, but you can combine it with other creative supplies to get the exact look you want.
Conclusion: a creative, economical and unforgettable Christmas
When you start making your own paper Christmas decorations, you’re living the magic of the festive season right from the start. By folding, cutting and gluing your papers, you infuse a little of yourself into your home decor. The result? A Christmas unlike any other, cost savings and the satisfaction of having created a magical atmosphere for your loved ones with your own hands.
Whether you’ve made three snowflakes as a family or assembled an XXL papercraft reindeer to take pride of place in the living room, congratulations: you’re in the DIY Christmas spirit! ✨ Keep exploring, keep innovating: there’s always a new idea to try (and this article will remain here to inspire you at will). Don’t forget to take a look at our Papercraft-3D store to discover our models and why not add to your collection of homemade creations.
On that note, the whole team wishes you a merry creative Christmas ????! And if this article has given you any ideas, show us your masterpieces: share your photos of DIY paper decorations on Instagram by tagging us @papercraft3d – we’d love to see how you reinvent Christmas in paper.